#how to seal acrylic paint on wood
Text
If you’re a woodworker or a DIY enthusiast, renovating your outdoor and indoor furniture or creating unique crafting items, this guide will help you to understand how easy it is to paint your wooden products with acrylic paint.
#how to seal acrylic paint on wood#how to seal acrylic paint#seal acrylic paint on wood#wood junctions
1 note
·
View note
Text
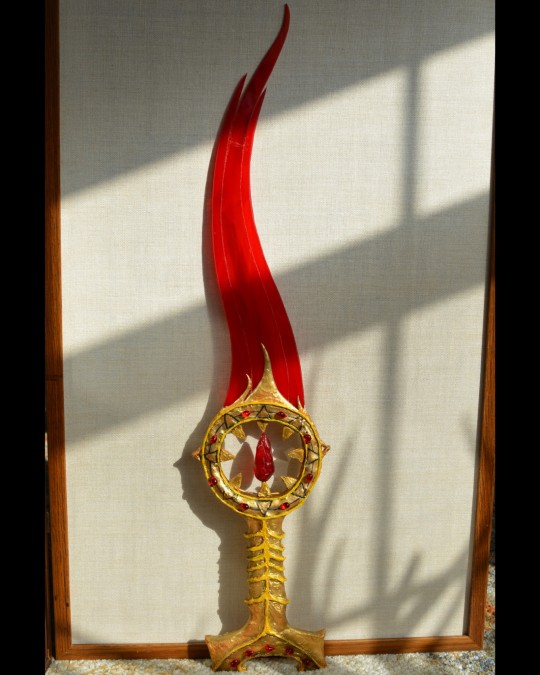

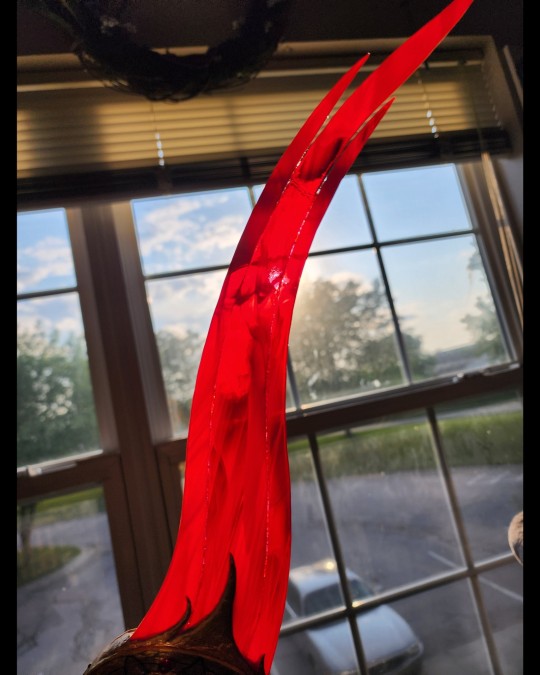
"But tomorrow, and tomorrow, and tomorrow, and tomorrow, my blades will thirst again." - Orin the Red , Baldur's Gate 3
▫️
▫️
▫️
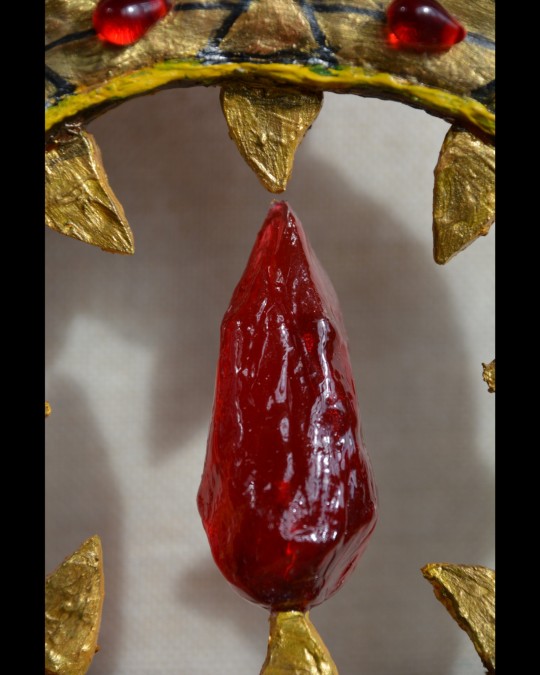
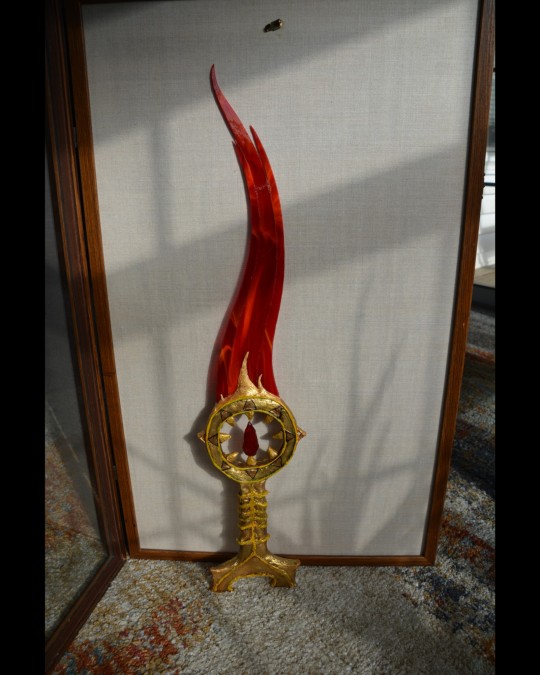
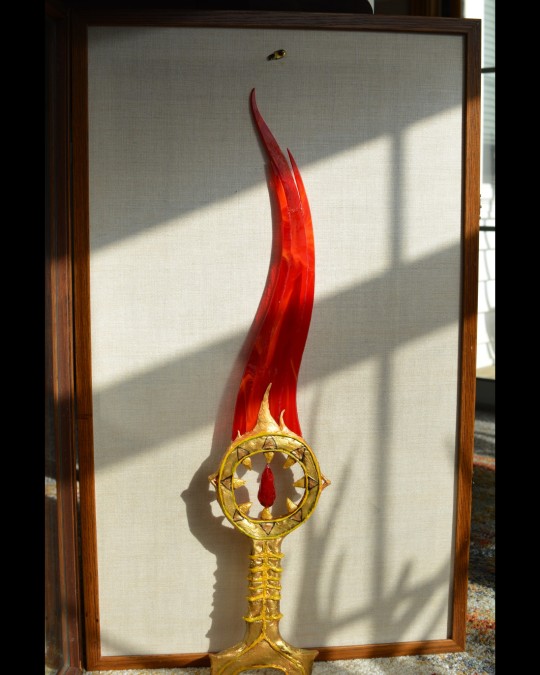
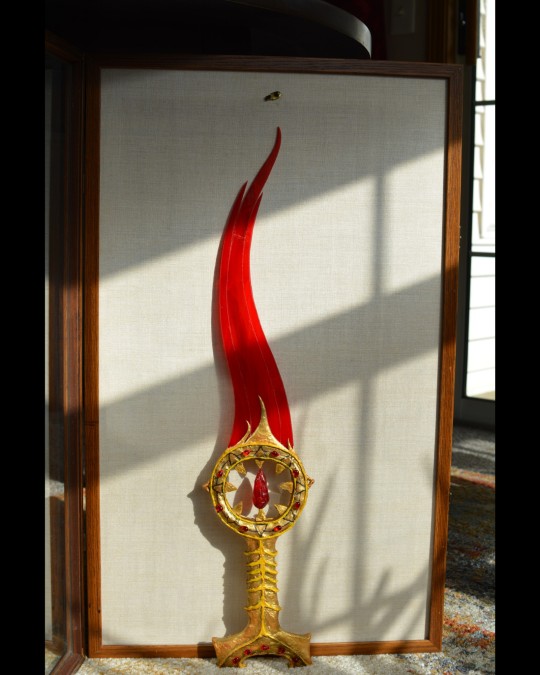
Recreated the bloodthirst dagger from Baldur's Gate 3 carried by Orin. The design was so beautiful and unique. I could have done something simple, but this screamed display piece. With the help of @foiledimagineer we created something beautiful, and I can not thank them enough for helping me make this idea into reality. Sitting at almost 26in tall .. I'm obsessed 😍
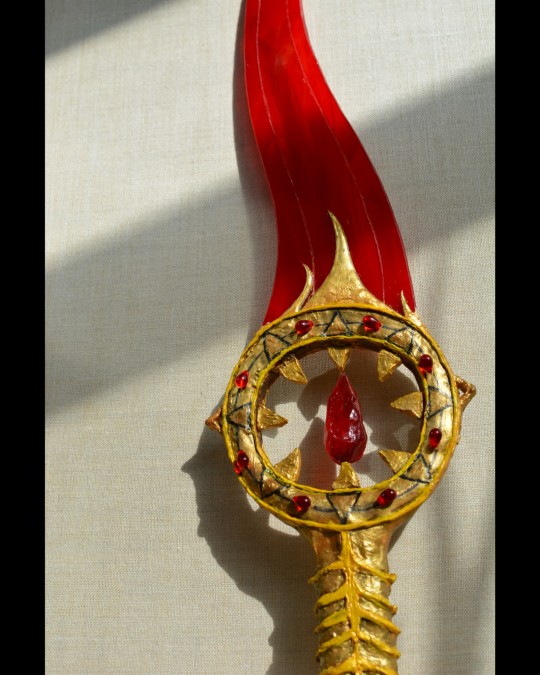
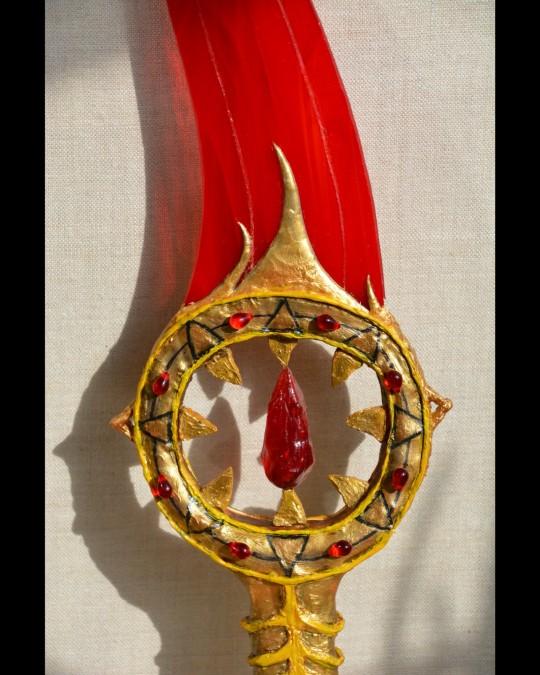
Materials used :
- Air dry clay
- Air dry foam
- Resin (mold had to be made from scratch. A replica soap carve out sealed heavily was used to form the mold)
- Inner claws made out of buildable nail gel filed down to shape
- Teardrop /bloodrop beads
- Black marker / Acrylic paint
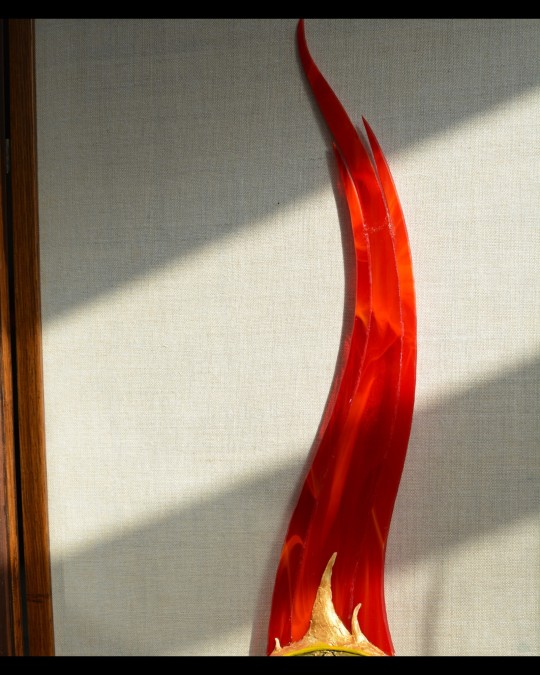
And of course, the star of the show ✨️The Blade✨️ made out of a vibraint, fiery hint of orange glass cut by the wonderful @foiledimagineer.
I can't wait to get it up on the display case. Currently mid staining the wood. Had to get a custom shadow box made with how tall it is. 😅
#bg3#baldur's gate 3#bg3 art#artist#art#artwork#on display#glass work#resin art#clay#foam#collaboration#cosplay#cosplay props#larian studios#maggie robertson#orin the red#bg3 orin#dagger#bloodthirst#bg3 bhaalspawn#chosen of bhaal#bhaal babe#dark urge#crafts
63 notes
·
View notes
Text
The Icon of Eönwë- TRSB Process Post

See the promo post here!
Above the cut is a relatively brief explanation of symbolism, design choices, and everything re: the text. Under the cut is the full (long) story of how I managed to create my magnum opus, + process pics!
Very early in my days as a Silm fan I read a silly summary of the Silmarillion and in the summary of the maiar I somehow completely misread it as saying Eönwë had indigo skin and my Eönwë has been blue ever since. The bird characteristics followed naturally from his service to Manwë, though I kept him fairly humanoid because I imagine as herald he interacts more with Incarnates than other Maiar.
His hair and the color of his wings mostly stemmed from my vague annoyance that he's rarely depicted in a "traditionally (religiously) angelic" way, so I gave him the features of the angels in my church. Floofy hair and golden brown-red-blue wings. The armor and clothing followed from this, with the bonus of the scale armor continuing the feather motif.
The ruby on the sword pommel is there because there was no other red in the composition besides the wings and it looked unbalanced. This icon was painted prior to the War of Wrath, so it isn't necessarily Manwë's sword that he uses during it.
The position his hand is in is a priest's blessing, though people in the @tolkienrsb discord mentioned it reminded them of Buddhist hand forms as well. Interpret it however you will within the meaning of "Peace be unto all".
The Sarati was deliberately chosen as the older form of writing, to be more traditional, and the words are Valarin as I think suits a religious artifact. The transcription reads:
Mayâz Manal Iȝônowêz (Maia-holy Eönwë -> Holy Maia Eönwë) Akesa Baradâš Mânawenûz-iyôz (Voice-raised/high Manwë-of -> High Voice [Herald] of Manwë)
It all started last March, when (instead of doing all the overdue assignments I should have been working on) I decided to draw Eönwë for no particular reason. I further decided that I was going to draw him in the style of Eastern Orthodox/Byzantine icons, because the style is unique, thematically relevant, and frankly very underutilized in fanart (I would soon learn why that is).
(I also found it funny to draw a character made by Tolkien- devoted Catholic- in the Orthodox style.)
I kinda-good-enough finished it over spring break, desperately ignoring the sword and the wings, and was reminded of the existence of TRSB. I wanted to participate, knew I wouldn't have the energy to write, and had no other art in a good enough state to submit. I've long wanted to explore the weirdness of religion in Arda, and this was the perfect opportunity.
The lovely @goschatewabn claimed my sketch and I was off! And then I wasn't.
I decided that there was no way to do my vision justice without painting it, that my cheap sketchbook would not hold up to that, and that I would rather stab myself than transfer the drawing to a canvas.
"Hmm" I thought, "Icons are traditionally painted on wood. Maybe I should get a piece of wood from the neighborhood workshop, cut out the sketch, and glue it on there to paint."
"That's a brilliant idea, me," I thought, "But what about the wings (which you haven't drawn) and the sword (which you haven't drawn)?"
"I'm in denial," I thought, "So please shut up. That's a problem for future me."
("Fuck you," thinks future me, repeatedly and with great vigor, ever increasing in wrath as I must spend ~20 hours sketching out and then painting the wings before I do anything I actually want to do because I need to glue Eönwë down over them.)
The wood is successfully found, cut to size (shout out my father for his help), sanded, and conditioned over the course of an afternoon. White acrylic paint and modpodge are obtained from the craft store (shout out my mother for going, I asked for gesso but they didn't have any), and the wood is generously modpodged to seal it because I didn't want to shell out the money for sealant.
See above for my suffering re: wings. I wanted to violently destroy every art supply in the house rather than go through sketching the individual feathers. I bravely restrained myself, and allowed myself the brief reprieve of figuring out how to do the halo.


Not wanting to buy gold acrylic paint, and with my metallic markers working poorly on the wood, I came to the solution of mixing mica powder (that my sister had in excess from her slime-making phase) mixed with modpodge. The result is very very golden and shiny and exactly what I was looking for, though it's difficult to get an even and smooth consistency.


"Hmm," I thought, as I cut out my sketch and glued it down, "maybe it would be a good idea to sketch out the sword now, before I start painting,"
"I'm in denial", I thought, "And besides, we just suffered through doing the wings. We deserve a little break. That's a problem for future me."
("Fuck you," thinks future me, repeatedly and with increasing desperation and devastation as I must sketch out a decent looking sword, fold it to cut it out to be symmetrical, and line it up with his hand so I can perfectly cut out a section of the handle, and the two pieces must then be glued on perfectly.")
It's now relevant to mention that traditionally, icons are painted dark to light. Symbolically this represents the triumph of good over sin, etc, but practically this is a key to the style, as the previous layers build up undertones and also allows for the signature shading style. It also takes much more work to build up a good color, even using fairly decent paint.
(What brand, you ask? Well it came in an art kit I got when I was like 15 and forgot about until the start of the summer. So no idea.)
Was it worth the work? Yes. The final piece looks cool as hell (Valinor?). Am I mad about it? Also yes.


Painting the individual scales of the armor was an exercise in patience and withstanding torture for extended periods of time. It was done over the course of three days, totaling around 10 hours. I mixed mica into the paints and then sealed it with a less intense mica-modpodge mixture, which is very difficult to appreciate in photo but looks fantastic irl.
The clothes were difficult because I had to work with a different style than I had been. Feathers are typically rendered in a more graphic style, as in my piece, and while hair is usually shaded more typically I found a few examples of this style, and the armor was similar. But now I had to do folds and actual shading, which is very difficult when you have a large area and very fast-drying acrylic. On the other hand, I was finally free of all the golds, browns, and yellows. I was so sick of them by then.
(The way I got around the fast-drying on the palette was by DIYing a wet palette. They're magical. You just stick wet paper towels in a tupperware and cover them with a layer or two of parchment paper (or wax paper in a pinch, although I poked some holes on the bottom layer because it's more water-resistant) and it will keep the paint wet for ages- even for a few weeks in my case with the lid on.)
It's at this point that progress halted because I had to pack for returning to college, and get a tattoo, and get horribly sick with a headcold, not in that order. My event partner was very patient with me, which I appreciate more than I can say. Once I was settled in to my new environment, though, I got right back to working


The skin was not extremely difficult to paint in and of itself (the shading and color mixing was fairly straightforward), but all the tiny, finicky details were very stress inducing. I used a teeny tiny nail art brush for details, and even that felt too big at some points (cough EARS AI VALAR THE EARS WERE SO HARD cough). Going around all the tiny feathers on the face and ears was an exercise in holding my breath and using every possible technique to steady my hands. Getting the hand right was also difficult, but fortunately they already look weird in the style, so it was just a matter of making them look weird in a deliberate-looking way.
Besides the text (and last-minute inclusion of the ruby in the pommel- I woke up and decided it needed the contrast) the eyes were the last thing I painted. It felt fitting. I poured my blood (achey back+hands+legs) sweat (I sanded the wood outside on a very hot afternoon) and tears (stress) into him, and in return on this 9"x13"x1/3" sheet of wood he came alive for me, and hopefully for you too. He isn't perfect, there are a few things that in retrospect I would've done differently, but he's the best I've got. I hope I did the High-Voice of Manwë justice.


#my art#trsb24#trsb2024#tolkien reverse summer bang#tolkienrsb#eonwe#silmarillion#silm art#tolkien#tolkien fanart#traditional art#also my mom throughout this process was both very encouraging and very uncomfortable#she was like 'it's not sacrilegious because you aren't doing it with religious intent and you're doing it differently#but it *feels* very sacrilegious'#me telling her that for proper symbolism the icon would be hung in the west instead of the east did not help#she thinks it looks very good and her visibly conflicted feelings are very amusing to me
24 notes
·
View notes
Text


everyone, meet CHIPS!
chips is a handmade alien clown puppet, my first ever puppet i made entirely on my own! he has a huge mouth plate with a collapsing eye in the center, two controllable arms, and he's just a silly little guy!
more info as to how i made it below if any fellow puppet makers are curious :~)
some specs:
the puppet's shell is entirely 1/2" reticulated foam, pattern drafted by me. the mouthplate is 1/8" plywood covered in 2mm eva foam. all the teeth, tongue, and texture-y detail in the mouth is foam clay! the eye in the mouth's center is a series of five wire arches hinged together with thread, covered in painted muslin! so it folds flat like an accordion when you close the mouth.
the mouth was primed with a mix of black and white plastidip to give it a speckled look, then painted with multiple thin layers of fabric paint. i sealed it all with angelus high gloss leather sealant (because it's what i had).
the puppet's arms contain shoelaces that feed through holes in the body and shirt and tie internally so that they are removable. each "hand" has a leather pocket hidden in the foam seam for the arm rod to be inserted. the arm rod, not pictured, is made of wood dowel and a wire coat hanger bent straight.
as for covering, i used joann's anti pill fleece in solid white and black. to get the stars, i used artesprix black sublimation paint (which is notably NAVY and not black...) on some sublimation paper to paint stars first. then, i cut them out and individually sublimated every single star onto the fleece with a heat press. this took a long time, but it came out super clean!
the fake button eyes and his crown are made of worbla, painted and sealed with a glossy acrylic medium.
#fish makes#puppet#puppetry#puppets#puppet making#crafts#clowns#clowncore#clown art#clown puppet#alien#monster art#horror
76 notes
·
View notes
Text
art tips
here's some traditional art tips from me:
acrylic painting:
different brands do different things with their paint and one of them has to do with pigment characteristics versus consistency. For example, most of Liquitex’s paints are the same texture and consistency because they adjust their formula to act as such, whereas Golden Acrylics doesn’t and the pigments characteristics are allowed to shine through. Learning about specific pigments can be a pain but it can also help you make sure your painting ends up how you wanted it to.
if you’re doing a layered painting “proper painting”- THIN LAYERS. THIN THIN LAYERS. acrylic loves to clump up on itself like nail Polish. Go slow and pay attention to how it dries.
acrylic paint appears lighter than how it will dry. If you’re planning a color scheme, get some paper or a sketch page and swatch your colors and let them completely dry. They will also appear a lot lighter if you dilute them with water.
one note of the characteristic of acrylic paint is that it doesn’t tend to have the depth or luminosity of oil paint. If you get the right paints, you can do it. Some paints are more transparent and they work great for this. Work in thin layers, layer and layer and layer, and add opaque paints to add definitive layers so once the painting is done, there is depth. Phthalo paints work great for this.
when mixing colors, the paint can start to look foggy, and a lot of times this is from air being whipped into the paint. If you’re worried that this foggy paint won’t look how you wanted it to, swatch it and let it dry. In my experience, it applies and dries fine.
oil painting:
this is for really people who had terrible instructors or self taught: fat over lean does matter. fat over lean is the concept that the oilier paint should be for the final layers while the thinned out paint, or lean paint, is for the first layers. this helps to prevent cracking on both traditional oils and water mixable oils. so your leanest paint is for your under painting while your fattest paint is your final layers. this isn’t really a “learn the rules to break them” concept, it’s more of a “you want your painting to survive more than 5 years” concept.
oil paint appears the same color it will dry as if it is at normal opacity. This gets effected by diluting or fattening the paint, however.
if you’re gonna paint on paper with oil paint, use thick paper. I mean at least 300g/140 lb paper. If you can, prime it with gesso. And it’ll work great.
Water mixable oil paints work the same as traditional oil paints without the need for solvents or mineral spirits.
watercolor & colored pencils:
colored pencils: treat these like newborns. gentle. the pigment can break easily, like pencil graphite can. use circles to blend and lay down a more opaque layer. sharpen them gently. i have a whole separate, manual sharpener for my colored pencils.
watercolor paintings: use cotton paper or paper with cotton in it. trust me it works better. the paper warps less and you can add more water than just normal paper. cotton paper is more expensive though. kinda like using wood board instead of canvas for an oil painting.
Watercolor: take care of your brushes like they are your one and only begotten son, okay? You can paint with a messed up brush in acrylic or oil but watercolor depends on the brush a lot of times.
general art tips:
Get a heavyweight paper sketchbook if you want to sketch out paintings or swatch paint and keep them for future reference.
Paint in general: PAY ATTENTION TO THE LIGHTFASTNESS ! This is very important if you ever intend to have your art in galleries or for sale. Lightfastness just means how long the pigments in your paint stay the same as when they were packaged as when they are on your painting. Improved lightfastness pigments are normally marked with “permanent” in their names, like “permanent alizarin crimson”.
General safety: PICK UP YOUR PAINT WATER OR SEAL IT IF YOU HAVE PETS!! Even if they won’t get fatally sick, it won’t make them feel good, and in my experience they don’t care if the water is bright red.
Painting: have a designated paint water cup. Do not drink Out of this cup. Learn it is a paint water cup. Then you will Not drink out of paint water cup.
GET SOME BRUSH SOAP!! Get it!! I promise you it makes a difference. If you can’t invest in any, use something like Dawn or Mrs. Meyers dish soap but keep an eye on how dry the brushes are if they are natural hair. The paint soap I use is the Masters brush cleaner and preserver and I got a massive tub of it for $20 at my local art store.
find a local art store if you are able! And I do not mean Michael’s or Hobby Lobby. I mean local. A lot of times they’re competing with these stores and they have cheaper prices and some even have student/professor discounts. The one I go to has a lot of stuff under MSRP and I get a discount. And they don’t sell any bad quality items.
if you’re struggling with a concept, find a book on it. Internet Archive as a library with a lot of art books, some stores sell art books. Art books are useful insight; even if you don’t agree with the author, it can help you realize what you’re trying to achieve. However, if you’re buying it, make sure to skim it and see if it’s actually useful for you. I have a lot of DK published art books.
if you feel stagnant in your art, look at art. I mean it. Look at photography, painting, fashion, sculpture, jewelry— look at things. This is how I ended up painting fish. And guess what? I freaking love painting fish. I again have a library of books just so I can look at them For inspiration.
General art: if you want to be able to travel with your supplies but don’t know how to do so, let me give you some tips in this tip:
Get a massive bag. I mean a big ole canvas bag. I got one from Aldi for $8 that works great. If you already have one, even better.
If you have a big enough backpack, you can use that too.
Get a palette that can cover. You can DIY one, probably, or you can buy one. Then if you have any wet paint, you don’t have to throw it out or risk getting it everywhere. If this isn’t a concern of yours, no worries.
Use a hair tie or scrunchie to bundle your brushes together. This keeps them from going everywhere.
Situate your paints so they won’t be crushed if you’re taking tubes.
Bring a small amount of brush cleaner with you. I reused a skincare jar for mine.
Bring what you’re going to paint on.
General art: reuse jars. I mean it. I have some skincare jars that I’ve reused to hold paint oil and brush cleaner and I use old pasta sauce jars for brush cups. They work great.
here’s how to wash off different paints from your skin- oil paints— get a true soap. Dish soap works too. Acrylic paint— let it dry and you can brush it off with a nail brush or old toothbrush. watercolor paint- wipe it off with a wet wipe or a dampened paper towel/hand towel. If you’re going to use a hand towel, have a designated towel since it can stain.
Stretched canvas; if you’ve damaged or pierced your canvas, you can probably fix it with gesso and acrylic paint, or just acrylic paint. You can also sew the canvas back if you really want to save it.
Here’s some art stuff I like and use but you don’t need it:
Masterson oil palette
Pentalic Nature Sketch 25% cotton sketchbook
Winsor & Newton Artisan Water Mixable oil Colour
Golden Professional acrylic heavy body paints
The Masters Brush cleanser and preserver
Liquitex palette knives
#art#art tips#art help#art advice#art process#artist on tumblr#artists on tumblr#oil painting#acrylic painting#watercolor painting#traditional art#🖤 art tag
24 notes
·
View notes
Note
i am so so SO curious as to how u made your mensis cage it looks absolutely fantastic (i wanna eventually make my own too :])
omg hi! I made a twitter thread about it actually :]
Crossposting here in case any of y'all can't access it:
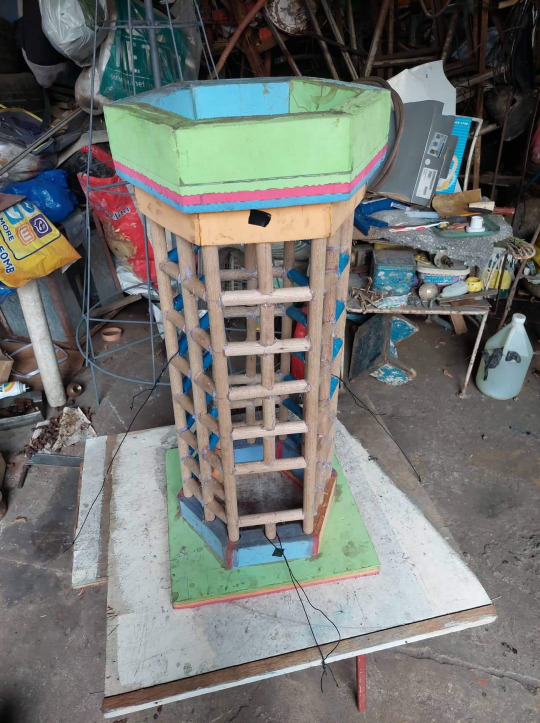
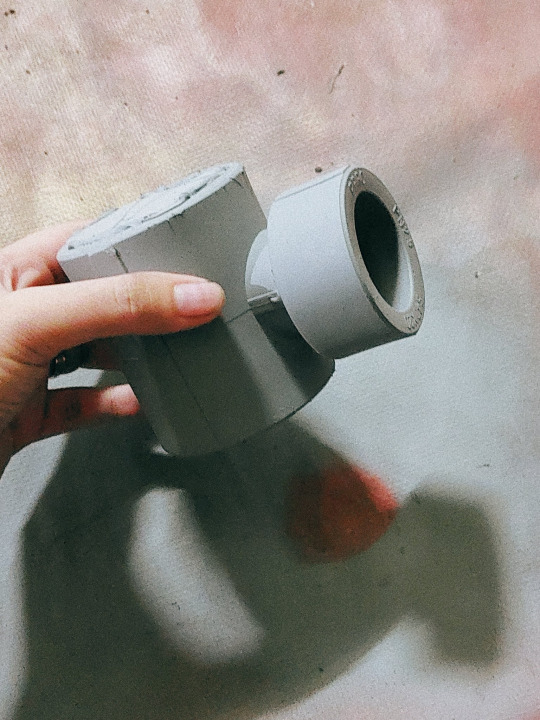
Woz's Mensis Cage DIY (Feat. Valtr's helmet)
It was a lot of trial & error— we used a combo of wood dowels and pvc pipes for the bars, tho in retrospect having em all in pvc woulda been lighter 🥲

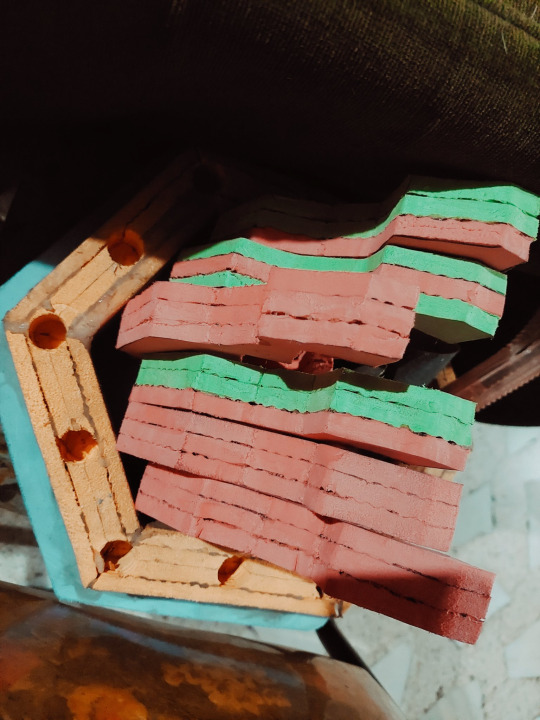
Base and top are made from foam! We don't have craft foam where I live so we used the foam from those puzzle playmats for toddlers, and layered them to the right thickness
Lots of dremel work to sand out the edges—had to cut all of em w an exacto knife


We glued them together with contact cement and filled the gaps with caulk, then dremel again
Also drilling holes for the bars + the top
Behold. Gay mensis cage

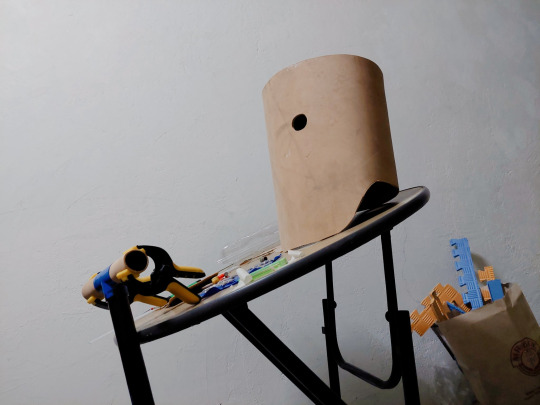
We also started on Valtr's helmet! It was really floppy foam so we sandwiched some chipboard between two pieces to make it stiff
top is leftover playmat foam that we cut just enough so it fits snugly
Tried not to use a lot of contact cement and more regular glue here bc fumes
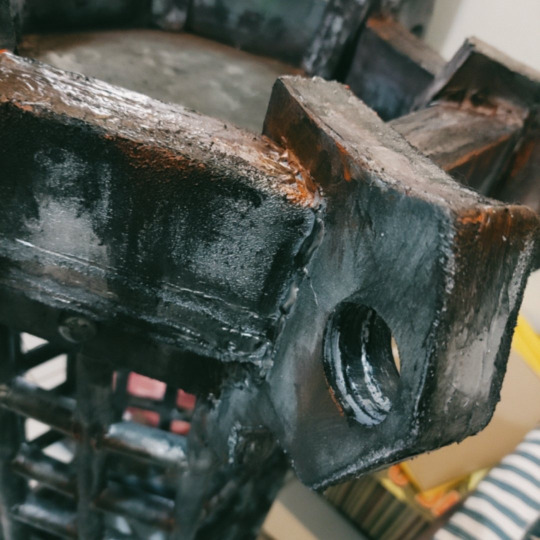
Primed the cage!!! (also the helmet once it dried)

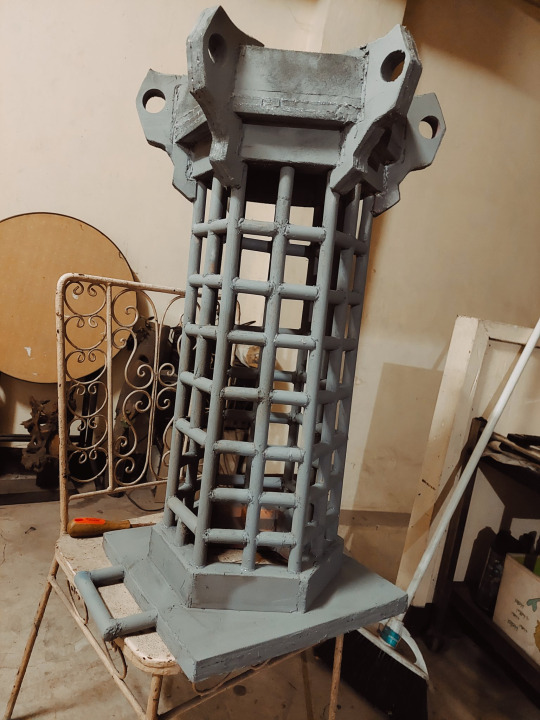
Used hot glue to seal remaining cracks + smooth "foamy" places
Sprayed silver paint as the base then weathering w acrylics
Used a sponge + brushed black paint to simulate soot/rust, esp corners + edges
Tried to also get the inside. used my hands to make it look spotty + dirty


Chain link is made out of foam! We made em seperately.
Valtr's belt buckle is an old button pin we repainted. Mensis bolts are just round buttons that we sanded the back off.
Didn't have time to make Valtr's belt lantern but a pipe did the trick. The lantern top was made of foam

To connect the chains to the cage we cut one side then fed it thru the hole. Since it's foam, it's pretty flexible. We reconnected it with hot glue and it's like good as new
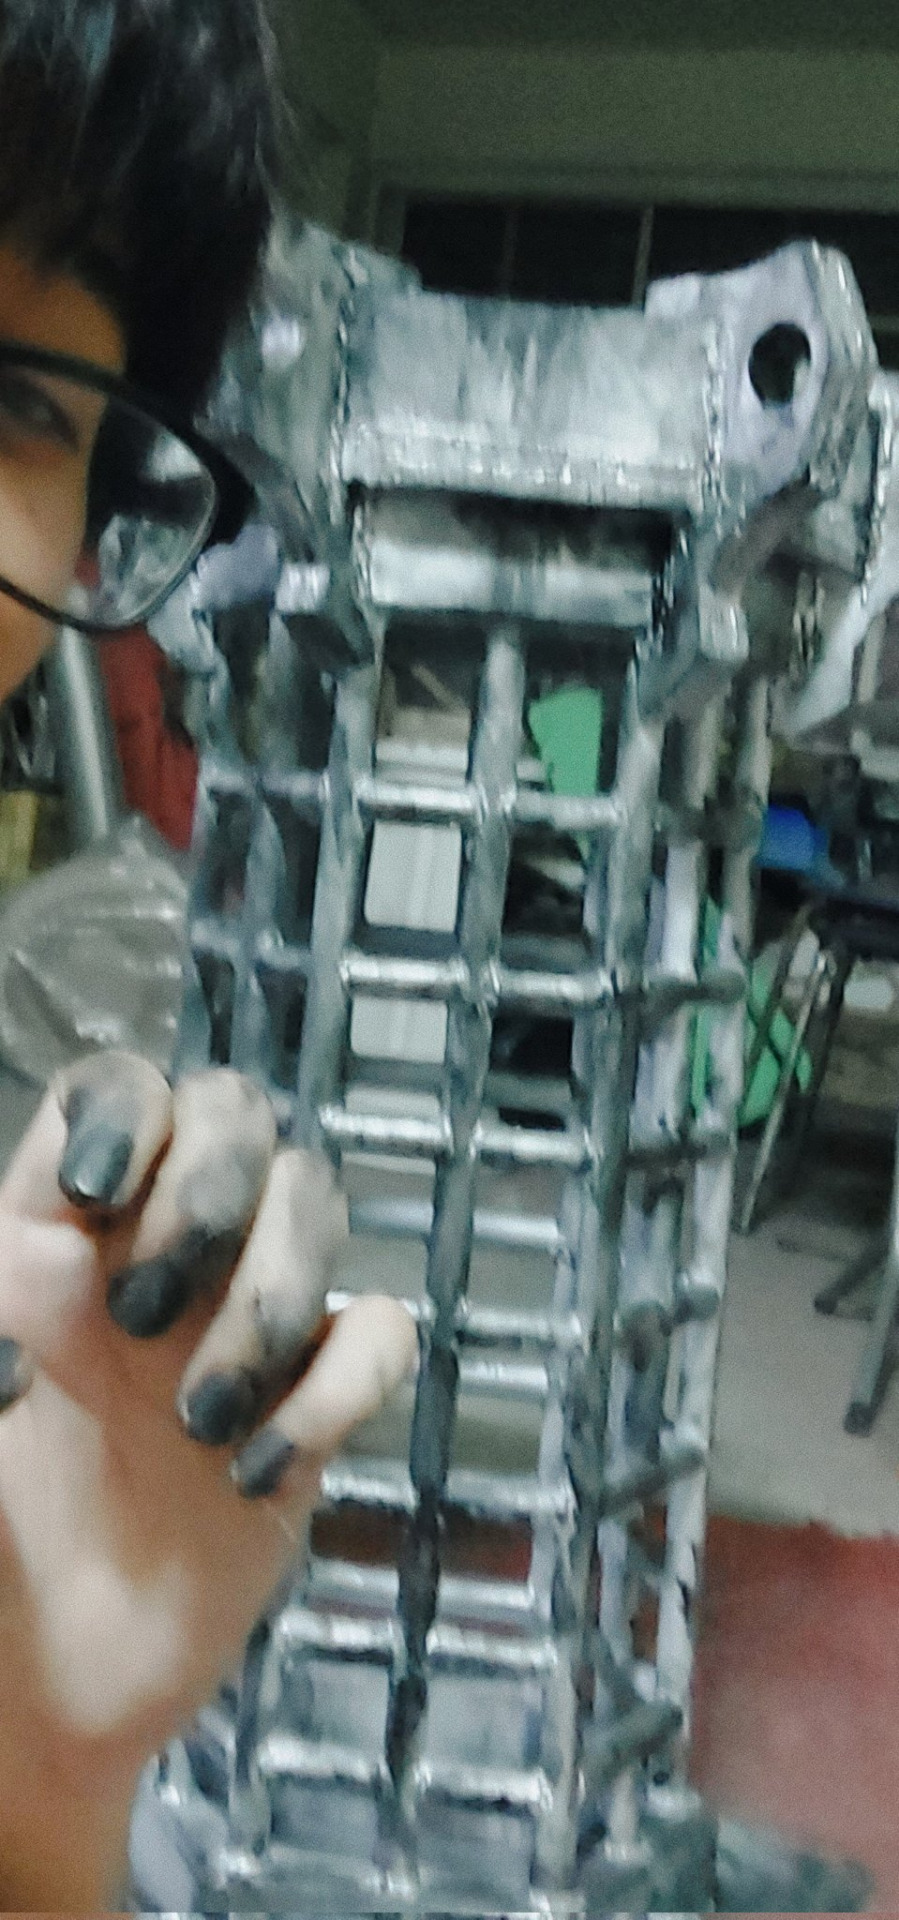
The fun thing abt hot glue is that if you paint over it, it looks like welding :] perfect for the cage

Tadaaaa
All the rust details is acrylic. Black then brown then bright orange
Brushing them into the corners n crevices really helped sell the look! Especially the water stains on top/under the holes
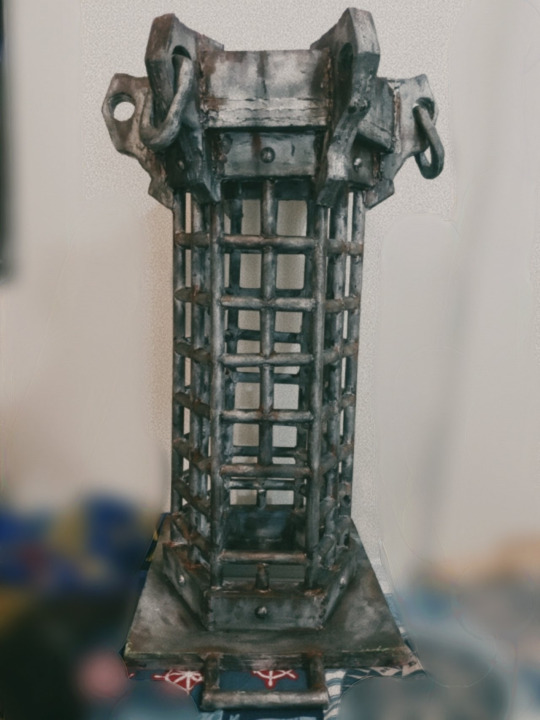
Anyway ya that's it!! Thanks for reading :]
I learned a lot from this.
We started the cage Aug 6 and finished quite literally the morning of the con, Sept 17. Worked only weekends tho bc we had day jobs
It's not heavy for me personally, tho I would def recommend using pvc instead
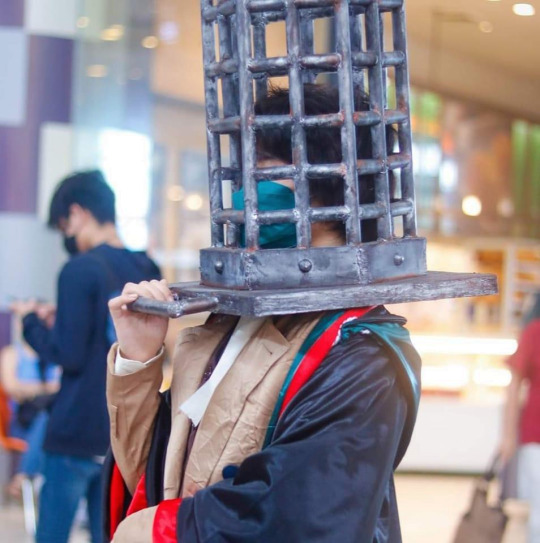
Feel free to substitute the materials with whatever you have available in your area, and please take into account the total weight of it + the robes! I live in a tropical country so I had to make sure the fabrics were light + breathable enough, and that the cage wasn't too heavy to walk around in for long amounts of time.
good luck!! :] feel free to tag/message me if you ever base it off mine, I'd LOVE to see what y'all come up with! (But also it makes my heart feel v fuzzy)
#micolash host of the nightmare#micolash#bloodborne#soulsborne#mensis cage#cosplay#cosplay diy#ask#mothrodent
43 notes
·
View notes
Text
Collage curio cabinet
Another day, another awesome find! This miniature curio cabinet was £2. Part of the reason it was so cheap is probably because one of the handles is slightly broken (just missing the hanging part) but it's still perfectly usable.

Though I did think the paint job was quite pretty, it's not my style, so a repaint was in order. I used what I had to hand which was cheap black acrylic paint. Not ideal for furniture perhaps, but I'm happy enough with it. Also because I was lazy and didn't remove the old paint the doors are now very tight fitting and I can't close them properly. It's easy to fix, I can sand the top and bottom of each door down to the wood and then repaint them, but honestly I don't mind too much, and I can always do this in the future if not being able to close it gets on my nerves.

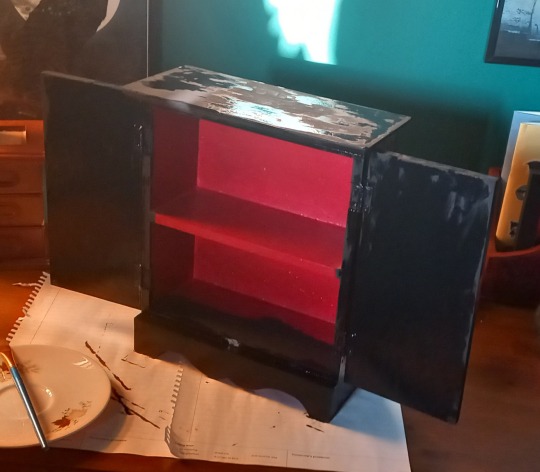
If the inside had been as red as its appearing in this pic I probably would have kept it like that, but the lighting must have been weird as it's exactly the same orange that you see in the first pic.
Any little charm or dangle would be good to replace the broken handle - I had this fake pearl teardrop in my collection from an old charm bracelet. I absolutely love how it looks, and it's actually way easier to grab hold of than the other handle, however unfortunately I've only got one of these pearl droplets so I can't remove the other handle to make them match just yet. This kind of thing pops up all the time in charity shops though, I'm sure I can find another charm bracelet or even better a pair of earrings that I could use.
The ring I've used to connect it is a hinged body piercing ring which I ordered online but was too small for me to comfortably wear, and I have a few so can use another when I need to.

I have a huge stack of scrapbooking paper from another similar project I did recently, so I cut two pieces of that using my paper guillotine to glue into the back.

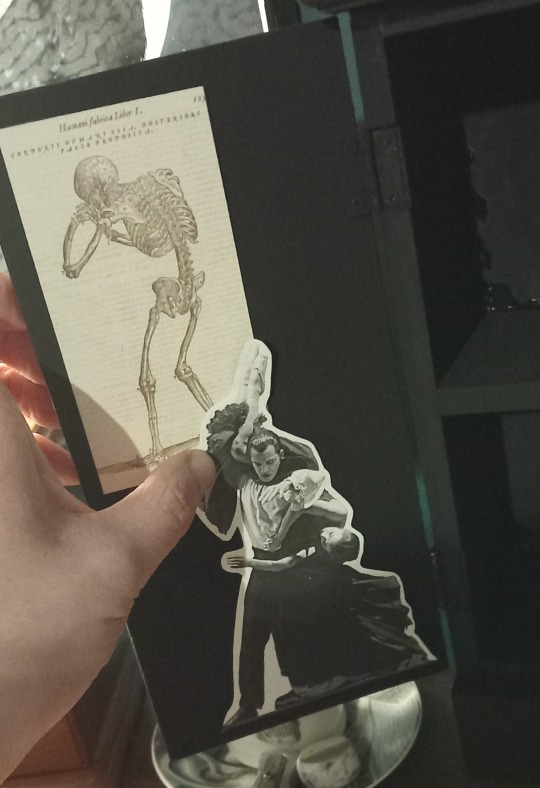
I also have tons of interesting bits of paper and art left from that same project which I wanted to see if I could use. This is a 100% perfect spot for one of the anatomical drawings I have, as it looks like he's praying to the cthulhu candle I've put on top! (Paint inside still slightly wet here, i was impatiently trying bits out!)

This is what I came up with for the other door (another anatomy drawing and a flyer from a ballet version of Dracula)
I haven't yet decided what to do on the front of the doors. There's nothing in my collection of paper pieces that's really speaking to me right now. I think it would look really cool with some metallic bits stuck to the front but again, nothing in my collection that I like enough to glue on there, so I'm going to leave it as is for now and will add more in the future if/when I find some pieces that work. Here's how it looks for now after using mod podge on the doors and the back, though I think I'm probably going to go over the whole cupboard to help seal the paint. Apologies for terrible lighting.


Bonus piece: amongst my bits of paper I had a guide from a William Blake exhibition which contained this reproduction of one of the plates from The Marriage of Heaven and Hell. I really wanted to use it, but Blake is so important to me and the picture so perfect that I thought it warranted special treatment. Instead of using it in a collage with other pieces, I painted a small piece of board from a broken picture frame and stuck it to that, and made a little triangle out of some jewellery wire so I can hang it on my wall. It's extremely lightweight so although this is only taped down it shouldn't come unstuck.


#gothic art#goth diy#gothic#paper craft#collage#decoupage#goth upcycling#upcycle#upcycling#thrifting finds#thrifted#thrift finds#thrifting#thrift store#charity shops#charity shopping#charity shop finds#william blake#the marriage of heaven and hell#diy#diy craft#diy projects#anatomical drawing
12 notes
·
View notes
Text
So, you wanna channel that Harry Potter nostalgia in a way that doesn’t involve buying official merch? I got a solution for you: obtaining your own custom wand. You can make it, or you can buy it. I have done both.
How to make your own wand:
Start with the base. You could use a stick from the woods, as long as you clean it. You could use a wooden dowel. You could roll up some construction paper into a thin tapered tube, like I did. If you use that method, be sure to seal off the ends with hot glue.
Add shape to it with hot glue. Give it lumps and bumps. Add spirals and vines. The sky’s the limit.
Paint it with acrylic paint. If you wanna make it look weathered, a sponge brush is a good tool.
I will not post my example here, but here’s a tutorial. This may be the exact tutorial I followed. I don’t remember. I made that wand around 8 years ago. https://www.instructables.com/Make-an-awesome-Harry-Potter-wand-from-a-sheet-of-/
If you wish to buy a high quality, unofficial wand, go to a ren faire. I guarantee you there will be a woodworker selling handmade wands that have nothing to do with Harry Potter but are clearly inspired by Harry Potter. The one at my local ren faire even takes it a step further and offers hollow wands that come with a custom core. I asked for a hippogriff hair core and I watched him stuff the ‘hairs’ inside the wand. It was magical.
Also, there are several places online where you can get a custom wand.
2 notes
·
View notes
Text

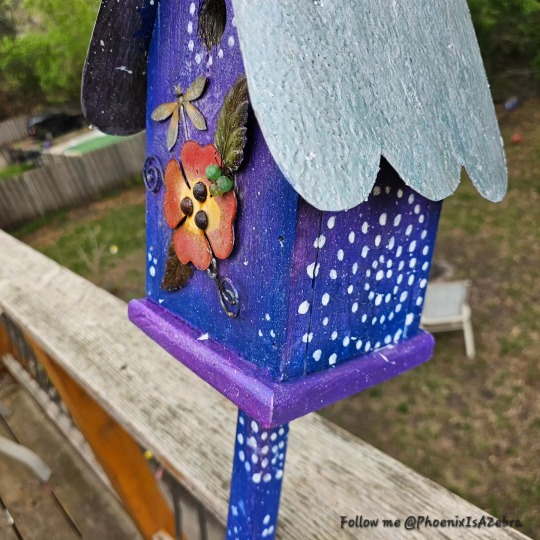
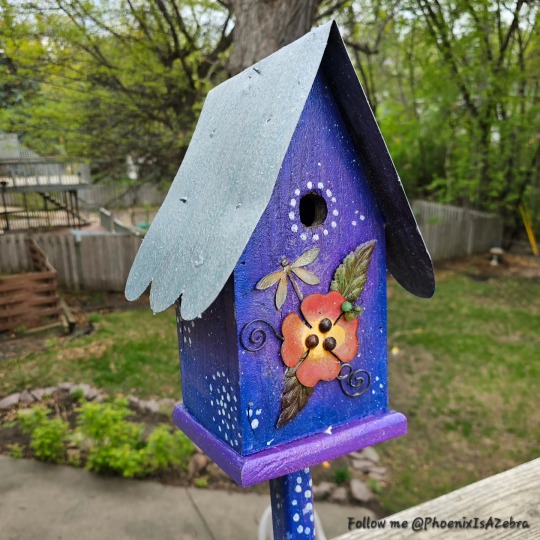
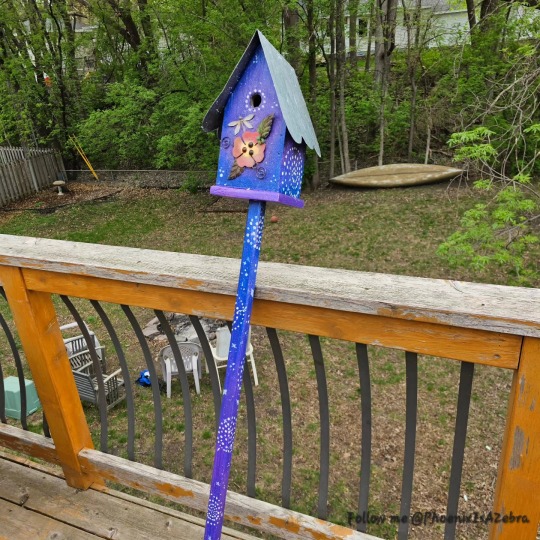
When I moved in with one of my best friends this past winter, it was hard to see all of the garden decorations that had been left behind by the previous owner of the house due to all of the snow on the ground and how faded they had become from many years in the sun. As the snow began to melt, the treasures began to appear and they became my muse for creative inspiration.
This wooden bird house had a green and brown faded metal roof, peeling and chipping natural wood throughout, and no color aside from the faded metal embellishments on the front. I used acrylic paint for color and modge podge to seal and will likely get some UV resistant weather sealer as well for extra protection.
Follow me on Tumblr, Instagram, Facebook, and TikTok to follow my health journey, art projects, advocacy, writing, and other endeavors! ✨
#art#birdhouse#bird#house#DIY#refurbished#woodworking#acrylic#paint#painting#purple#blue#butterfly#artist#disabled artist#hypermobile ehlers danlos#chronic illness#spoonie#outdoors#summer#2023#project#garden#nature#wildlife#woods#Minnesota
11 notes
·
View notes
Text
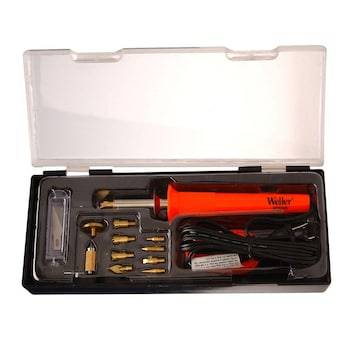
Christmas Shopping for Young Traditional 2-D Artists
Hey there! I know it's early, but I'm already starting to see some posts about the common experience of being a kid artist with parents wanting to get something a little nice, and so they got a kit like these as a gift:
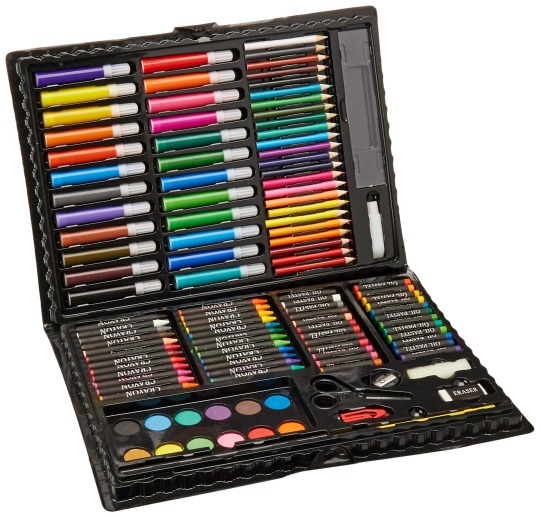
And one thing I never see under these is what a young artist might actually prefer to get.
These kits can range from $20-$50 depending on the quality of the material, company, and location. This kit was actually 18.6 OMR (46.76 USD) but I will be using a prince range of about $30 assuming you're going for something NICE but something they can USE.
This list is primarily of categories and things to consider getting YOUNG artists (4-12) but I don't see any reason you can't tweak some of these to be for older artists!
I'm also going to focus generally: Quality over Quantity. A good, nice set of art materials (whichever you choose) will always last longer, be more useful, be more fun, and be more loved than a cheaper set with more. I don't want to mock people who buy these sets, because I know they're purchased out of love and the want to make someone happy and tell them "I love that you're being creative," and I treasure every memory with them. I treasure less the memories of markers like those short ones in their either breaking in my hand because the plastic was too thin, or the tip snapped off, and the water colors never working- the set is just bad. It's a scam made to make you buy it.
So instead, let's find some products you can get as a nice present with the same intent. Let's be real, almost no kid ever used EVERYTHING in these sets, at least not all at the same time. Think about if your artist has ever said they wanted to try something specifically, or maybe they just have a favorite medium.
If not and you think "my young artist already has that, they use it all the time!" maybe the way to go here is by choosing an "upgrade." Type and quality of materials don't make the artist, but this is about getting something that looks or feels really nice for a special occasion, so that's what we're talking about today.
Paints:
I would not get a child of any age paint as a primary gift. I will explain more about what that means in a moment. For now, though, let's entertain different paint types- skipping past "finger paints," as any non-toxic paint really can serve as a finger paint, and into the main three types.
Watercolor- Paints activated with water! Easiest to clean, and if your artist tends to only want to paint some of the time and not every day, you're never in danger of them drying out and going bad. You can just went them and reuse them each time. Can be stored in almost any dry space, like a closet or shelf- even a tote if they seal well. Very easy to find non-toxic variants. For 10+ artists, though, watercolors can be a bit anticlimactic. They've used them before, and you might want to get them something new. In that case, go with gouache. They're like an acrylic/watercolor hybrid that can dry and layer easily unlike watercolors that usually come out transparent no matter how much of a pigment you layer on. They can be used on the same paper and even thinner paper since they're not so wet they'll warp any material. Can also go onto cardboard for school projects, which watercolors won't really work on.
Acrylic: Rubbery when it dries, easy to pick out of fibers if it gets stuck in your carpet- let it dry in chunks, do not wipe- dab if wet. It's very possible though with the right cleaning product and a little time. It dries somewhat quickly so older artists can work on projects faster rather than having to wait until layers dry to continue. Most commonly non-toxic.
Oil: Stays wet a long time. This can slow an artist down and give another artist a longer time to work and blend colors for a smoother look. Almost impossible to clean fabric without some heavy product, untreated wood is ACTUALLY impossible. Can stain clothes, lighter paint on your walls and cabinets, and even leather. I would definitely save this for an 10+ kid. Non-toxic variants DO exist, but look very carefully and closely so as to make sure this refers to accidental EATING and not just BREATHING if you're brave enough to give this to a toddler.
These are not all the paints out there, but they're usually what people are deciding between at the store. As for "primary gift," I would get a cheap set of paints for any new painters and then get some nice brushes. This means five year olds who just started and 12 year olds who only painted in art class twice a year. Expensive products can be fun surprises, but I know I was intimidated by some "nice" supplies I got as a kid. I wanted to make sure that I didn't waste it- that I used it f-or the "right thing"- because I didn't want to use nice material on something that looked bad.
Also, if you're a parent looking for this to be a long time thing, you probably also don't want to see your child mixing all of the tubes from that $80 paint set into a nice brown mess. Let them explore and be artists, but I'm sure they'd be just as intrigued by the mixing of colors and experimenting with which colors do what if you got a respectable $5-$10 set of primaries from Walmart.
Why I recommend brushes: As long as they're not the kind to pluck out the hairs, a nice set of hair brushes will last years. I still have some from my first set, and they're still my favorite. Take the time to look up how to care for them (rinsing them at the end of every session, using soap and sometimes conditioner to keep them healthy) and they'll serve you for a long time. I would stay away from bristled brushes and find something soft. In reviews, look for things like bristles falling out and the tips falling off entirely. Then look for texture. Soft brushes are better at picking up pigment and bristled brushes are better at creating texture. Even if your watercolor set comes with a brush, at least get a couple soft ones from the store.
Markers:
I'm assuming you want to go up a bit from Crayola, but stay away from Copic. They're cheaply made, overpriced, and are suspected by some users to have actually stopped filling their markers with as much ink as they used to.
I use Prismacolor personally, and they're essentially the same concept: A marker you can blend like paint using a blending tool. You can color a whole picture and then go in and blur two colors together. It works better if the color is still wet, but the alcohol in the blender reactivates it. Just like watercolor- great for those who might leave a project in the middle. If you have a child you're worried about putting them in their mouth, they use non-toxic ink, but it's probably still a risk if they were to do it continuously.
I would also suggest looking into brush markers, which act a bit more like water color pens. They do make a bit of a mess, but are easier to clean than paint pens, which just have paint in them. Paint pens are better for artists who want to draw on non-paper. They're usually used on car windows for graduations and weddings. Some brands are translucent, so look through the reviews to make sure they're opaque for an easier time for your artist. Non-toxic variants are available for both.
Crayons:
People are going to be mad at me, but pastels are just grown up crayons. Oil pastels or softer pastels can make a mess, but normal or chalk pastels are really easy to clean up and almost never make a mess in the first place. Would probably be easier to wipe off than your average wax crayon, actually. Most are non-toxic, but read the labels and do your research beforehand, as they might be harder to find from stores and brands you trust due to them not being as popular as the previously listed categories.
I suggest pastels because they're a fancier crayon-type-material and you can find pretty much any kind for any age of artist. They blend easy at any time, don't dry out, and you can replace a set pretty easily if your artist gets hooked. All of the joy and ease of oil paint with none of the sacrifice. If you're looking for accessories: get a brush or a cheap sponge set so they can play with textures.
Colored Pencils:
Gotta give it to Prismacolor again. This time, I'll even tell you they're okay for younger users AS WELL AS non-toxic. They're wax based, so don't store them in a warm place, and you can ALSO blend with these! You can buy a big or small set, and with the layering and blending abilities, they can still make any color they can think of. If your artist has SENSORY ISSUES and hates the chalky texture of pencils, the wax centers are super smooth, so they won't have to worry about that.
If you're not into Prisma, I would stay away from sets of short but plentiful sets. If a pencil is shorter than a few inches, it could be hard to grab at all, much less after many uses. You've literally cut how long that pencil could be used comfortably in half.
Paper:
I'm not going to get into paper (as that's a whole bag in its own and is unique to each medium) but if you are determined to get some nice paper for a specific thing, try asking "What kind of paper is good for 'brush markers/acrylics/pastels/ect'?" at your local art store or an online sales associate. Youtube artists also cover this a lot.
If you're getting canvases, I would also pick up a can of white gesso so your artist can prep that canvas and maybe some sealant. Canvases that are hung can fall hard and chip paint or get gouged easier while being moved, so store them properly- especially if they have something on them. Of course, this CAN happen to paper, but since it's usually in a book or stack or box.
Get a thick ringed sketchbook for the most ease of use- you can flip it over without bending the binding, you can rip out pages more easily, you can leave it in a hot car or drop it in a puddle and unless the paper's really thin most of the book will probably be fine.
Get a bound sketchbook (one with glue or string binding the pages like a normal book) for style and the ability to do "spreads' (art that uses two pages next to each other.) There are really no other benefits, and this is the worst one for any kind of paint because you have to prop it open to let the paint dry.
3 notes
·
View notes
Text
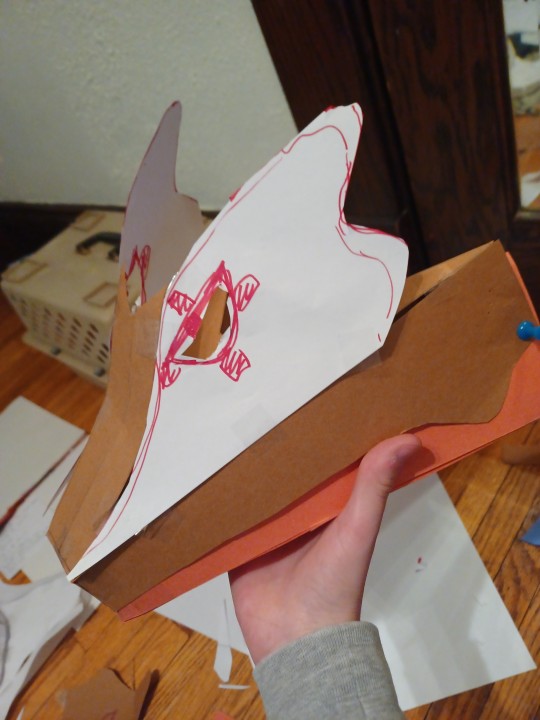
🐊How I made Kaiman's head🐊
OK so @all-my-friends-are-dead asked for a tutorial for my Kaiman cosplay, and so I decided to make this post. I've never made a tutorial before and I will be honest my process was a lot of trial and error, I made a lot of different drafts and 2 different practice helmets before I was satisfied with the result. Also I didn't take a lot of pictures so I will try to describe as best as I can! If anyone has questions or wants to talk about cosplay stuff my dms are open!
I will put it under a read more since it got very long T-T
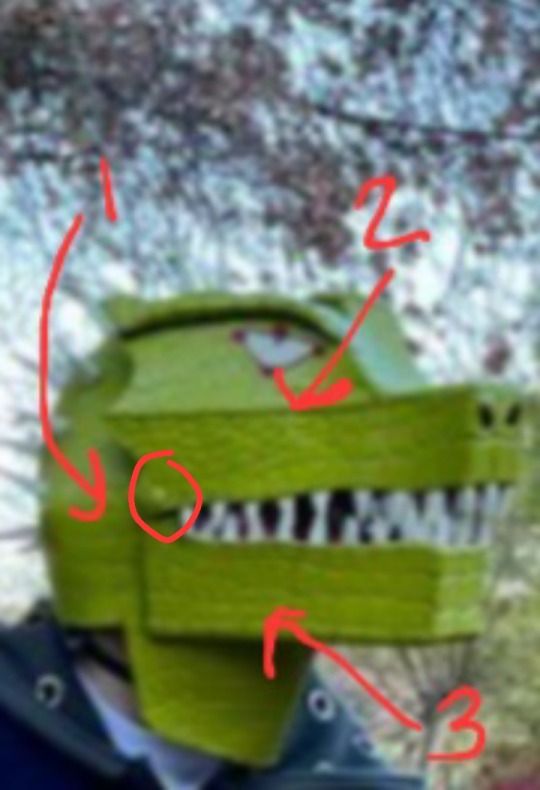
So basically the head is made of 3 parts that are all attached together by a pin on each side. There's the "helmet" which is the back part, and then there's the upper and lower jaw.
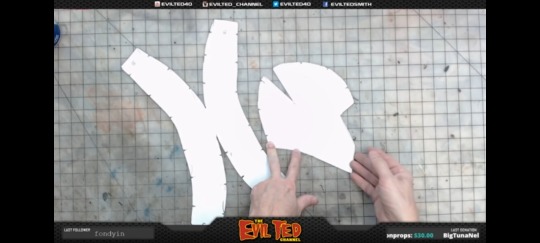
To make the helmet part I mostly followed Evil Ted Smith's video on youtube "how to make a foam helmet" but I used very thin craft foam (like you can get at Michael's) that's about 3mm or so. Some of the steps he shows in the video like using a heat gun to shape the foam aren't really necessary if it's this thin, you can just use a hairdryer.
For the helmet pattern I basically just measured my own head and made my own version of the pattern in the video (screenshot below) since I wanted a more exact fit. At first I tried using thicker EVA foam like he did but I ended up changing that because Kaiman's face looked too stretched out when I put the jaw pieces on. Adjusting the pattern to be smaller with the thinner foam made it so it didn't slide around on my head as much either.
The patterns for the upper and lower jaw went through a lot of adjustments before I found one that I liked, and I didnt base these off any exisiting patterns. This one I'm pretty sure was the final draft. (Or at least very close)
I used kaiman's character model from the anime and also pictures of lizard skulls to try to get an idea of what this should look like, and I also used slightly thicker foam (6mm) the upper and lower jaw except the neck part which was 3mm and the eyebrow ridges which were thicker EVA foam (1/2 inch).
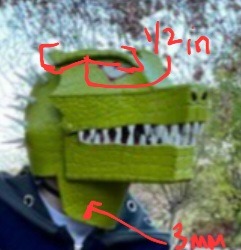
To get the scaley look I did a couple practice runs on paper and then drew them with sharpie on to the foam. Then I used a wood burning tool to etch the the scales into the foam. I did this before any of the sealing, fixing the seams or painting.
The last thing I did before painting the pieces was to make the spikes and teeth. I cut out the teeth from the 6mm foam and used 2 pieces of glued together 6mm for the spikes. I used a dremel to make the spikes into a rounded cone shape.
After this was done I did some more sanding and dremeling to make sure the seams and edges looked clean. Then I used sealed the foam using a couple coats of modge podge and then spray painted with primer and then finally with bright green on all of it. Theres a good Evil Ted video that shows all the steps to get rid of seams on foam here, I pretty much followed that except for the plastic dip because I didnt want it that shiny (and i didnt want the scales to be filled in). After the spray paint dried I used acrylic to do the detail painting (spikes, teeth, eyes, and inside of mouth, ear hole)
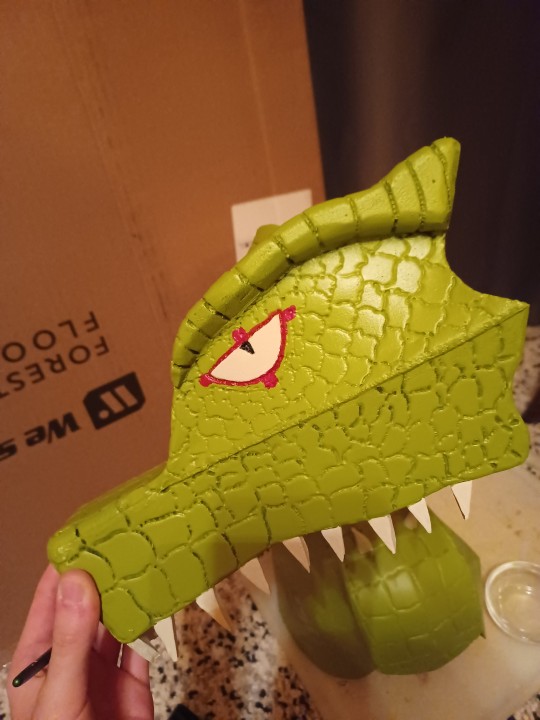
Finally I pinned everything everything together using paper fasteners spray painted green

And that is pretty much it I think! Many hours were spent but ultimately im happy with the result so yeah! Here is a Kaiman old man selfie as congratulations for making it through all of that!

#long post#i said id put this in the rb but i think im just going to make a separate post#dorohedoro#cosplay#kaiman#dorohedoro cosplay
17 notes
·
View notes
Text
Simple Tricks to Fill Gaps in Baseboards and Molding
Gaps in baseboards and molding are a prevalent problem in homes, particularly in older structures where settlement or natural wear and tear have occurred. These holes not only distract from the aesthetics of your home, but they can also allow drafts and vermin in. Fortunately, filling these gaps is a reasonably simple operation that you may complete on your own using some basic tactics and tools. Here's how to successfully Fix Gaps In Baseboards And Molding to restore your home's flawless appearance.

1. Determine the source of the gaps.
Before you can begin to fill in the gaps, you must first understand why they exist. Gaps might arise owing to natural settling of the house, wood shrinkage, or incorrect installation of the molding or baseboards. In some cases, the gaps are seasonal, expanding and contracting with weather changes.
2. Choose the Right Filling Material
Choosing the right material is critical to achieving a seamless appearance. The three most popular solutions are caulk, wood filler, and spackle. Each has benefits:
Caulk is best used to seal gaps between baseboards or moldings and the wall. It's adaptable, allowing it to move alongside the houses natural settling and development. Silicone or acrylic latex caulk is often used because it may be painted over after drying.
Wood Filler is useful for filling gaps in baseboard or molding, particularly if the wood is chipped or split. Wood filler can be sanded and stained to match the existing wood.
Spackle is a wonderful alternative for filling minor gaps or nail holes in wood. It's straightforward to use and may
3. Setting up the Area
Before applying any filler, clean the area surrounding the gap. Clean up any dust, dirt, or loose paint with a dry cloth or vacuum. If the gap is too huge, use a utility knife to slightly widen it to improve filler adhesion. Also, keep the area dry to avoid moisture becoming trapped beneath the filler, which can lead to mold or mildew.

4. Applying Filler
For Caulk: Cut the caulk tube tip at a 45-degree angle for improved control. Apply a steady bead of caulk into the gap, beginning at one end and progressing to the other. To ensure a flawless finish, smooth the caulk with a damp finger or a caulk smoothing tool. Wipe off any excess with a wet towel.
For Wood Filler: Using a putty knife, press the wood filler firmly into the gap. Overfill the gap somewhat to make it easier to sand afterward. Allow it to dry completely before sanding it smooth. You can then stain or paint the area to match the existing wood.
For Spackle: Using a putty knife, apply spackle to minor gaps or holes. Once dried, and the area lightly to create a smooth surface.
5. Finishing Touches
Once the filler has set and been sanded smooth, it is time to paint or stain the surface. If you're painting, apply a primer beforehand to ensure that the paint adheres properly. Apply the paint or stain in thin, even layers, allowing each layer to dry before applying the next. This will produce a professional-looking finish that mixes in with the rest of your baseboards and molding.

Conclusion
Filling gaps in baseboards and molding is a simple but efficient approach to keep your home looking and functioning properly. Following these tips and utilizing the correct materials will result in a smooth, gap-free finish that improves the overall appearance of your home. Regular upkeep and attention to detail can ensure your baseboards and molding
0 notes
Text
Sealing Coatings Market Industry Competition Analysis, Revenue and Forecast Till 2032

The Reports and Insights, a leading market research company, has recently releases report titled “Sealing Coatings Market: Global Industry Trends, Share, Size, Growth, Opportunity and Forecast 2024-2032.” The study provides a detailed analysis of the industry, including the global Sealing Coatings Market Trends share, size, and growth forecasts. The report also includes competitor and regional analysis and highlights the latest advancements in the market.
Report Highlights:
How big is the Sealing Coatings Market?
The sealing coatings market size reached US$ 14.9 Billion in 2023. Looking forward, Reports and Insights expects the market to reach US$ 21.4 Billion by 2032, exhibiting a growth rate (CAGR) of 4.1% during 2024-2032.
What are Sealing Coatings?
Sealing coatings are substances applied to surfaces to form a protective layer that guards against moisture, chemicals, corrosion, and other environmental factors. They are utilized on various surfaces like concrete, metal, and wood to prevent harm and prolong the lifespan of the substrate. Commonly used in construction, automotive, and industrial sectors, these coatings enhance durability and preserve the aesthetic appeal of surfaces.
Request for a sample copy with detail analysis: https://www.reportsandinsights.com/sample-request/1788
What are the growth prospects and trends in the Sealing Coatings industry?
The sealing coatings market growth is driven by various factors. The sealing coatings market is experiencing consistent growth due to rising demand for protective coatings across industries like construction, automotive, and manufacturing. These coatings safeguard surfaces against corrosion, moisture, and environmental damage, boosting the longevity of materials. As technology advances and sustainability gains importance, the sealing coatings market is poised for further expansion, offering a variety of solutions to meet the diverse needs of various industries. Hence, all these factors contribute to sealing coatings market growth.
What is included in market segmentation?
The report has segmented the market into the following categories:
Resin Type:
Acrylic
Silicone
Polyurethane
Epoxy
Others
Substrate:
Metal
Concrete & Masonry
Wood
Plastic
Others
End-Use Industry:
Building & Construction
Automotive
Industrial
Marine
Aerospace
Electrical & Electronics
Others
Application:
Roofing
Flooring
Walls & Ceilings
Windows & Doors
Tank Linings
Others
Technology:
Water-based
Solvent-based
Radiation-cured
Powder-based
Others
Sales Channel:
Direct Sales
Distributor Sales
Online Sales
Price Range:
Economy
Mid-Range
Premium
Functionality:
Waterproofing
Corrosion Resistance
Thermal Resistance
Chemical Resistance
Others
Curing Type:
Air Cure
Heat Cure
Moisture Cure
Others
Segmentation By Region:
North America:
United States
Canada
Europe:
Germany
United Kingdom
France
Italy
Spain
Russia
Poland
BENELUX
NORDIC
Rest of Europe
Asia Pacific:
China
Japan
India
South Korea
ASEAN
Australia & New Zealand
Rest of Asia Pacific
Latin America:
Brazil
Mexico
Argentina
Rest of Latin America
Middle East & Africa:
Saudi Arabia
South Africa
United Arab Emirates
Israel
Rest of MEA
Who are the key players operating in the industry?
The report covers the major market players including:
3M Company
Akzo Nobel N.V.
Axalta Coating Systems
BASF SE
Dow Inc.
Henkel AG & Co. KGaA
Hempel A/S
Jotun Group
Nippon Paint Holdings Co., Ltd.
PPG Industries, Inc.
RPM International Inc.
Sherwin-Williams Company
Sika AG
Tikkurila Oyj
Wacker Chemie AG
View Full Report: https://www.reportsandinsights.com/report/Sealing Coatings-market
If you require any specific information that is not covered currently within the scope of the report, we will provide the same as a part of the customization.
About Us:
Reports and Insights consistently mееt international benchmarks in the market research industry and maintain a kееn focus on providing only the highest quality of reports and analysis outlooks across markets, industries, domains, sectors, and verticals. We have bееn catering to varying market nееds and do not compromise on quality and research efforts in our objective to deliver only the very best to our clients globally.
Our offerings include comprehensive market intelligence in the form of research reports, production cost reports, feasibility studies, and consulting services. Our team, which includes experienced researchers and analysts from various industries, is dedicated to providing high-quality data and insights to our clientele, ranging from small and medium businesses to Fortune 1000 corporations.
Contact Us:
Reports and Insights Business Research Pvt. Ltd.
1820 Avenue M, Brooklyn, NY, 11230, United States
Contact No: +1-(347)-748-1518
Email: [email protected]
Website: https://www.reportsandinsights.com/
Follow us on LinkedIn: https://www.linkedin.com/company/report-and-insights/
Follow us on twitter: https://twitter.com/ReportsandInsi1
0 notes
Text

“1 on 1 (2 Face a Covert Bully)”, 2024, Oil, acrylic, and graphite on linen

“1 on 1 (2 Face a Covert Bully)”, 2024, Oil, acrylic, and graphite on linen (detail)


“Larva Stage (Exposed to Linger)”, 2024, Oil, acrylic, and graphite on linen


“Cute Ones, Abducted”, 2024, Oil, acrylic, and graphite on linen

“Routine Maintenance (Your Mouth Comes Second)”, 2024, Oil, acrylic, and graphite on linen
Stefanie Heinze’s paintings at Petzel for MORTAR (the cute ones shouldn’t go unnoticed) have a lot of layers- both in paint and detail. What they mean may depend on your own interpretation. The poem below by Sophie Robinson or this interview with herself may provide some clues.
From the press release-
SWEET SWEET AGENCY by Sophie Robinson
the candy here is hard & filled & there is nothing i love more
than to be treasured. if nobody’s watching i just do nothing: lie down
don’t hardly breathe, keep my face in careful stillness not to crease
its cute forgettability. the world is full of edible munchkins & it is my life’s work
to work out how to stay creamy on the inside, how not to sour myself
up with little nips of this or that or otherwise cut holes in myself thru which
to be seen. i must learn to love what i cannot know: the wide bleached anus
on a porn blog, the insane demands of toddlers, the desire for moderation or
slimness of affection, the reasons lovers leave, the trash my cat brings back,
the crack of footsteps in the woods at night, why the killer kills.
i learn it all the hard way but fwiw
i would never snap the rabbit’s neck again
i would rewind i would keep it every time
Following the artist’s relocation from Berlin to New York this past year, Heinze’s newest suite of works investigates systems of knowledge and truth, challenging received notions of representation.
Heinze considers mortar as a site of genesis, the container of beginnings, from which raw materials are processed. Mortar can be the sound of aggression, bombardment, a foil or a threat. Mortar and pestle, a receptable for grinding ingredients, a cup for holding and crushing hard, like the grinding of teeth, or the moment infatuation becomes obsession, when yearning turns from tender to brutal. The paste which binds building blocks together, holding and distributing weight, sometimes decorative, composed of cement, water and sand. Paint is mortar, the built environment is mortar, the grind is mortar, decisions are sealed in mortar, and so is the longing for something even better and bigger and harder.
Heinze starts with small-scale drawings and collages, which are translated to large-scale tracings, undergoing several transformations as her canvases take shape. Rendering her surfaces over several months, layers of line and color are suspended in scenes at once frozen and in motion. Heinze works with a sense of suspicion, disputing the power of images. Her depictions are at times plush, like her floating (emoji)-bodied cherubs, or sharp and dense, like her reckless, airborne cinder blocks. Heinze’s pictures lend expanded, fragmented associations to her subjects, both stony and swaddled, heavy and buoyant. Heinze’s works negotiate categorization, neither pure figuration nor abstraction. Language hits a limit here, reaching for the means to describe–an enzyme, a digestif–where words fail. Heinze strives for a more empirical vocabulary, generating fields of sensation.
Interested in divination practices, ranging from tarot reading to online “spiritualist” influencing, the artist creates images motivated by imagined futures, drawing on both medieval and New Age “Youtubian” utopias. Influenced by the theory of the third hand in painting, the experience of transcendence which overtakes the artist at that critical point of flow state absorption, Heinze leans into this tradition of mysticism. Heinze allows the pieces to reveal themselves over time, creating kinetic, shifting pictures that trip expectation. Heinze builds tender worlds, in which instinct and environment coalesce in new impossibilities.
This exhibition closes 6/8/24.
#Stefanie Heinze#Petzel#Art#Chelsea Art Shows#NYC Art Shows#Art Shows#Chelsea Art Galleries#Painting#Petzel Gallery#Sophie Robinson
0 notes
Text
How Can You Decorate a Wooden Box?

Wooden boxes and baskets are perfect options for storing jewelry, trinkets, or other types of small items which you want to store in a safe way. However, you will find many boxes in the market which have no perfect finishing. Thus, whenever you need to store your valuable items in a perfect-looking wooden box, you can try several methods to change the style of the box and make it your perfect storage. So, whenever you need to decorate corporate gift boxes or basket boxes wholesale, you can try painting the box in an attractive color, or attach a colorful fabric, or even a few attractive images to give the box a look that you actually desire.
So, here let us talk about the method through which you can easily decorate a wooden box and make it really attractive.
Procedures to decorate a wooden box
There are a few ways through which you can perform the job. A few of those are described here in a step-by-step process.
Method 1: you can engrave and stain a design
Step 1: Print out the design
First, you need to give the desired size to the painting with editing software on your computer. Now, print out a copy of that design. To create this design, you can either choose from different options available on the Internet or even make one of your own.
Step 2: Use a carbon paper
In this step, you have to set a layer of carbon paper on the box where you wish to engrave the design. While doing this, you need to ensure that the darker part of your carbon paper can touch the wood, or else the image would not get properly transferred. Check that the carbon paper doesn’t shift around or move while you are transferring the design.
Step 3: Trace the outline
Now, you have to trace around the outlines of the design with a pencil and firm pressure. Ensure to cover the complete outline of the design, or else the design will not get properly transferred. You can lift up the corner of the paper one or two times to check if the design has transferred accurately. You need to give good pressure to transfer the design complete; however, make sure not to rip through the paper.
Step 4: Carve around the design
After transferring the design properly, you should use the Dremel tool to carve the design on the box. You have to hold this tool like a pen and then press its tip into the wood to follow the outline of the design. After carving around the outline, lift the tool up a few times to blow away the sawdust. In this way, you should carve out the outlines of the design completely.
While following this step, you can curve as deep as you wish; however, do not punch through to the inside of your box.
Step 5: Sand away the edges
Now, you have to apply a little pressure and remove the rough edges and areas of the wooden box with sandpaper. In order to not damage the design, you should work with short back and forth motions. Also, do not forget to blow away the sawdust a few times as well.
Step 6: Rub the stains
After smoothing out the edges, you should pick up a specific color to decorate your wooden box. Then dip a part of a piece of cloth in that stain. Now, rub the stain onto the wooden box, and apply it by following the direction of the grain. Continue the procedure until the box has a uniform color. Now, allow the color to dry for several hours.
Step 7: Seal the box
Mix the wood finish with a stick properly to avoid the formation of bubbles. Now, dip the bristles of the brush into the color and use straight and long strokes on the surface of the box, and remember to apply an even and thin layer. Next, smooth out the finish and then leave it for 4 hours.
Method 2: Attach a decoupage
Step 1: Paint with acrylic paint
To decorate your wooden box, you can use acrylic paint of your favorite color and paint the box. After painting, leave the box for 20 minutes to dry.
Step 2: Smooth out the paint
With sandpaper, you can eliminate all the raised areas of the paint. However, do not give excess pressure, or you may harm the wood. While using sandpaper, blow the dust off a few times.
Step 3: Print the image
Give your image the desired size to fit the box perfectly. After that, print the image.
Step 4: Apply decoupage glue
Dip your brush into the decoupage glue and paint a thin layer of the glue on your box’s surface where you want to add the image. Make sure that the glue doesn’t have any raised parts or bubbles.
Step 5: Attach the image
Now, set down the image carefully on the wooden surface and press it down. Push out the wrinkles or bubbles toward the edges and give the surface a smooth look.After that, just use a little pressure and set the image perfectly.
Step 6: Brush the glue over the image
Dip the brush again into the glue and apply a thin layer across the entire surface of the image on the box with gentle pressure. Then carefully wipe off the residue of the glue with a paper towel and leave the box for 24 hours.
Step 7: Rub away the edges
To rub away the edges around the image, you need to get a wet sponge and wring it out properly. Then gently rub it around the exposed parts of the part that you don’t need.
Step 8: Apply acrylic varnish
Now for the finishing touch, you should apply a layer of acrylic varnish gently and allow it to dry for several hours. In this way, you can give your favorite wooden box the best look you desire.
Therefore, these methods can help you to decorate your bulk gift baskets wholesale or wholesale basket boxes in the most amazing ways. However, if you are still not sure what to do, you can contact The Craft Tree for some amazing ideas and suggestions.
Blog Source :- https://www.theccrafttree.com/how-can-you-decorate-a-wooden-box/
Basket Boxes Wholesale, Bulk Gift Baskets Wholesale, corporate gift boxes, wholesale basket boxes, Wooden Box
0 notes
Text
Painting Furniture With Spray Paint: Transform Your Furniture with Ease

Are you looking to transform your old furniture into something new and fabulous? Painting furniture with spray paint is a quick, easy, and effective way to give your pieces a fresh and updated look. In this comprehensive guide, we'll walk you through everything you need to know to successfully paint your furniture with spray paint.
Why Choose Spray Paint for Furniture?
Spray paint offers several advantages when it comes to painting furniture. It provides a smooth and even finish, it's easy to apply, and it dries quickly. Additionally, spray paint comes in a wide range of colors and finishes, making it a versatile choice for many different projects.
Preparation
Before you begin painting your furniture, it's essential to properly prepare the surface. Start by cleaning the piece thoroughly to remove any dirt, dust, or grime. You may also need to sand the surface to create a smooth and clean base for the paint to adhere to. Make sure to protect the surrounding area with drop cloths or newspaper to prevent overspray.
Choosing the Right Spray Paint
When selecting spray paint for your furniture project, consider the type of material you are painting and the finish you desire. Many manufacturers offer spray paint specifically designed for use on wood, metal, plastic, and more. Choose a high-quality paint that is suitable for your furniture material and provides the finish you want.
https://www.youtube.com/watch?v=8I-By2pzMCE
Application Tips
When applying spray paint to your furniture, it's essential to do so in a well-ventilated area to ensure proper air circulation and prevent inhalation of fumes. Shake the can thoroughly before use and apply the paint in smooth, even strokes, holding the can at a consistent distance from the surface. It's best to apply multiple thin coats rather than one thick coat to avoid drips and runs.
Drying and Curing
After you've finished painting your furniture, allow it to dry completely before handling or moving it. The drying time will vary depending on the type of paint you used and the weather conditions. Once the paint is dry to the touch, let it cure fully according to the manufacturer's instructions to ensure a durable and long-lasting finish.
Finishing Touches
Once your painted furniture is fully cured, you may choose to add a protective clear coat to enhance durability and longevity. Consider applying a clear polyurethane or acrylic sealer to seal the paint and protect it from wear and tear. You can also add decorative elements like stenciling or distressing for a personalized touch.
Benefits of Spray Painting Furniture
- Quick and easy application
- Smooth and even finish
- Wide range of colors and finishes
- Durable and long-lasting results
- Versatile for various materials

Frequently Asked Questions For Painting Furniture With Spray Paint: Transform Your Furniture With Ease
How Do You Properly Prepare Furniture For Spray Painting?
To prepare furniture for spray painting, start by cleaning the surface with a mild detergent. Sand any rough spots and wipe away dust. Use a primer to help the paint adhere. Finally, ensure the area is well-ventilated before spraying.
Can Any Type Of Furniture Be Spray Painted?
Yes, you can spray paint almost any type of furniture. However, it is important to consider the material of the furniture before starting. Wood, metal, and plastic are typically suitable for spray painting.
What Type Of Spray Paint Is Best For Furniture?
For furniture, it is recommended to use a high-quality spray paint that is specifically designed for the material of your furniture. Look for options labeled for wood, metal, or plastic, depending on the surface you are painting.
How Can I Achieve A Smooth Finish When Spray Painting Furniture?
To achieve a smooth finish, hold the spray paint can about 8-12 inches away from the furniture and apply thin, even coats. Allow each coat to dry before applying the next. Sand lightly between coats if necessary.
Conclusion
Painting furniture with spray paint is a fantastic way to breathe new life into your old pieces and create a customized look for your home. By following the steps outlined in this guide and using high-quality materials, you can achieve professional results that will rejuvenate your furniture and enhance your space.
Get ready to unleash your creativity and transform your furniture with the power of spray paint!
Read the full article
0 notes
Last Seen Blogs

your-so-sexy-ahaha
Manic Panic

the-kill-switch
Devotion That Corrupts

the-volterra-chronicles
Tales of the Volturi

ilovethebritishroyals
ilovethebritishroyals
