#have been using cotton embroidery floss
Explore tagged Tumblr posts
Text
Y’all.

#bookbinding#this is a niche bookbinding post#silk thread is hard to find in my corner of canadia#i am delighted#cannot wait to try sewing endbands with this#have been using cotton embroidery floss
14 notes
·
View notes
Note
Any tips on learning to make buttonholes? I've been putting it off for.... *checks notes* like three years.... but better late than never and all that. I don't have any fancy machines so I gotta do it by hand but that seems right up your alley.
Thanks!
It IS up my alley, yes, I do most of my buttonholes by hand!
I'm actually part way through filming an 18th century buttonhole tutorial, but I expect it'll be a few more weeks before I finish that and put it on the youtubes, so in the meantime here's the very very short version. (The long version is looking like it'll probably be about 40 minutes maybe, judging by how much script I've written compared to my last video?)
Mark your line, a bit longer than your button is wide. I usually use a graphite mechanical pencil on light fabrics, and a light coloured pencil crayon on dark ones. (I have fabric pencils too, but they're much softer and leave a thicker line.) You may want to baste the layers together around all the marked buttonholes if you're working on something big and the layers are shifty and slippery. I'm not basting here because this is just a pants placket.
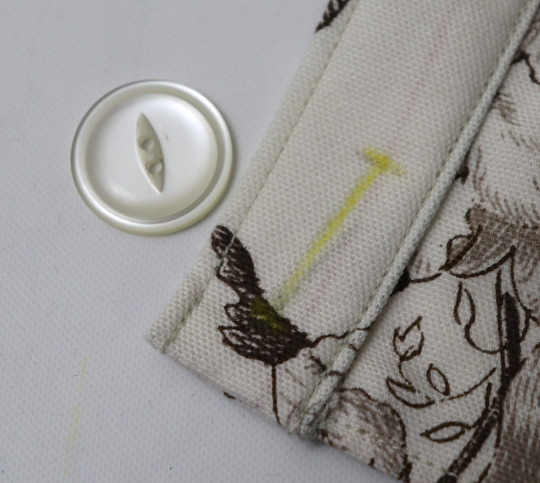
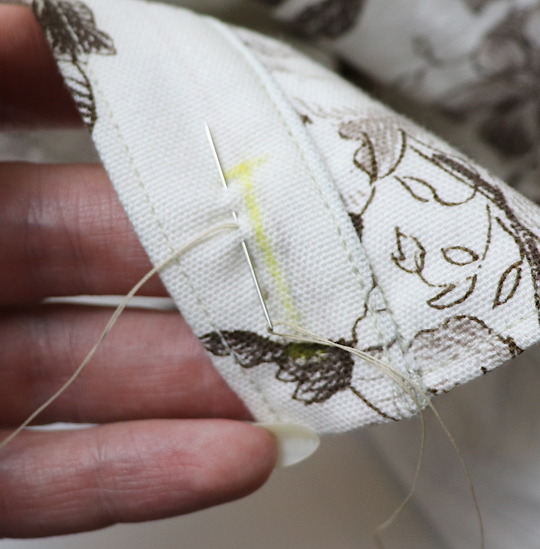
Do a little running stitch (or perhaps a running backstitch) in fine thread around the line at the width you want the finished buttonhole to be. This holds the layers of fabric together and acts as a nice little guide for when you do the buttonhole stitches.
Cut along the marked line using a buttonhole cutter, or a woodworking chisel. Glossy magazines are the best surface to put underneath your work as you push down, and you can give it a little tap with a rubber mallet if it's not going through all the way.
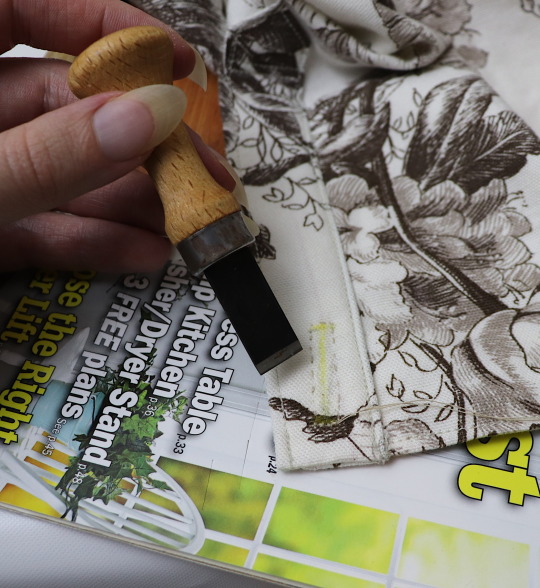
I'm aware that there are some people who cut their buttonholes open using seam rippers, and if any of them are reading this please know that that is abhorrent behaviour and I need you to stop it immediately. Stop it.
Go get a buttonhole cutter for 10 bucks and your life will be better for it. Or go to the nearest hardware store and get a little woodworking chisel. This includes machine buttonholes, use the buttonhole cutter on them too. If you continue to cut open buttonholes with a seam ripper after reading this you are personally responsible for at least 3 of the grey hairs on my head.
Do a whipstitch around the cut edges, to help prevent fraying while you work and to keep all those threads out of the way. (For my everyday shirts I usually do a machine buttonhole instead of this step, and then just hand stitch over it, because it's a bit faster and a lot sturdier on the thin fabrics.)
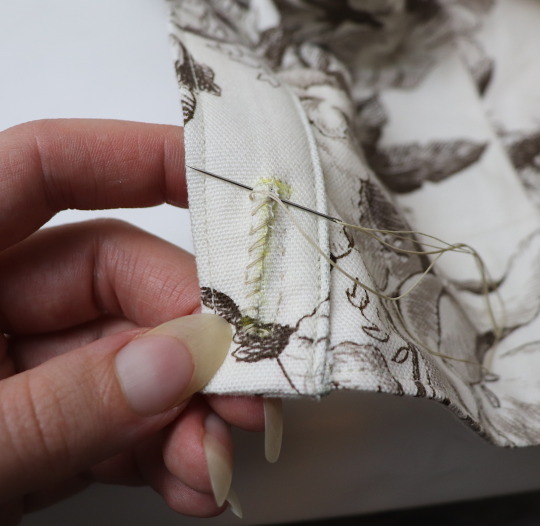
I like to mark out my button locations at this point, because I can mark them through the holes without the buttonhole stitches getting in the way.
For the actual buttonhole stitches it's really nice if you have silk buttonhole twist, but I usually use those little balls of DMC cotton pearl/perle because it's cheap and a good weight. NOT stranded embroidery floss, no separate strands! It's got to be one smooth twisted thing!
Here's a comparison pic between silk buttonhole twist (left) and cotton pearl (right). Both can make nice looking buttonholes, but the silk is a bit nicer to work with and the knots line up more smoothly.
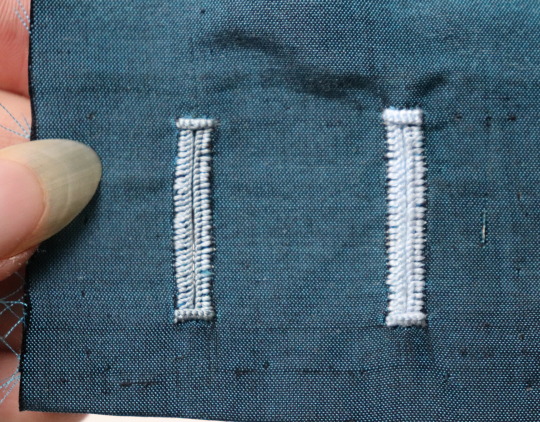
I've actually only used the silk for one garment ever, but am going to try to do it more often on my nicer things. I find the cotton holds up well enough to daily wear though, despite being not ideal. The buttonholes are never the first part of my garments to wear out.
I cut a piece of about one arm's length more or less, depending on the size of buttonhole. For any hole longer than about 4cm I use 2 threads, one to do each side, because the end gets very frayed and scruffy by the time you've put it through the fabric that many times.
I wax about 2cm of the tip (Not the entire thread. I wax the outlining/overcasting thread but not the buttonhole thread itself.) to make it stick in the fabric better when I start off the thread. I don't tend to tie it, I just do a couple of stabstitches or backstitches and it holds well. (I'm generally very thorough with tying off my threads when it comes to hand sewing, but a buttonhole is basically a long row of knots, so it's pretty sturdy.)
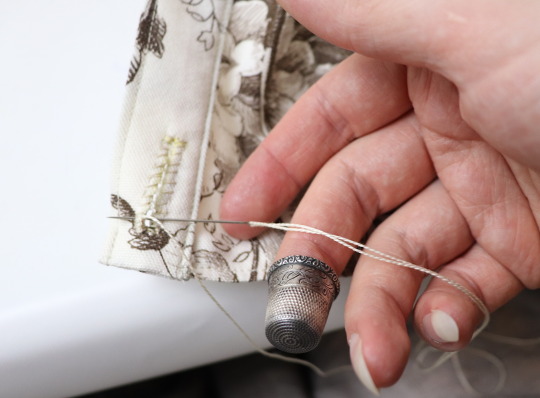
Put the needle through underneath, with the tip coming up right along that little outline you sewed earlier. And I personally like to take the ends that are already in my hand and wrap them around the tip of the needle like so, but a lot of people loop the other end up around the other way, so here's a link to a buttonhole video with that method. Try both and see which one you prefer, the resulting knot is the same either way.
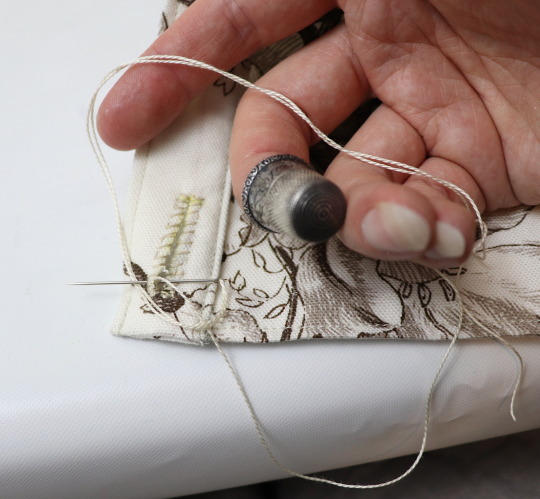
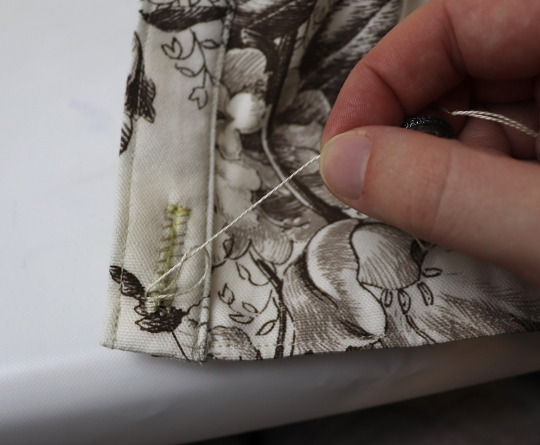
Sometimes I can pull the thread from the end near the needle and have the stitch look nice, but often I grab it closer to the base and give it a little wiggle to nestle it into place. This is more necessary with the cotton than it is with the silk.
The knot should be on top of the cut edge of the fabric, not in front of it.
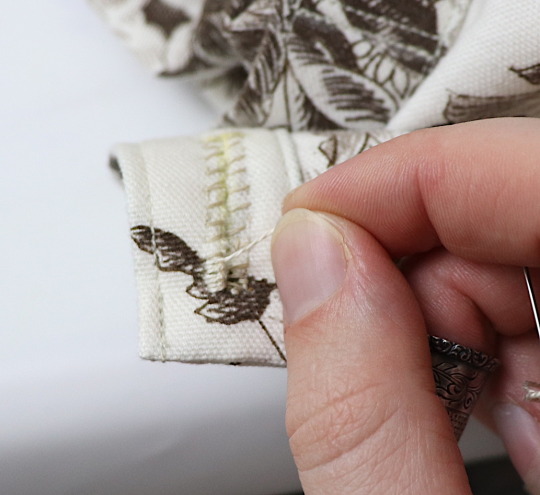
You can put your stitches further apart than I do if you want, they'll still work if they've got little gaps in between them.
Keep going up that edge and when you get to the end you can either flip immediately to the other side and start back down again, or you can do a bar tack. (You can also fan out the stitches around the end if you want, but I don't like to anymore because I think the rectangular ends look nicer.)
Here's a bar tack vs. no bar tack sample. They just make it look more sharp, and they reinforce the ends.
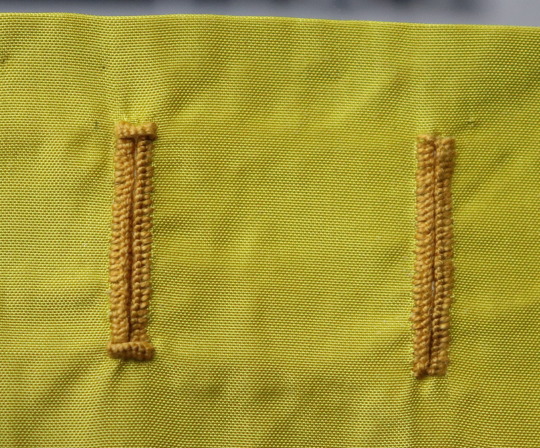
For a bar tack do a few long stitches across the entire end.
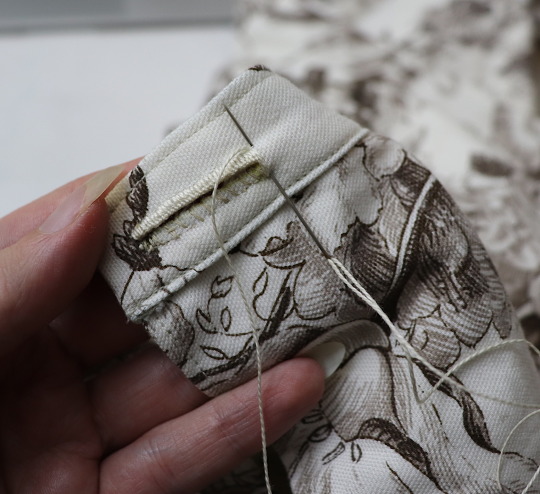
And then do buttonhole stitches on top of those long stitches. I also like to snag a tiny bit of the fabric underneath.
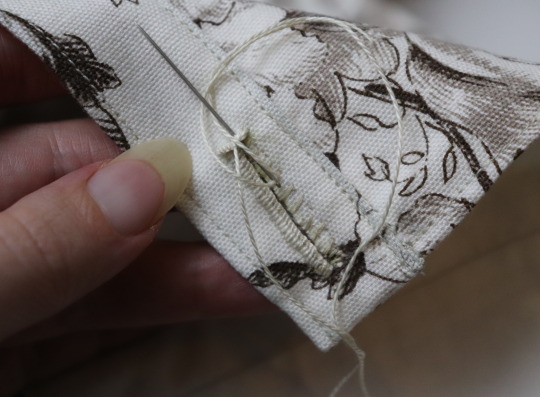
Then stick the needle down into the fabric right where you ended that last stitch on the corner of the bar tack, so you don't pull that corner out of shape, and then just go back to making buttonhole stitches down the other side.
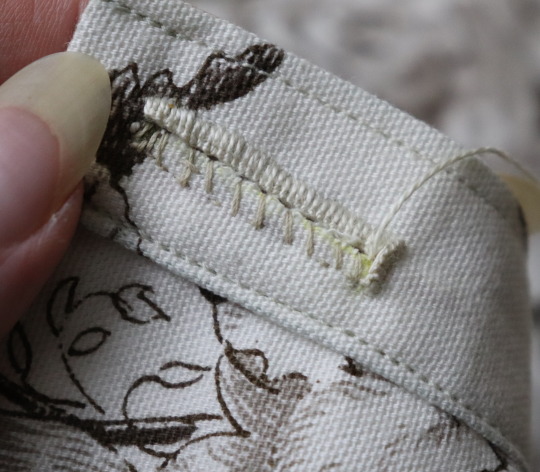
Then do the second bar tack once you get back to the end.
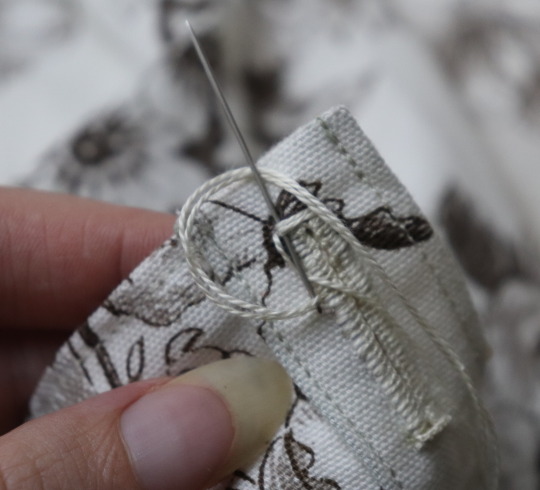
To finish off my thread I make it sticky with a bit more beeswax, waxing it as close to the fabric as I can get, and then bring it through to the back and pull it underneath the stitches down one side and trim it off.
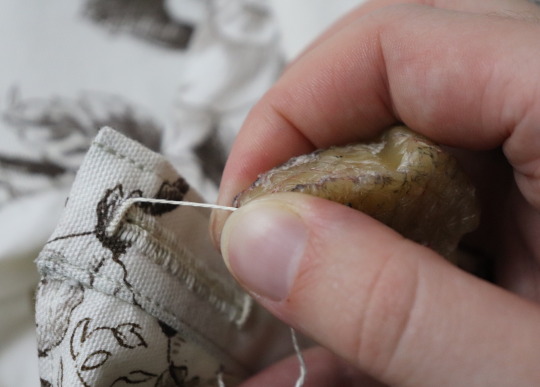
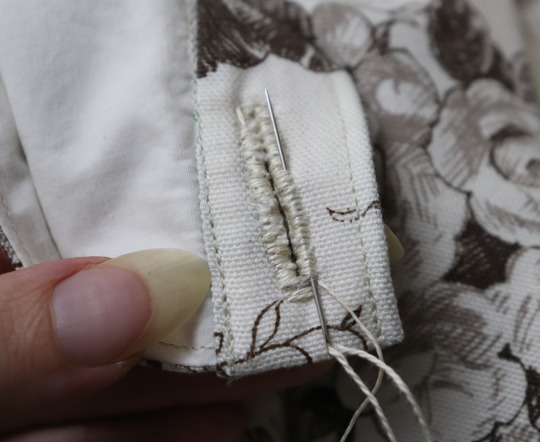
In my experience it stays put perfectly well this way without tying it off.
Voila! An beautiful buttonholes!
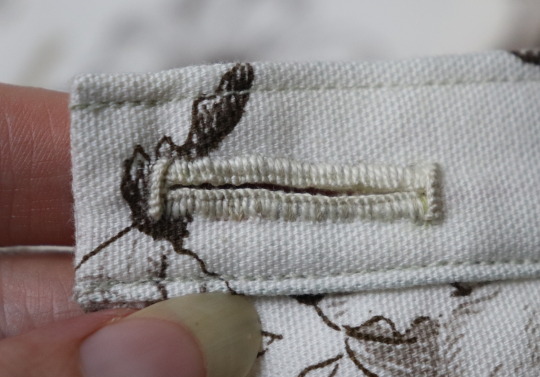
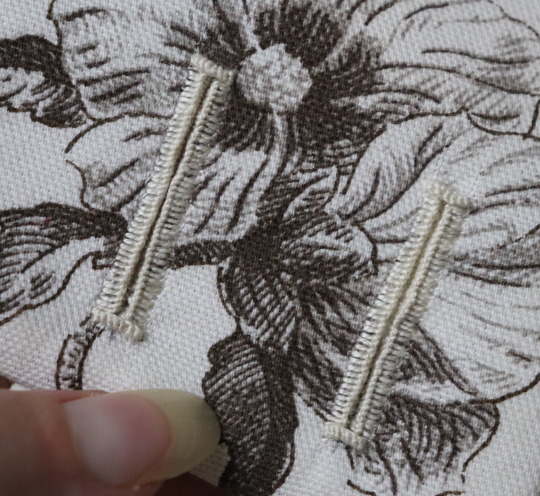
If you want keyhole ones you can clip or punch a little rounded bit at one end of the cut and fan your stitches out around that and only do the bar tack at one end, like I did on my 1830's dressing gown.
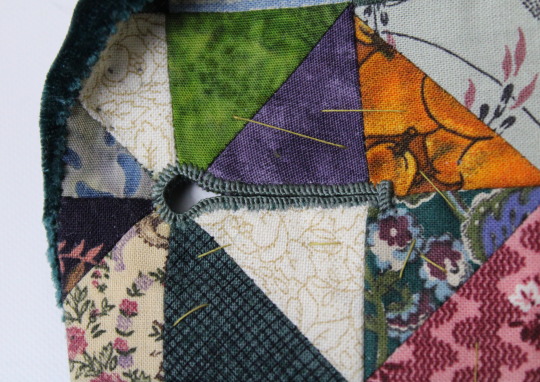
(I won't do that style in my video though, because they're not 18th century.)
Do samples before doing them on a garment! Do as many practice ones as you need to, it takes a while for them to get good! Mine did not look this nice 10 years ago.
Your first one will probably look pretty bad, but your hundredth will be much better!
Edit: Video finished!
youtube
And here's the blog post, which is mostly a slightly longer version of this post.
#ask#buttonholes#sewing#hand sewing#sewing tutorial#I've been procrastinating on the video this week#I want it done! I don't want to work on it I want new projects! I want to cut out more gloves!#currently forcing myself to do the last few buttonholes on these pants and then maybe I can cut out new gloves? as a treat?#but I hope I get some filming done tomorrow too
4K notes
·
View notes
Text
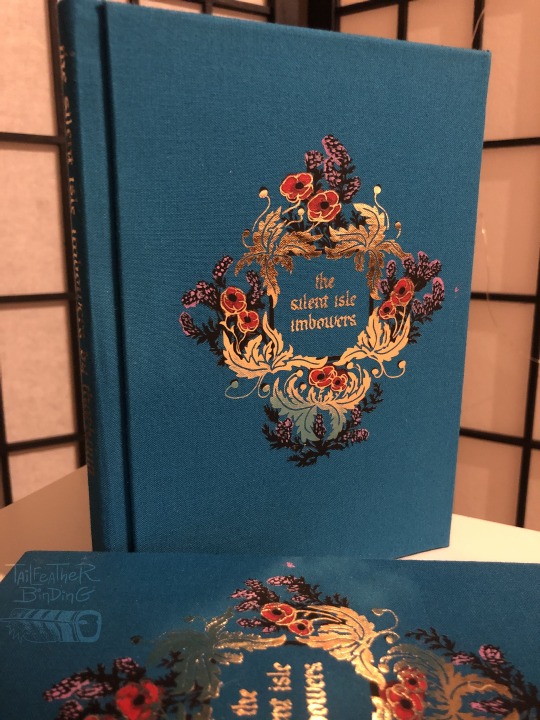
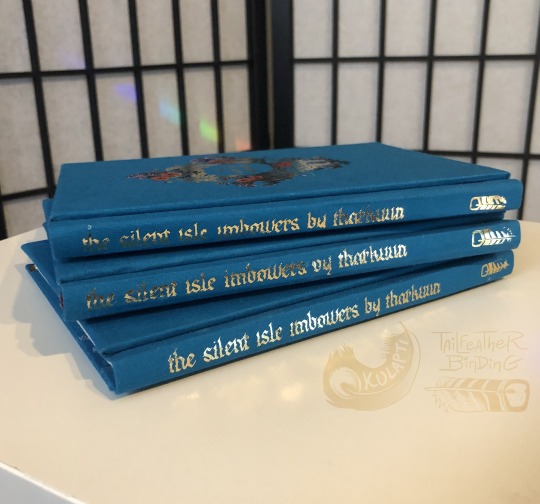

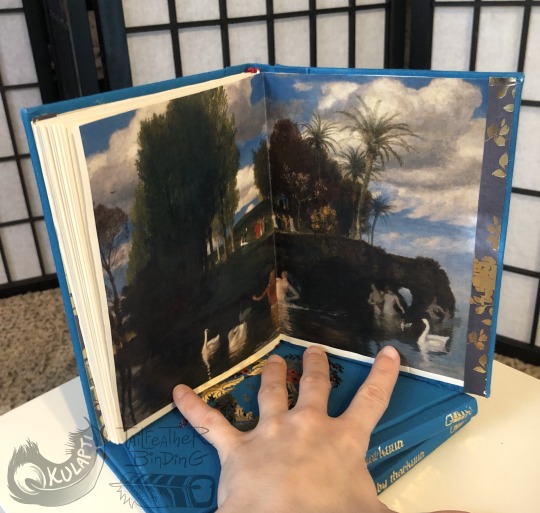
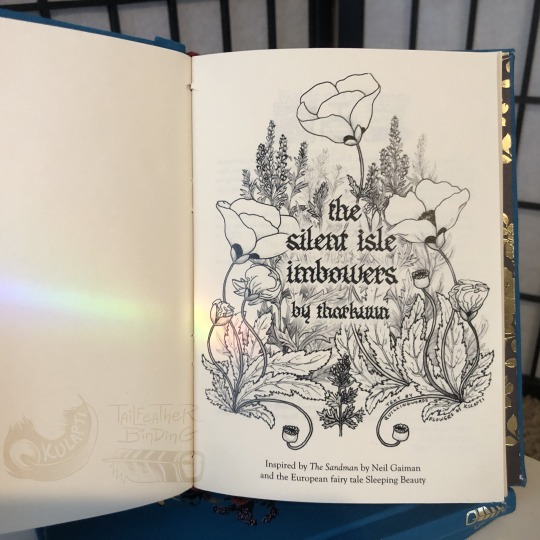
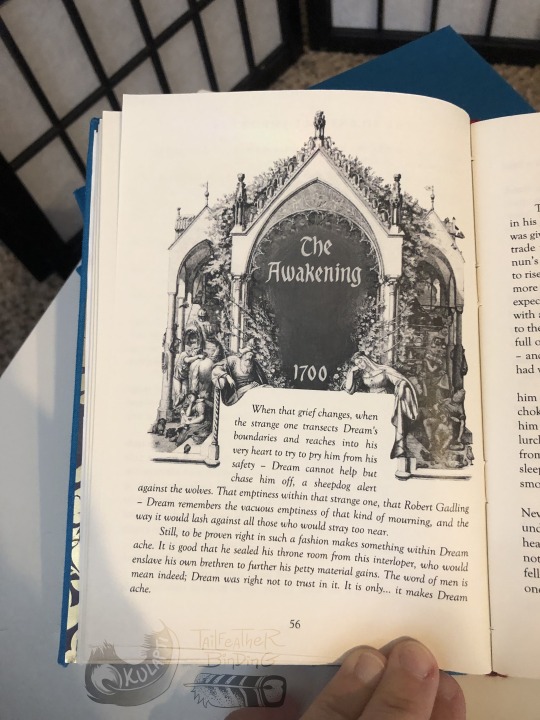
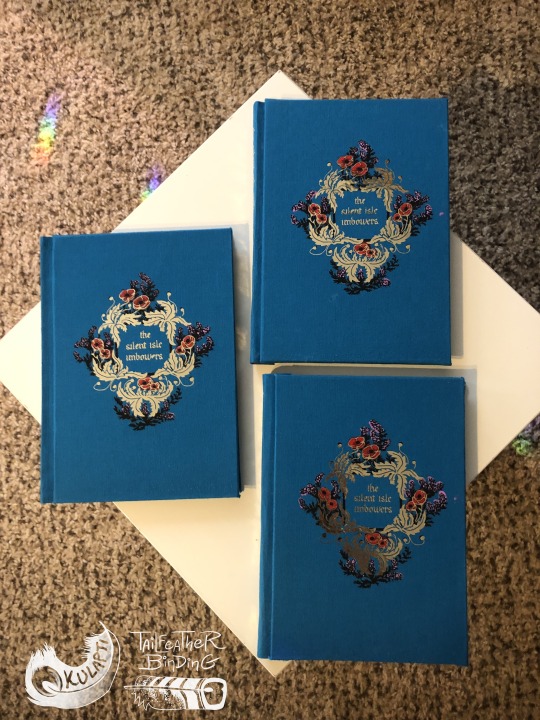
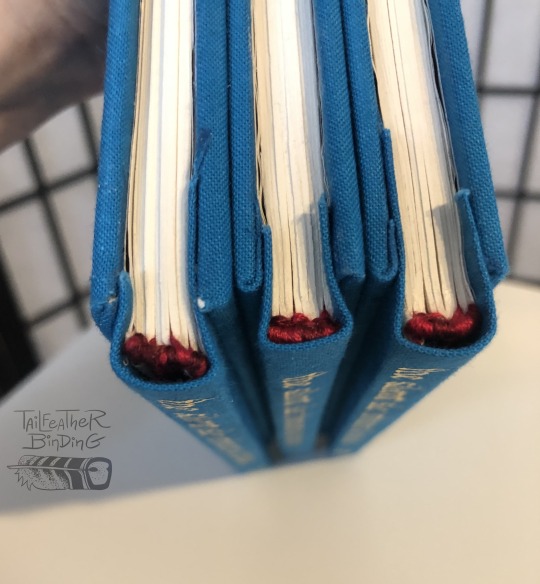
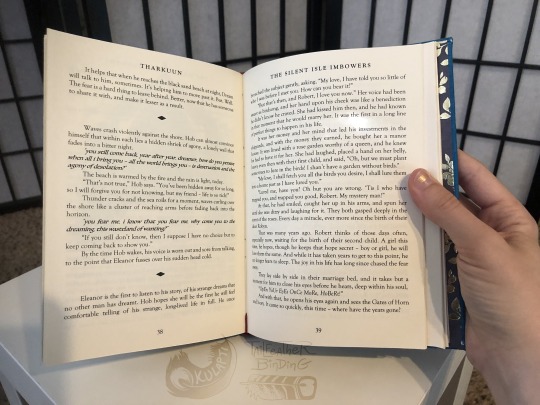
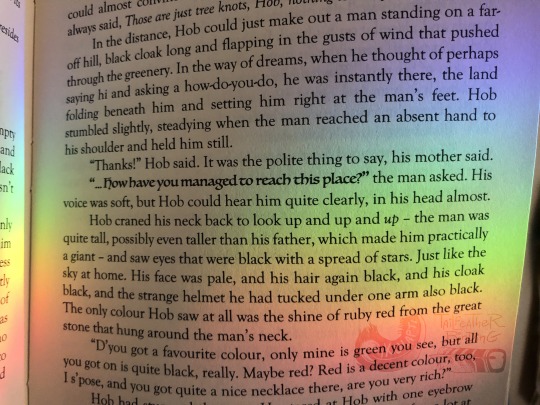
Aug 2023, bookbinding of The Silent Isle Imbowers by Tharkuun.
I’m sooo so so pleased to finally share this! I have been actively working on this for many months and waited until Tharkuun received her copy before posting so the final result would be a surprise.
-----------About this bookbinding under the cut
This binding has been one of the more elaborate pieces I have attempted so far. This has been my first binding where I (1) made three copies of a piece at once, (2) used a modified a historical illustration, (3) collaborated directly with another artist on the decorative elements, (4) finished matching art for the cover and title page, and (5) layered paint and heat-transfer vinyl for the covers. These are also (6) the first non-tiny books I have made with this style of hinge and cover attachment.
Pretty much immediately after I first read this story I felt I had to make myself a copy of this. I had a strong mental image of a vintage-looking cover for a fairy tale, with a deceptively simple design of flowers on the cover, probably with fancy metallic accents, the kind of thing you’d find in an interesting used bookstore with no summary, no text on the back, no dust jacket, just the flowers and maybe a title. I’m going to make a separate post about making this cover design a reality because oh man has it been a journey lol! I designed and drew the digital art for the cover (digital because of the cut and application method), as well as the corresponding title page illustration (pencil and dip pen, scanned, title added digitally).
When I asked Tharkuun about it she was excited to suggest I get in touch with quillingwords, who generously agreed to collaborate with me! Among her talents quilling writes calligraphy, and hand wrote both the book title and chapter headers for me to incorporate into my plans. Check OUT those chapter headers! So fancy! A font could never!! Quilling has also been very encouraging and let me yell about this project in dms for months so the final result could be a surprise for Tharkuun. Thank u so much quillingwords, your calligraphy adds invaluable amounts of swag to this project.
I was going to do some kinda neat font for the chapter headers, but quilling’s work is too cool for that and I decided to use a modified piece of a historical illustration instead. The illustration also happens to be cool as heck: I was browsing the Artstor database (an academic quality resource available for free via Jstor, my beloved) and found E. N. Neureuther's 1836 gorgeous etching for etching of the fairy tale Briar Rose, an illustration made for a printing of a Brothers Grimm recorded German fairy tale with Sleeping Beauty elements. Much to my delight this illustration not only matches the general look I wanted but is actually relevant to the story, itself a Sleeping Beauty spinoff.
Slightly less stylistically consistent are the endpapers, which are prints of two different paintings by Arnold Böcklin: Isle of the Dead (1883) in the front and Isle of Life (1888). The first painting had occurred to me as an excellent visual to go with the story, and Tharkuun and I discussed this and agreed that pairing it with the related later, more optimistic piece was too thematically appropriate to resist.
I had fun and learned a lot making these books and I am very pleased with the result!!
Materials: Archival bookboard, cardstock, cotton cheesecloth mull, archival PVA glue, linen thread coated in beeswax, paper cord, red cotton embroidery floss. Blue cotton backed with archival paper, acrylic paint, machine cut black and gold heat-transfer vinyl. Laser printed text and illustrations. Metallic scrapbooking paper.
#artists on tumblr#bookbinding#ficbinding#fanbinding#dreamling#my art#here there be fandom#the sandman#the silent isle imbowers#tharkuun#described#id in alt text#pls imagine me screaming continuously about this project for oh idk 4 or 5 months? oh I can make shiny books??#im not allowed to @ people in this post apparently#links and fic rec in reblog#laying on the floor I found a few missing words I must have deleted on accident while fixing formatting#poppies (Papaver somniferum) and mugwort (Artemisia vulgaris)#tailfeather binding
787 notes
·
View notes
Text
For Solarpunk aesthetic week I finally after like a year of putting it off mended a pair of threadbare pyjama pants I wear constantly. They didn't have holes yet but you could see my fingers through the fabric when I put my hands inside them. It took me most of the afternoon because I kept getting distracted. So I finally put on an audiobook and then hyperfocused so hard I missed my chance to take the bus to therapy. The ADHD has been bad today but! I got something I had been putting off done!
I used size 10 crochet cotton because it's what I had that wasn't embroidery floss (which I didn't want to use because it's not as durable since it's meant to come apart). The fabric was scrap fabric leftover from one of the shirts I made into a crop top this summer.
Patch leg one (inside and outside)

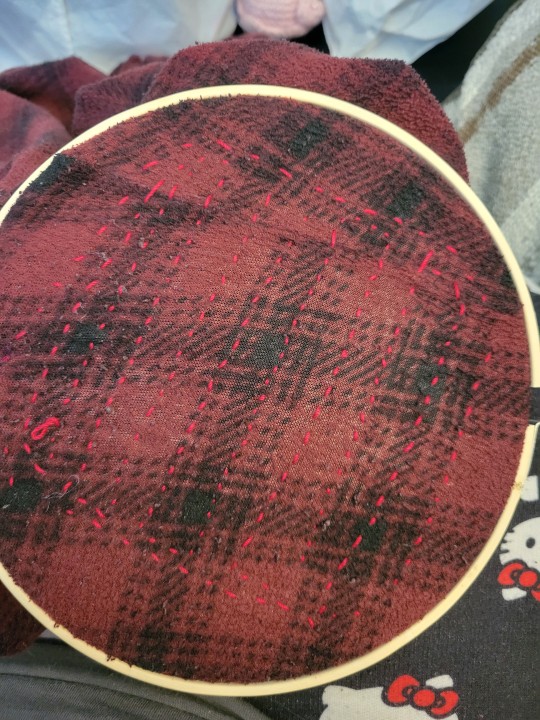
Patch leg two (inside and outside)

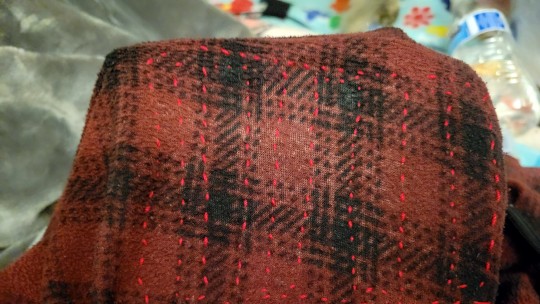
It's hard to tell but the second patch has much neater stitches. I also stitched down the ends of thread in the second one.
Finally! I have done the thing! Next is a shirt I found a small hole in, but since the hole is small I am going to just use embroidery thread to fix it.
287 notes
·
View notes
Note
where do you get the strings/threads for your weavings?
i make a lot of my yarn and thread myself (i spin it out of silk, cotton, or wool, and dye it as well) but when i need large quantities or don't have access to my spinning equipment or the time/energy i buy it
for weaving i usually buy my cotton and linen warp yarn from brassard and my wool from lemieux and briggs & little (all are canadian manufacturers, but they can be purchased outside of canada) i buy other yarn from knitting yarn shops both in person and online, and sometimes luck out at thrift stores. romni wool is my favourite yarn shop in toronto, and root studio is my favourite in kuala lumpur
for embroidery i usually use regular dmc cotton embroidery floss or perle cotton, and i buy other embroidery threads on etsy or i find them in craft shops in person. i found a basket of silk embroidery thread in a craft shop in halifax recently, unlabelled, and i've been using those a lot the past couple weeks
30 notes
·
View notes
Note
i love your trans dragon embroidery!! i don’t know a lot about it yet, but i’ve been looking into techniques to learn and i was wondering if there was a name for the stitch you used to fill the body colours on the dragon? i love how it looks, so nice and flat and even
Hey there! Thank you so much. Sorry in advance this is long, i just really fucking like talking about the topic, and I'm actually really used to helping newbies get started. The fill is entirely 'long and short stitch' throughout the entire piece. It's normally used the most in the technique called 'thread painting' which usually aims for photorealism and involves swapping out a lot of colors to achieve a smooth color transition. I instead do one solid color for my fills, and rely on the thread direction + refraction of light to give it depth. That's a style choice vs it being exactly normal or usual - like any art, embroidery artists develop a recognizable style even when using different stitches or approaches to their work. I mention the above caveats because here's a guide from the Royal School of Needlework showing how long and short stitch is worked. It shows it as it's most normally used - very careful planning of the stitches to achieve closer to lifelike shading, and swapping out colors at junctions. Thread direction still matters even when you use different colors for shading as shown in that guide. The goal no matter what when using mercerized cotton or silk floss for this is to make it as smooth as possible so that it's glossy and reflects light. Back to my art style - without color changes, the animals or fabrics or whatever I'm embroidering long and short on, the end result of controlling the thread direction is that it looks far more lifelike and has depth, such as in this photo from the original post, where you can see how the light hits different twists and turns.
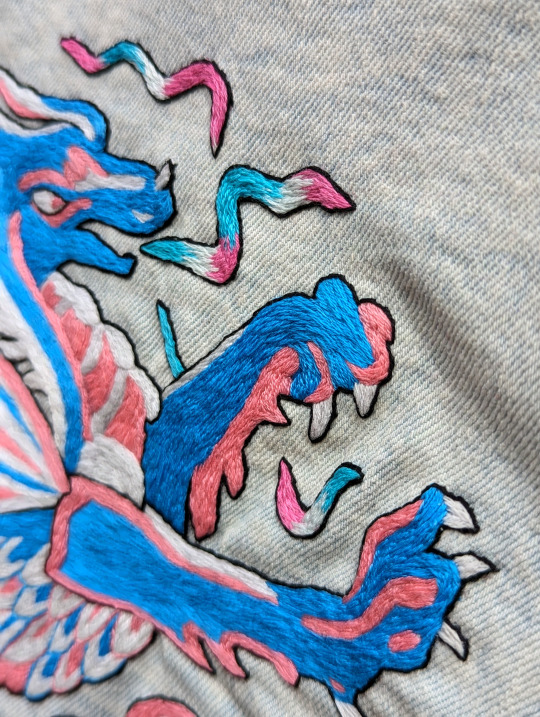
The light reflecting differently on different parts is a key part of my style - it's not a happy accident and that is why it looks as nice as it does, it's the most important part imo, because even if the long and short stitch was done correctly, it might look odd or not be the look I wanted if say, I made all my thread simply point up and down. I had to choose as I went how I wanted the components that make up the dragon to contrast and work with each other, since it is a very smooth and even surface, to provide the visual interest. The wings being entirely smooth and slick with their different color sections, the grip of the claws, the way the muscles work over each other on the legs, the scales being outlined and interrupting the flow - these all build within the composition of the piece to help direct the eye.
My original pattern I used doesn't have instructions on that, it's basically a stencil. However modern patterns aimed at teaching this technique do show where to direct and angle your floss in order to get the correct result: nice and flat and evenly shiny. If you're interested in the photorealism aspect of long and short stitch, check out Michelle Staub, who has a very excellent book that teaches both the stitch techniques and how to blend colors. Stitching animals with fur direction is a good way to get a handle on how rendering fur and muscles works.
#chatter#embroidery help#that should probably be a tag i guess! i do like talking about how the sausage gets made
55 notes
·
View notes
Text

Kaitag embroidery, 2ft. 10in. x 2ft. 2in. Caucasus 18th century. Cotton ground.
Kaitag textiles are an unusual embroidered textile art form from the Kaytagsky District of southwest Daghestan, Russia, inhabited mainly by Dargins and Kumyks. Kaitag textiles are of simple construction, being laid and couched silk-floss embroidery on a cotton ground. The designs are often in the style of classical Safavid Persian art, sometimes illustrating horsemen and hunting scenes. Abstract Kaitag designs have been compared to those of Matisse and Paul Klee, though it is unlikely that either artist ever saw a Kaitag textile. Surviving examples are mostly from the 17th and 18th centuries. These embroideries were apparently made for local use in weddings, funerals, and for cradle trappings. Wikipedia.
24 notes
·
View notes
Text
Finished Uintuva's bind! It's every completed fic of their OTP from ao3, Kakashi/Tobirama. And one secret fic that I wrote that hasn't been published yet.
This is really fun because a) half our friends have contributed to the ship over the years and b) it's the first time I was binding something that included my own writing!


It's my second time trying a half binding! (The thing where the book cloth is also on the corners). Also my first time painting a fore edge in a landscape/realism style.
For technical details, the cover paper is scrapbook paper, the bookcloth is the heat n bond method on cotton. I did about three separate thin layers of acrlyic setting spray on it to try to treat the right side of the cotton. It's better than regular cotton but not as effective as wheat starch paste or even the 1:1 wheat starch paste to mod podge mixture.
This was one of the first textblocks i did but unfortunately it sat on my shelf for about six months because I couldn't figure out how I wanted to do the cover. I solved the issue by just making a dust jacket! Not pictured here, ran into the picture limit. Gonna reblog with more pics.
I accidentally bought embroidery MACHINE floss instead of embroidery so that was thinner than *fishing lure.* -10/10 do not recommend. I had to tip in half the signatures manually with glue to stabilize it and even then the spine went concave on me.
The end papers are card stock with foil and foil reactive tonor. To achieve this effect I a) spent 10 years of my life making the collage (jk), b) made three versions of the picture. The actual picture, and then a version without the "gold" sections and a version with ONLY the "gold" section. I printed the latter out, foiled it, and then ran it through the printer again to print the rest using the "blank space for the gold part" version.
I also got a STAMP with Flowe Mountain Press on it! Super fun. Since this textblock was printed before I ever had a logo :)
You can't deny it turned out really cool, though. I'm going to make separate reblogs to talk about the interior and the dust jacket.
53 notes
·
View notes
Text
Mending those pesky wear holes in the inner upper thighs of jeans: a journey.

The vast majority of us that both do not have a wide thigh gap and are moderately active while wearing jeans will encounter this type of damage tear frequently. And if, like me, you can't afford to replace your jeans every few months and find the placement of these holes a little problematic, mending them is an attractive option.
But patching such a large area - and the material is thinning and needs reinforcement no matter how small the hole is currently- on the exterior is very obvious and often unsightly, bringing potentially unwanted attention to a fairly personal area.
So!
The answer is to apply the patch to the inside and make sure both the fabric and the thread match the existing material as closely as possible.
I had accumulated an impressive number of jeans that had developed this defect (24!), some over two decades old. I first took a separate stack of jeans that either I couldn't wear anymore or had other defects not worth repairing and cut them up for patches. I ended up with four long usable panels (2 per leg, front and back). I cut one of these panels in half to use as my interior patch to cover the crotch and a length down each inner thigh.

I then pinned it in place, going down both sides of the seams first (since that area is less stretched out) and then pinning the edges down after smoothing them out.

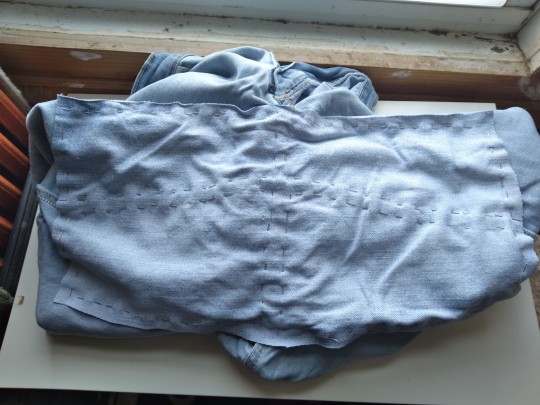
And then I hand-basted the patch in place with some high-contast embroidery floss I had left over from various cross-stitching kits.
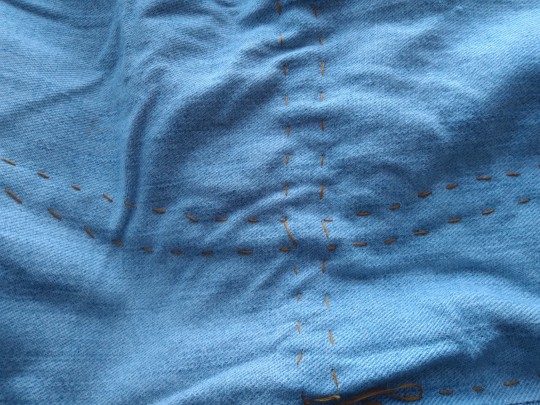

I tried to make it lay as smooth as possible, but as wearing the jeans tended to turn the flat fabric into concave, there were a few spots that ended up with a few wrinkles in the original material. I made sure to put them near the big seams so they're less noticeable.
And then I dragged out my sewing machine and loaded it up with the special needles for jeans (reinforced to go through tough/thick fabric) and the special cotton thread for jeans in a medium blue. Unfortunately I could only get one color of jean thread due to my cash flow situation so it will show a little on the lighter and darker jeans, but not enough to worry about.
I then sewed a simple stitch next to my basting thread. It was all straight lines with 90 degree turns. The only issue was I could only sew a few inches at a time, because I was essentially working in a bowl. Had to pause to readjust the piece and smooth out the next run. It still went really quickly.

And then I used my trusty seam ripper to remove the basting thread and viola! Here's one of the pairs with a higher contrast so you can see what it looks like on the exterior:

You honestly don't notice it when they're being worn. If you use a smaller patch (or two separate patches), you may want to do some more reinforcing stitching. By making my own patches so large, most of the stitching is outside of the friction zone so the thread won't be threatened by wear. For the stitches next to the original seams, well the seams have a higher profile and will protect them.
The one thing I will change the next time is to use pinking shears on the patches before I pin them in place to control fraying. Otherwise I've been wearing them and it's great!
#clothes mending#blue jeans#sewing#pesky upper inner thigh wear and tear#seriously i walk so much that i can wear holes in women's jeans in a month or two#and in men's levi's (much thicker and 100% cotton instead of spandex) in 6 months#i only had one pair of jeans left when i finally finished mending these#but i got caught up on doctor who dvds and the 5 seasons of gbbo that are on dvd while pinning and basting#i then stalled out on machine sewing for like four months because my brain said it was illegal#but the threat of having to go pantless finally kicked it into gear#i do now have two more pairs to pin and baste before i put the machine away i just need something compelling to watch
2 notes
·
View notes
Text
Of Belt Favors and Letters
The Queen's Champion tournament of Nicolette Deuville II is this coming weekend (November 11, 2023) and for it, I have created two gifts for my inspirations. First, a belt favor for my wife. Second, a letter of intent for my queen.
This isn't my first time making a belt favor, but it's my first time making a sizeable belt favor for my wife. I made it for the Queen's Champion tournament of Nicolette Deuville II, in hopes that it brings my wife luck and glory. <3
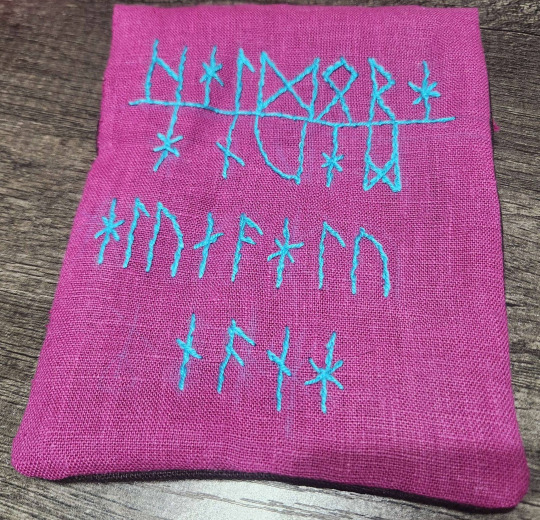
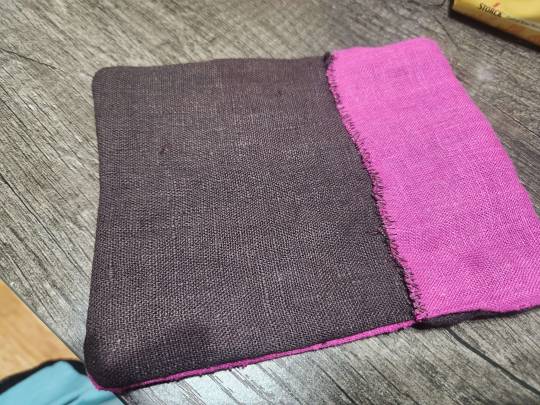
It is embroidered on a leftover piece from my first dress I ever made for reenactment and the first dress I ever wore to an SCA event. The text is based on the Setre comb inscription dating to about 600 AD. The text on the comb appears to read
hal maR mauna alunaalunana
Ever since I came across it, I've been entranced by Ottar Grønvik's translation of this inscription:
Stone-maiden may thrive achieve everything, enjoy everything
As my wife's SCA name is Halldóra, I've always wanted to interpret this poem into a gift for her. I used a single strand of cotton-wool blend yarn rather than using embroidery floss to call back to the embroidery texture of the Bayeux tapestry. As I did not have any large blocks of space to fill with the Bayeux couched satin stitch, I did this project in split stitch and a single couched line for the center line of the A section of the inscription

For my letter of intent, I wanted to do something that felt more appropriate to the persona of Áshildr Inn Hárfagri, so I decided to try my hand at carving leather. First, to draft and translate my letter itself.
While my letters of intent are usually rather wordy, since I would be trying a new craft for the first time I wanted to keep it short and sweet. I decided upon "My queen, my sword is yours" and began researching an appropriate sign off.
I came across the Einangsteinan inscript on the Einang stone, which is typically interpreted to read "ek (gu)dagastiR runo faihido" or "I Gudgæst wrote these runes." Substituting my own name for Gudgæst's, I now had a signoff of "ek ashildR runo faihido."

I wish past me did a better job of copying notes down somewhere present me would find them with regards to spelling my own name in runes as I've done this before for the Letter of Intent for the QC tournament of Toryn Sevenstitches II.

Make note that the "d" in Áshildr is spelled with a teiwaz rather than a dagaz. I thought that was interesting and not a choice I would have made casually, so I re-researched this difference. The Vatn Runestone, pictured below, appears to read rhoaltR ...something. rhoaltR is commonly interpreted in this case to be Roald, from Hróaldr. With the inverted algiz used as the R following the hard consonant at the end of the name, I consider this sufficient evidence of how to appropriately write a -dR name in runic inscription.

Then came the translation.
My Queen > dróttning mín (first person singular feminine possessive) > drotning min
My sword is yours > sverðsins (singular def. gen declension of sverð) mín er þín (second person gen. posessive) > swerþsins min er þin
I Áshildr carved these runes > ek Áshildr runo faihido > ek ashiltR runo faihido

As my queen's arms include a wolf in chief, I also carved a wolf into the leather. I used a pencil to sketch the runes and wolf onto the leather, then carved with an Xacto knife and a scalpel. I have found I prefer the straighter lines I accomplished with the xacto knife and found the ergonomics superior, but the scalpel produced clearer, easier to read marks against the undyed leather.
While this was meant to reflect the runic inscriptions in stone, this is obviously not stone. I chose to do this in leather rather than on paper or canvas because the three dimensional nature of carving, how runestones such as the Jelling, Einang, and Vatn stones were carved, is better represented in a thick material such as leather rather than painted on to canvas or drawn on paper. Carving these runes and this design gave me a greater appreciation for the straight lines of the Futhark runes and for the artistry, skill, and patience of those long-dead runewrights. Gudgæst, Roald, though long gone from this world, live forever in the carvings they left behind.
"Deyr fę, deyia frǫndr, deyr sialfr it sama; ec veit einn at aldri deýr: domr vm dꜹþan hvern."
#arts & sciences#a&s#sca#society for creative anachronism#leatherwork#leather carving#embroidery#runes#futhark#futhark runes
15 notes
·
View notes
Text
Making a regency gown: Part I-lost-count
Based on the fact that I haven't posted an update in an entire month, you'd think I finished the gown, right?
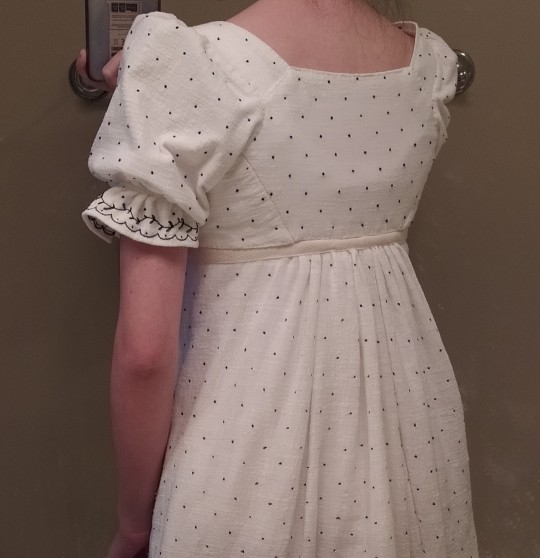
Right??
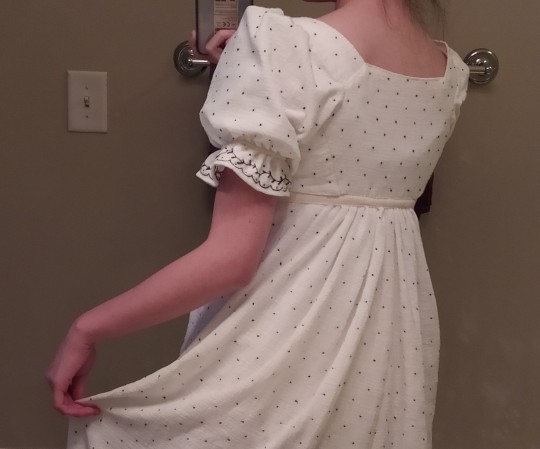
Wrong
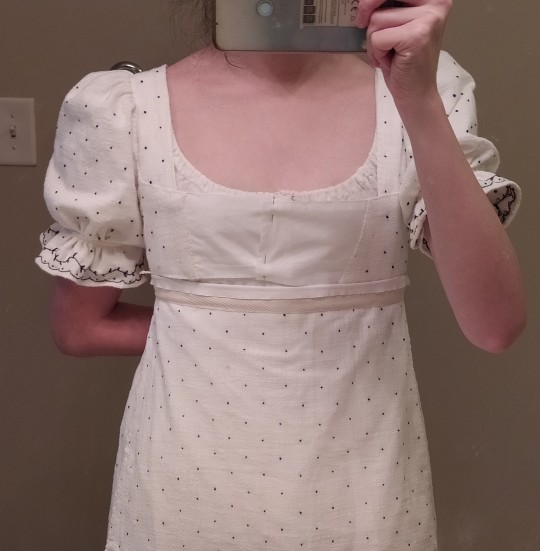
The back looks beautiful and I finally attached the skirt to the bodice, but this thing is still nowhere near finished. As you can tell from the front view, I still haven't gotten around to drafting the front bodice bib thing. I'm also contorting my arm behind my back because I haven't finished the waistband yet, so the apron front skirt doesn't close yet. (Btw, I also sewed little drawstrings running down the length of the sleeves so they can be adjusted and puff up a bit more.)
What you also can't tell is that the bottom half of the skirt still needs to be embroidered. Unfortunately, I've been running the inpatient service for the past 2 weeks so I haven't really had much time for this project. But I was able to embroider the parts of the skirt that are near seams so that I could get the construction of the skirt done. The parts that I haven't embroidered yet are just blank expanses of flat fabric, so they'll be easy to go back and finish later.
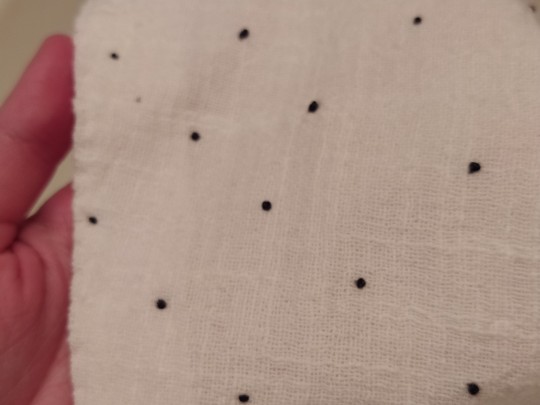
I wanted the front panel of the skirt to be flat and more structured, so I lined it with a sturdier cotton than the gauze fashion fabric, and that made it easy to do the colonial knots. I chose not to back the rest of the skirt with a lining because I wanted the back gathers to drape properly. But that posed a problem because the gauze is an open weave, and my colonial knots wanted to pull right through. I ended up taking a clue from the inspiration extant gown, where the dots are actually thousands of tiny metal staples, not embroidery stitches. They made the dots by stacking 3 staples in a "snowflake" configuration. So I tried that with my embroidery floss, and it worked pretty well but took much, much longer.
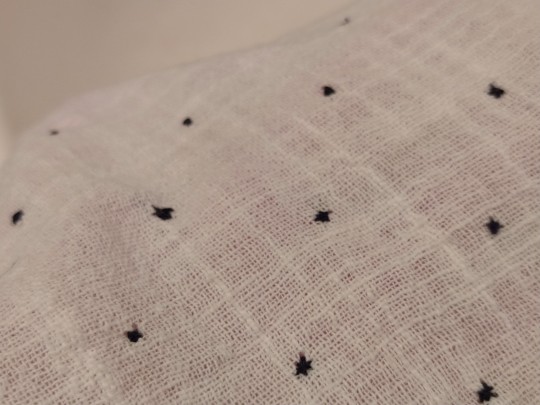
However, it quickly became apparent that I was going to run out of both embroidery floss and sanity before I would finish. So I had to go and buy several more spools of navy blue embroidery floss, albeit in 2 different shades because they'd run out of the exact color I need, but it's not terribly noticeable so I'm just going to have to live with it. I also forced myself to spend at least 1 hour a day doing the stupid embroidery on the skirt...until work got busy and I wadded the gown into a ball in the back of my closet for 3 weeks
Anyway, I've been tracking the amount of time I've spent on the project. Not including time spent on patterning and mockups, the bodice took 30 hours to construct and embroider by hand. The skirt took 9.5 hours to cut out and construct (a good percentage of that time was spent on prep work and being finicky about the placement of my pattern pieces because I had a very limited quantity of fabric to work with--seriously, strongly strongly recommend against trying to make a regency gown with only 3 yards of this cotton gauze, 0.5 yd of which I can't even use because the pre-embroidered border is hot pink). The skirt embroidery took 35 hours thus far, and I'm halfway done, so it'll probably take another 35 hours to finish. And then I have to make and embroider the bib front and waistband, which will probably take another 1-2 weekends. Except I need to study for boards, so idk when I'll get to that.........
36 notes
·
View notes
Text


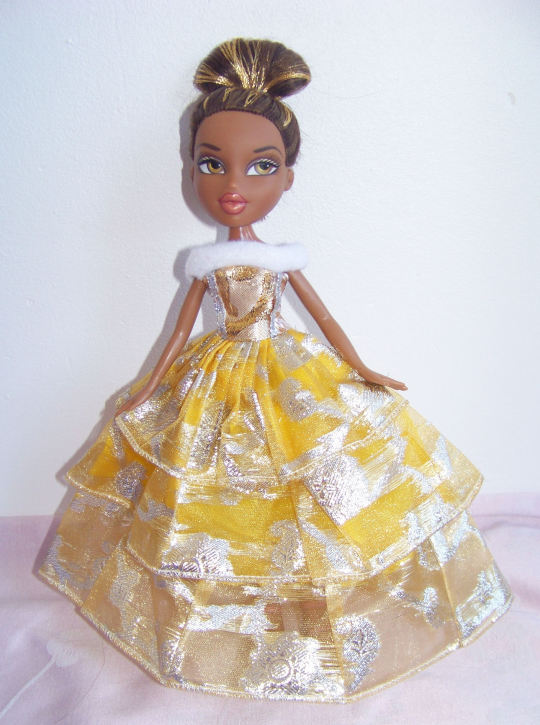

I should probably make a scavenging tag to keep tab of this buuuut it kind of goes under the home hacks and multipurpose crafting i've been doing ever since that first 2008 doll streaks with gold embroidery floss rooted using a toothbrush handle with the needle inserted by melting over a candle.
Guess this is kind of my brand. ¯\_(◡‿◡)_/¯
On Friday, I walked Lily briefly and found a big bin bag that was someone's chest of drawers emptied so I sorted it into clothes, recyclable and rubbish put it all in the correct bins and left the clothes and accessories for others to go through after picking out a few gorgeous scarves, a brand-new djellaba in bronze cotton, a lovely stained cream jumper (sweater) that i'm going to dye: it had a snagged loose knit - crochet looking but done by machine - back that just needed re-knotting/rethreading (what ever the word is for when you use tweezers to weave the yarn back through its original pattern and knot it down), a machine knitted snood to frog/unravel, some glitter body lotion and a notebook.
*I found the glue at another bin next to a bunch of tools (including a stainless ratchet wrench 😍 with accessories I couldn't carry 😥) thought I'd grab the glue in case there was a chance you could get some out by using a pin through the top as I'm currently waiting for superglue in the mail. Score: It's not jammed at all.
Loctite powerflex is pricey (€7 for 3g when you can get 20 x 3g liquid superglue for €4) and takes about double the time to set (hold tight and count to at least sixty not thirty) but it is magical stuff: not only does it go where you direct it to, you have a window to wipe off any excess without it leaving damage and it holds really well without cracking on flexible surfaces like vinyl, shoe soles, headphone wires. It's got superglue in it but also some kind of rubber base solution. It's one of those fancy glues you want around for the special stuff while having a backup of bog-standard superglue for basic repairs.
*I keep sleep and symptom notebooks to keep track of any circadian rhythm disruptions, migraines, gastrointestinal issues so I can circle back to a particular food or activity. I'd been using these cute panda shaped accounting notepads and stocked up but as with all things good, they got discontinued. I tried other notepads but it wasn't quite right: it needs to be lightweight, easily replaceable if I drop water on it, as unobtrusive as possible. This merch pocket book with the 5mm squares is just right when unbound into 6.
/// I learned this trick as a kid, someone showed me how different books were bound and how to salvage thrown out school exercise books, remelt crayons, use carbon copy, properly wash brushes... that kind of stuff. I think it was a free summer art class where you turn up and there are all sorts of different people and even if you end up just drawing ye olde square house, you absorb a bunch of history or techniques and get to watch other people: how they sketch, how they observe, I think that was the first time i'd seen cross-hatching and then couldn't unsee it in illustrations. I'm so glad my parents dropped me off at the various council, museum and church free events as a kid: some are really rigid and you get in trouble if you don't assemble the pompom bird exactly as instructed, others are an occasion to bond with some grandpa who'll show you how to whittle or learn and learn. ///
Why not go digital? because you don't want your phone on: you'll forget what you were supposed to do and go down a rabbit hole. Besides, half those things come with weird reward systems that make me feel obligated or guilty, or worse: diet propaganda. So that lil find has me set for the next year, I transcribed my current messy too big notepad into two pages and voilà! (well i still have a couple of symptoms to add now that i look it over)
*After working with yarn for a while, you start to get a sense for the type that doesn't pull apart when brushed or tugged and it's rarer than you'd expect so I took the snood despite not liking the green tinge to the mustardy colour: it doesn't make clawdeen's skin tone pop for example. So it's the right fibre with a light enough base for some dye experiments.
*it has taken forever and it's just a start (50+ more) but I have listed 12 more dolls on ebay!! there are reroots from before I got injured and deglued dolls i'm really proud of. If you're interested, I'd much prefer to sell in bulk to the EU, will happily sell at cost instead of those higher ebay prices and have a ton of doll heads and partially finished projects if you repaint or reroot.
9 notes
·
View notes
Text
@shieldmaidenofsherwood replied to your post “I keep telling myself "ok, storage space is...”:
What kind of heavenly thrift stores do you have near you 😫
It's a big Value Village (maybe they're all that big, I don't know, I haven't been to any others) and they have 3 racks full of fabric plus a wire shelf with baggies of yarn, embroidery floss, trim, buttons, etc.
A lot of the fabric there is awful, or stuff I have no use for, but good stuff turns up pretty often and there are always so many new things every time I go. I can't seem to walk out without at least one piece of fabric.
There's another two or three racks of tablecloths and such, and a few more of curtains, and one full side of an aisle just of bedsheets and pillowcases. I don't usually find anything good in with the tablecloths and curtains, but it's worth a look through, and I've had to tell myself to stop buying cotton sateen bedsheets until I make nightgowns out of the ones I already have.
I think it's the same chain that's called Savers in the U.S.? A lot of their stuff is overpriced, but fortunately not the fabric, which is what I'm after. I've also gotten multiple vintage fur coats and jackets there in the 20-35 dollar range.
All the other thrift stores in town are much smaller and have little to no fabric, so I almost never go to them.
27 notes
·
View notes
Text
As a sewist, I'm trying to reverse engineer this from a single photo, and this is what I've come up with.
The circle and oval showing plain fabric are probably the sites of the original holes. If you look at the unmended hole on the other leg, the holes have probably been cut out to give a nice smooth edge that's easier to work around.
The plain fabric in the center of those two spots is the patch fabric. This fabric is on the inside of the jeans, rather than the outside.
The blanket stitch around the edges both holds the original fabric to the patch and gives it a nice finished edge that won't catch and tear.
Denim is generally a fairly heavy and sturdy fabric. Which means you can use some fairly heavy and sturdy thread for your embroidery. I can't tell what was used here, but I'd probably use perle cotton. 4 to 6 strands of embroidery floss could also work.
Because the patch is on the inside of the jeans, you're probably going to be able to feel it when you wear them. This may not be a big deal for you, or it may make them unwearable, depending on if and how you respond to certain textures against your skin, and what style of undergarment you're wearing.
"Don't just throw ripped jeans away, you can repair them using these 10 cute Visible Mending techniques!!" unfortunately my friend the first point of failure for every single pair of jeans i have owned in my life has been the Crotch and Ass. Knees: fine, cuffs: fine; but 3 years in, and all that stands between the world and my astronaut-patterned taint is 0.5µm of denim worn so thin that every squat threatens to tear it to shreds like wet toilet paper. If the Tiktok craft community could figure out a way to resurrect jeans afflicted in such a way that doesn't involve adding a whole ass buttpatch like some sort of inverse assless chaps situation then that'd be great
67K notes
·
View notes
Text


I did some dyeing yesterday! I had a packet of absolutely ancient dye powder that I found at a thrift shop, which worked surprisingly well. The small bundle of embroidery thread is done with just that. The polkadotted fabric is done with liquid rit dye.
I tried to do a variegated effect with the larger skein of crochet cotton but putting a little more of it in the dye vat every 30 min or so then overdyeing it with the rit, but for some reason it didn't take the dyes very well. Still, I kinda like the sage to mint gradient. I plan to make a kippah with it.
I dyed the twill tape first with the powdered dye, and then with the rit. It turned out exactly how I had hoped. I shall be using it, and the embroidery floss, to make the closures for the harp case I've been working on.
I have no plan for the scrap of fabric, but I adore how it turned out. If I had a whole lot more of it I'd make a sundress, but this is all I've got.
Like my art? Want to see more, buy my textiles or jewelry, or commission something? Check out my ko-fi page and shop, or message me here on tumblr!
1 note
·
View note
Text
I think I’ve reached that stage as a fiber artist where crochet just kind of sprouts from me in spontaneous little bursts.


I crocheted a couple of new sweaters and I love them.

This one had no pattern. Yarn is Amber from the red heart gemstone line (discontinued, unfortunately. I’ve been hoarding this in my stash for years).
~~~~~~~
This one was a kitty blanket for a while.

It eventually became a sweater. This gorgeous pattern - ‘Lust’ by MermaidCatDesigns - took some time!

I made mine oversized and cropped because I had a certain fit in mind.

Yeah. Like that.
I love the cotton bamboo blend I used in this. It’s super crisp and has a nice weight to it. Really dried out my fingers working with it though. That definitely extended how long this one took to make.

Oh, and here’s a little (4”) granny square done up in embroidery floss. As a treat.

I love this delicate little thing, it makes me smile even though I have no idea what it is.
1 note
·
View note