#fabric selvage
Explore tagged Tumblr posts
Text

I highly recommend you remove your Selvage from your fabric before measuring and cutting your pieces. I see a lot of quilters in videos leaving their selvage on, however, the selvage is woven differently than the rest of the fabric so it will shrink at a different rate causing puckering in your quilt after it’s washed.
However, there are several ways you can use the selvage so you are not wasting the fabric. You want to cut about 1-2″ from the edge so you can see the selvage and a piece of its pretty fabric.
You can make a Scrappy Quilt or a a String Quilt using Selvages. You can also think beyond quilting and work them into sewing projects like bags, pillows and pin cushions.
Prep Well: An easy way to get your selvages sew-ready is to starch and press. Otherwise, your selvages can be pretty wavy and tricky to work with.
#crafts#gifts#decor#sewing#quilting#briar rose quilts#bedding#shopping#quilters of tumblr#fabric#selvage#fabric selvage#fabric scraps#scrappy quilt#quilt#string quilt#pillow#bags#sewing hack#sewing tip
1 note
·
View note
Text
I need some help
so. this is hard. here goes:
for the last six-ish weeks, I've had an exceptionally challenging time of things re: my haunted devil body being exceptionally haunted and full of devils, and I have missed a lot of work. a lot of work. might be losing my job soon, in fact, but I'm trying not to think about that.
I'm trying to crawl my way out of the hole, but I have nothing in the bank right now and no money coming in, literally this is a screenshot of my account from today, and it's not showing the insurance payment that put me $50 in the negative this morning.

I have no other savings, my credit card's maxed out, I don't know how I'm going to pay my upcoming rent and my cupboard's down to baking ingredients and canned vegetables, so the sitch is looking pretty gd grim for me right now.
if anyone wants to donate and can afford to be kind, I'm linking my paypal and cashapp below, but I'd prefer to be able to offer something in exchange.
I think most y'all are following me because it is known that I make quilts, but that's mostly a side effect of my true hobby: collecting fabric. (this is a joke. mostly.)
I don't know that I have the energy to commit to making quilts or other complicated goods right now, but I do have a truly massive stash and excellent color sense. I've pulled these curated fat quarter collections as examples of what I have on offer:
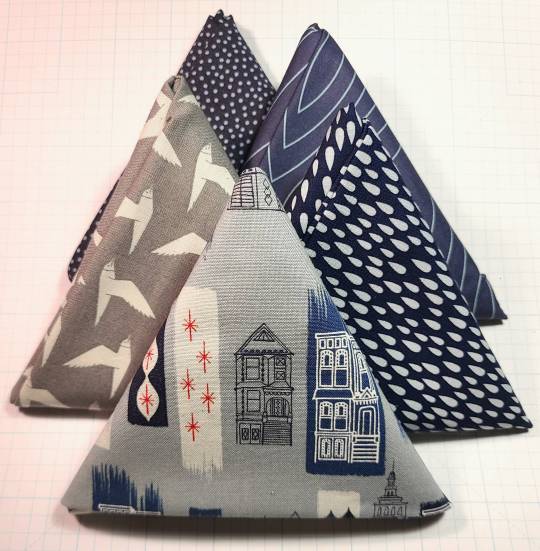
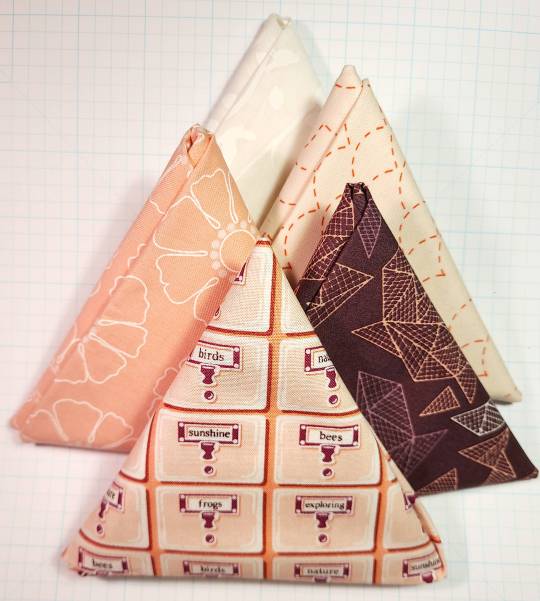
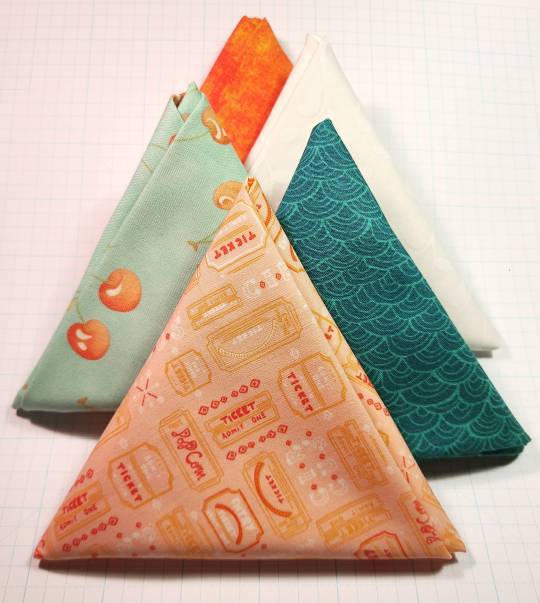
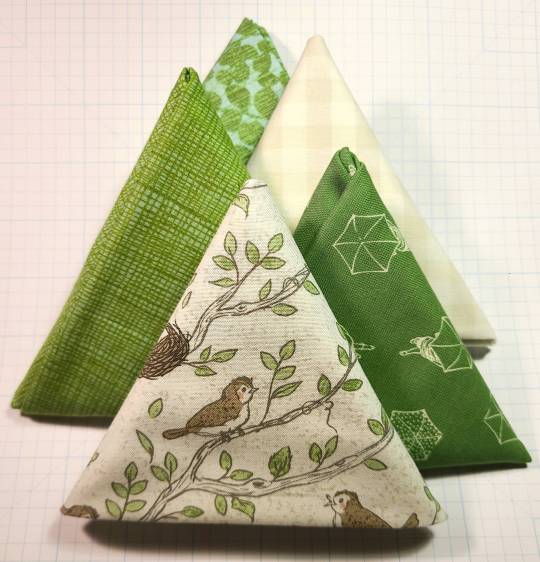
this is a very small sample of what I have in my stash; I've been collecting fabrics since 2014, so I have a massive collection of rare & out-of-print fabrics from Moda, Free Spirit, Windham, RKaufman and other brands, a portion of which I've catalogued and uploaded to gdrive here.
that's nowhere near my full collection, it's just a jumping off point of what I've got to work with. I'd put fq bundles on etsy or something similar to make it easier, but the total lack of funds has temporarily kiboshed that idea.
in the meantime, I'm selling individual fat quarters for $2.50 each and curated stash-builder sets of five like the ones above for $15. I'd also be happy to make coordinating pot holders not unlike this one at $35 for a pair.
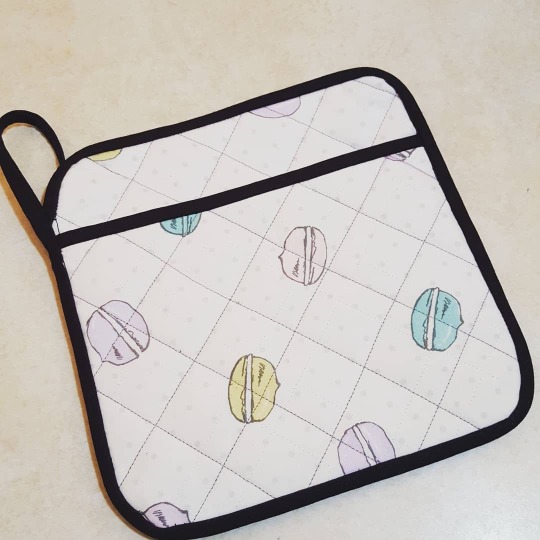
(pls don't ask me for oven mitts, I don't want to talk about one of my greatest failures)
NOTE: all fabric comes from a smoke, pet and fragrance-free environment, and will not be prewashed. I know that makes a difference to a lot of folks, not just me.
I'm also open to assembling pre-cut quilt & other craft kits, PM me to discuss what you're looking to make and I'll figure out if I can make it happen for you.
I appreciate any and all help more than I have words to communicate, and I know I'm pretty damn wordy! I'm pretty far down in the weeds at the moment, and I need to raise around $1800 in the next ten days in order to pay rent, catch up on my bills and pay for food and medication.
please help out a chronically ill artist and shop my stash!
cashapp
paypal
#help needed#signal boost#idek how to tag this#fabric destash#I guess?#I cannot overstate how much more awesome stuff I have than is listed in gdrive#that's just the fabric I had at least a yard of#(and had enough of the selvage to record the name and designer)#I also have a ton of unbranded fq's and yardage from joann's#idk how but I'll try to find a way to work some of that into the stash library#it's shockingly hard to photograph fabric tbh#quilting hell#sufferpunk life
259 notes
·
View notes
Text
this velvet appears to not have a nap and I am. so confused.
#sewing#velvet#my sewing#I'm finally finally finally getting around to actually cutting out pieces to sew from that velvet I bought back in August#first up will be the#Very Fancy Santa Hat#which has actually morphed into a hat for each me and Jack but hey I'll get a hat out of it so woooo#and after that it'll be time for the#velvet Yule dress#this is very lovely velvet. silk-rayon blend in just a gorgeous burgundy red#not a super deep pile but it drapes and moves beautifully and just looks lucious#except. the pile is the weirdest I've ever seen. some napped fabrics you can run your hand down it and it changes color#not this one. if I get my eyeline basically parallel with the fabric I can maybe see a teeny tiny bit of difference but it's subtle#I thought velvet pile always ran parallel to the selvage but this one doesn't even like to _wiggle_ parallel to the selvage#perpendicular to the selvage it wiggles back and forth but _still_ doesn't have an obvious up or down nap to it#for the hats it won't matter at all so in a minute here I'm just gonna go cut each hat piece out and just go with it#but I have spent the last hour trying to figure this out. interspersed with breaks to google and breaks to distract myself#but I don't appear to be coming up with any sudden break-throughs. it's velvet. it's silk. it has a lovely lush pile.#but somehow??? it just doesn't?? have?? a nap????#idek#I would like to figure this out before I make a floor-length princess seam gown out of the rest of the 7 yards I have on hand#but eh for the hats I suppose it really really doesn't matter
6 notes
·
View notes
Text
#I am curious about the differences in end selvage#currently I am throwing my shuttle and beating it down then switching my peddle with the beater still against my fabric before I close shed#weaving#loom#floor loom#craftblr#poll
11 notes
·
View notes
Text
I did it the liberty of london went on sale again & I got the fabric and pattern I wanted 🤭
#it was still a bit lol and i hope i got enough fabric... cause i assumed i would be a 8/10 like i am here in yhe us.#but according to my calculations w the pattern im a 14 lmao#but also the roll selvage is between the 45''/60'' that's also listed on the back of the pattern ! its like 57''#so i think i can make it work
5 notes
·
View notes
Text
0 notes
Text
Word List: Fashion History
to try to include in your poem/story (pt. 1/3)
Adinkra - a flat, cotton textile that is stamped with symbols which create the meaning of the garment; produced by the Asante peoples in Ghana
Agal - a rope made from animal hair which wraps around a keffiya (square cloth) on the head and is worn typically by Bedouin men
Akwete - a decorative cloth with complex weave designs, creating intricate geometric patterns, made with many vibrant colors; it is usually made into wrappers for women to wear and it is made by the Igbo women of Nigeria
Aniline Dyes - synthetic, chemical dyes for garments first invented in the 19th century
Anorak - a jacket that typically has a hood, but not always, which was originally worn by the indigenous peoples of the Arctic designed to keep them warm and protected from harsh weather
Back Apron (Negbe) - an oval-shaped decorative pad worn by Mangbetu women over the buttocks in Central Africa
Backstrap Loom - a lightweight, mobile loom made of wood and a strap that is wrapped around the back; it only needed to be attached to a tree or a post for stability and to provide tension
Banyan - a loose-fitted informal robe or gown typically worn by men in the late 17th to the early 19th centuries
Barbette - a piece of linen which passes under the chin and is pinned at the sides, usually worn in conjunction with additional head coverings during the Middle Ages
Bark Cloth - fabric made out of bark from trees
Beadnet Dress - a decorative sheath dress made of beads worn in ancient Egypt
Bloomers - a bifurcated garment that were worn under dresses in the 19th century; they soon became a symbol of women’s rights because early activist Amelia Bloomer wore drawers long enough to stick out from under her dress
Bogolanfini - (bogolan- meaning cloth; fini- meaning mud) a cotton cloth made from strips of woven fabric, which are decorated with symbolic patterns using the mud-resist technique, sewn together at the selvage to create a fabric that is utilized during the main four stages of a West African Bamana woman’s life: puberty, marriage, motherhood, and death
Bombast/Bombasted - the padding used to structure clothing and create fashionable silhouettes in the 16th and 17th centuries
Boubou - an African robe made of one large rectangle of fabric with an opening in the center for the neck; when worn it drapes down over the shoulders and billows at the sleeves
Buff Coat - a leather version of the doublet that was often, but not exclusively, worn by people in the military in the 17th century
Bum Roll - a roll of padding tied around the hip line to hold a woman’s skirt out from the body in the late 16th and early 17th centuries
Burqa - an outer garment worn by Muslim women that covers the entire body, often with a cutout or mesh at the eyes
Busk - a flat length stay piece that was inserted into the front of a corset to keep it stiff from the 16th century to the early 20th century
Bustle - a pad or frame worn under a skirt puffing it out behind
Cage Crinoline - a hooped cage worn under petticoats in the 19th century to stiffen and extend the skirt
Caraco - 18th century women’s jacket, fitted around the torso and flared out after the waist
Carrick Coat - an overcoat with three to five cape collars popular in the 19th century and mostly worn for riding and travel–sometimes called a Garrick or coachman’s coat
Chantilly Lace - a kind of bobbin lace popularized in 18th century France; it is identifiable by its fine ground, outlined pattern, and abundant detail, and was generally made from black silk thread
Chaperon - a turban-like headdress worn during the Middle Ages in Western Europe
Chemisette - a piece of fabric worn under bodices in the 19th century to fill in low necklines for modesty and decoration
Chiton - an ancient Greek garment created from a single piece of cloth wrapped around the body and held together by pins at the shoulders
Chlamys - a rectangular cloak fastened at the neck or shoulder that wraps around the body like a cape
Chopines - high platform shoes worn mostly in Venice in the 16th & 17th centuries
Clavus/Clavi - decorative vertical stripes that ran over the shoulder on the front and back of a Late Roman or Byzantine tunic
Clocks/Clocking - decorative and strengthening embroidery on stockings in Europe and America during the 16th-19th centuries
Cochineal Dyes - come from the Cochineal beetle that is native to the Americas and is most commonly found on prickly pear cacti; when dried and crushed, it creates its famous red pigment that is used to dye textiles
Codpiece - originally created as the join between the two hoses at the groin, the codpiece eventually became an ornate piece of male dress in the 16th century
Cuirass Bodice - a form-fitting, long-waisted, boned bodice worn in the 1870s and 1880s–almost gives the appearance of armor as the name suggests
Dagging - an extremely popular decorative edging technique created by cutting that reached its height during the Middle Ages and Renaissance
Dalmatic Tunic - a t-shaped tunic with very wide sleeves; worn by both men and women during the Byzantine empire
Dashiki - a loose-fitting pullover tunic traditionally worn in West African cultures that was adopted by African diasporic communities as a symbol of African heritage in the 1960s and then more widely worn as a popular item of “ethnic” fashion
Dentalium Cape - or dentalium dress is a garment worn by Native American women that is made from the stringing together of dentalium shells in a circular pattern around the neck and across the chest and shoulders
Doublet - an often snug-fitting jacket that is shaped and fitted to a man’s body–worn mostly in the 15th to 17th centuries
Échelle - a decorative ladder of bows descending down the stomacher of a dress; worn during the late 17th and 18th centuries; sometimes spelled eschelle
If any of these words make their way into your next poem/story, please tag me, or leave a link in the replies. I would love to read them!
More: Fashion History ⚜ Word Lists
#word list#fashion history#writeblr#dark academia#spilled ink#writers on tumblr#writing prompt#terminology#poetry#poets on tumblr#literature#light academia#studyblr#linguistics#lit#words#fashion#culture#worldbuilding#creative writing#writing reference#fiction#writing tips#writing advice#writing resources
251 notes
·
View notes
Text
Minoan Kilt
The large, structural skirt worn by Minoan women in art is instantly recognizable, and when I made my own I combined current best guesses with my own personal tastes.

My kilt shape follows the hypothesis laid out by Bernice Jones in her book Ariadne's Threads: The Construction and Significance of Clothes in the Aegean Bronze Age. She describes the shape of that of a labrys, a double-headed axe with apparent ceremonial significance in Ancient Minoan culture. This garment may be depicted in Linear-B logogram *166 + we, we-being the backwards-s-shaped squiggle in the center which identifies the piece as a garment.

See pages 336 and 341 in Marie-Louise B. Nosch, The Textile Logograms in the Linear B Tablets
Actual details on construction and materials below the cut:
Construction:
The top and bottom edges of the kilt are concave, so the sides are longer than the middle. This gives the chevron-shape seen on layered kilts in art. In addition, the curved top half makes the skirt flare out, accommodating the hips and giving more freedom of movement to the legs. My kilt measured from my waist to my anklebone at the longest point, and about 1.5 times around my waist.
I chose to make a flounced kilt, with smaller strips of fabric and trim applied to a large base piece, rather than a tiered kilt, in which multiple kilt shapes of varying length are layered one on top of the other, so you end up wrangling 3 layers of fabric around the waist. The flounced kilt saves fabric and gives you a lot more freedom with whatever trim you might want. Jones' diagram for a flounced kilt is seen below:

Unlike the version in the diagram above, I chose not to attach ties to the garment itself both because the linen I used was very heavy and I was concerned about weight, and also because folding the skirt and securing it with a separate tie worked just fine for my tastes. In total I had four flounces: 2 alternating rows each of fabric and fringe.
The vertical edges of most kilts are left plain, probably representing either the selvage or an edge otherwise finished off to prevent fraying. For my kilt, however, I ended up with a couple inches of self-fringe on either side as I adjusted the fabric to the correct width. At least three examples of kilts with fringed vertical edges are known, all three from the so-called "House of the Ladies" in Akrotiri
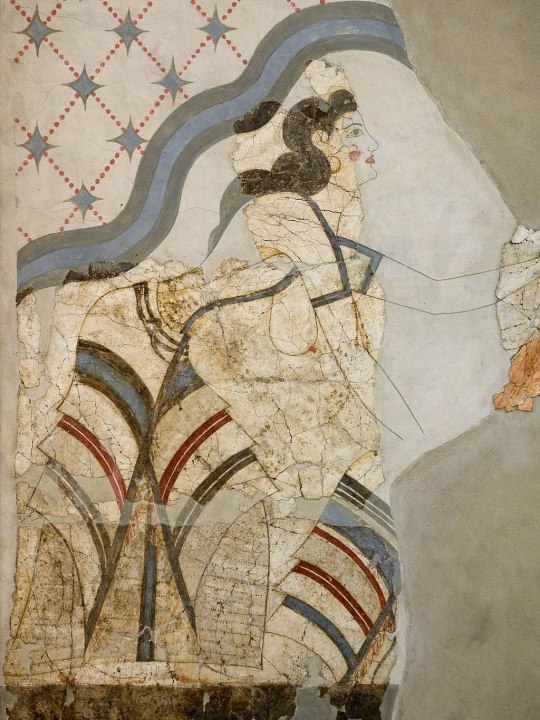
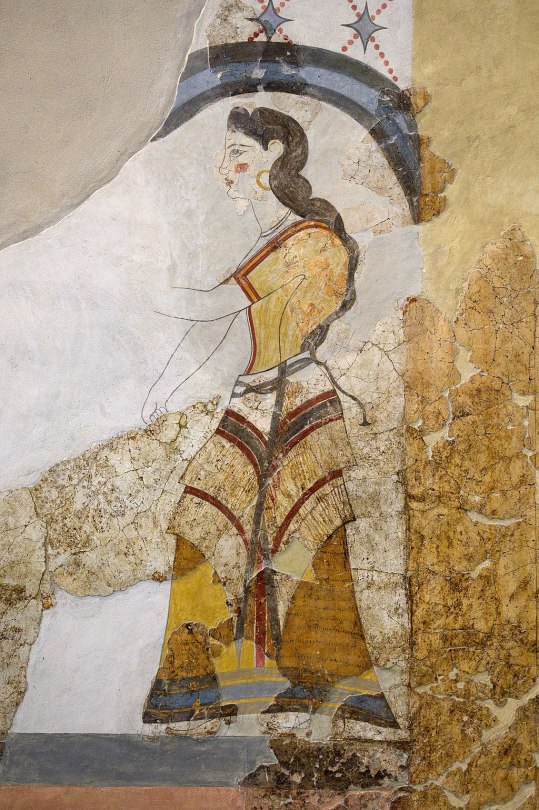
Photos from Wikimedia Commons. Image 1. Image 2.
The vertical edges of these kilts are reinforced with a colored band or tape, probably to keep the garment from unintentional further fraying. Accordingly, I did the same on my kilt. I also like that it gave a nice vertical diagonal to counterbalance the horizontal ones.
Materials
I tried to use mainly linen and wool, the fibers most available on Ancient Crete, but some of my trim was cotton because sometimes you just have to use what's cheap and available in the today times.
The base of my kilt is a heavy, patterned linen in what's called a diaper weave, meaning that a repeating diamond pattern is woven into the pattern itself. A lot of the Minoan textiles depicted in frescoes are characterized by repeating geometric patterns, likely woven into the fabric itself, and that was something I wanted to capture in my own piece. My linen is woven with both cream and natural colored threads. The heavy weight is important to give structure to the garment--otherwise it would be kind of limp. My linen was from Burnley & Trowbridge (shameless plug), as was the plain cotton twill tape I used to bind the top and bottom edges of the kilt, and the dark red wool twill tape I used along the vertical edges.
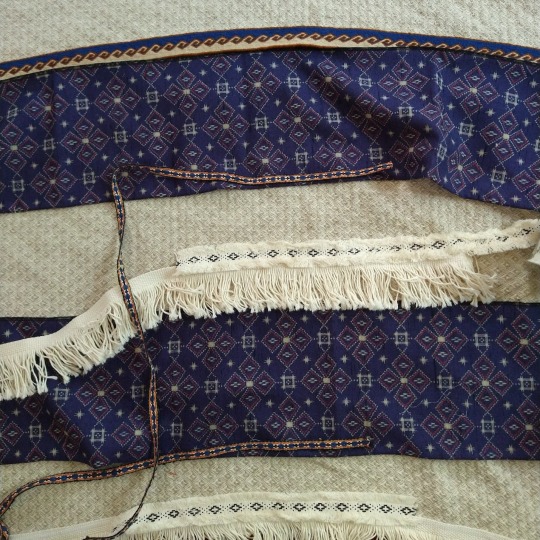
I bought my cotton fringe from a rug supply store. I had to search a while to find a fringe that would work for me, and I ultimately chose fringes with a woven header rather than the more common knotted one, so that it would lay flat against the kilt. I hid the woven header under a layer of cotton fringed trim from Michaels (yes, Michaels) with this really great diamond and dots pattern woven in black.
The blue layers are from a bolt of vintage wool Kimono fabric. Blue appears frequently in frescoes, likely achieved with indigo or woad dye, or even murex/mollusk dye. The fabric is printed with an imitation ikat pattern of diamonds and squares that made me think "the vibes seem right!" because quite frankly, you aren't going to get "historically accurate" Minoan textiles (which there probably isn't enough archaeological evidence to definitively describe) without, like, hand-weaving it yourself or paying someone hundreds of dollars to do it for you (and that price is if the weaver really likes you). Neither of which appealed to my desire to just make a fun, low stress project. Good enough is good enough.
The narrow trim on the bottom of the blue flounces is vintage cotton/poly woven trim. This trim, while narrow, was quite thick and stiff, which was great because it added more weight and structure to the end of my flounces since the wool fabric itself was quite thin.
The top layer is a custom tablet-woven wool trim that I commissioned from MAHTAVAhandicraft on Etsy. I imagined this as the "centerpiece" of my kilt, and I'd arrange everything to complement it.
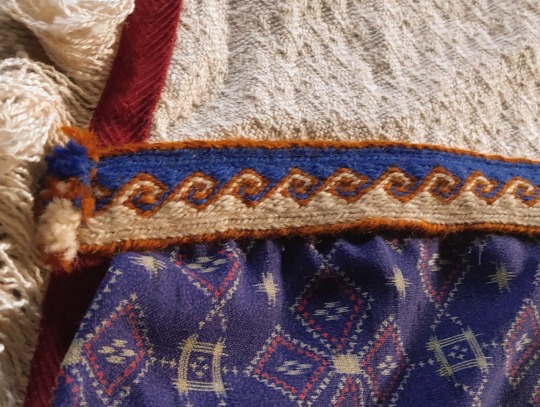
It's a kivrim pattern, which has itself only been traced to 19th-century Anatolia, but I didn't care. The way it looks like waves reminded me of how central the sea was to life in the Ancient Aegean and Mediterranean and it captured the idea and aesthetic I was pursuing. I mean, doesn't it remind you of these dolphins?
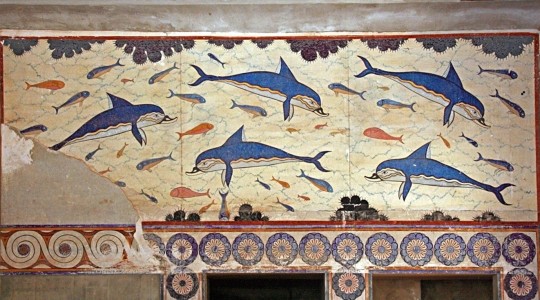
(I like the dolphins)
The whole thing was machine sewn with the exception of hemming and adding trim to the blue flounces. If you were to look at it from the back, you'd see lots of zigzag stitches, because i wanted to be fast! and have fun! not chase some unreachable ideal of "accurate."
As for wearing it, I chose to wear it with the top part folded/rolled down over a belt, so I have a thick tube of fabric around my waist. Many images, like the frescoes above of women with fringed kilts, appear to just show the kilt being tied closed. Other images are so fragmented or stylized that it's unclear what kind of skirt closure was used. Sculptures and figurines definitely show some kind of SOMETHING around the waist, whether this is folded fabric or a kind of belt is unclear. Different art could show different things!

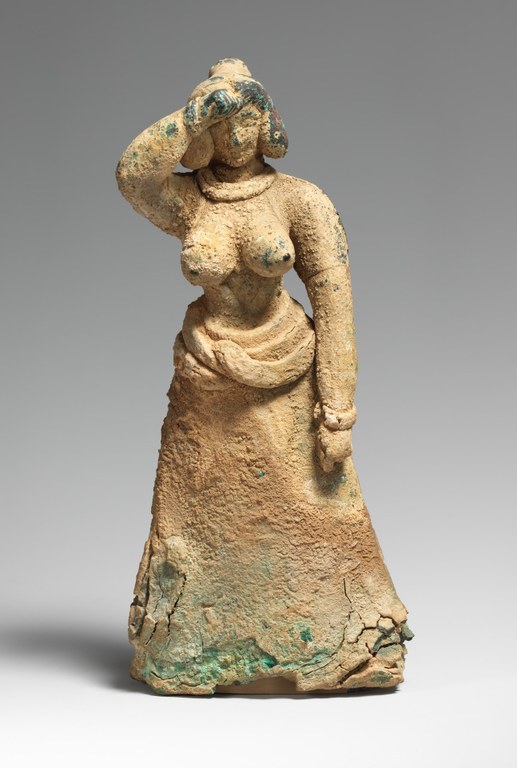
I think I see evidence of a continuous line from the skirt to the waist-roll on the figure on the left, found in Troas, which I think indicates some kind of skirt-folding situation. The woman on the right, found in Crete, looks more like she's wearing some kind of long coiled belt, or perhaps snakes. Who knows? I don't! For my own part, I found the combination of rolled waist + tie belt the most secure for doing things like kneeling, stomping around, and wading into rivers to rescue bees. I also liked that it gave me the bulk around the hips that gives Minoan figurines such a powerful silhouette, and proportionally gives more of an hourglass shape. If you wanted to do something more firmly grounded in the sources, stick just with the waist tie or belt, wrapped around a couple times and tied in back. If you want to be like me, just say "well we don't KNOW it didn't happen" and just do whatever you want. Have fun! Whatever happens, it should be fairly easy to move around in the kilt--this is not a restrictive garment, just a heavy one.
857 notes
·
View notes
Text

Robe à l'Anglaise
1780s
The Metropolitan Museum of Art
"Cotton emerged as a fashionable fabric in the 1780s with the chemise à la reine, the cotton shift favored by Marie Antoinette beginning in this turbulent decade. As always, clothing had political and international implications. One of the chief reasons the Lyon silk manufacturers railed against the reductive modern attire is that their luxurious silks were being abandoned in favor of imported cottons from India, confirmed in the costume on the right by a weaver's mark in the selvage."
59 notes
·
View notes
Text
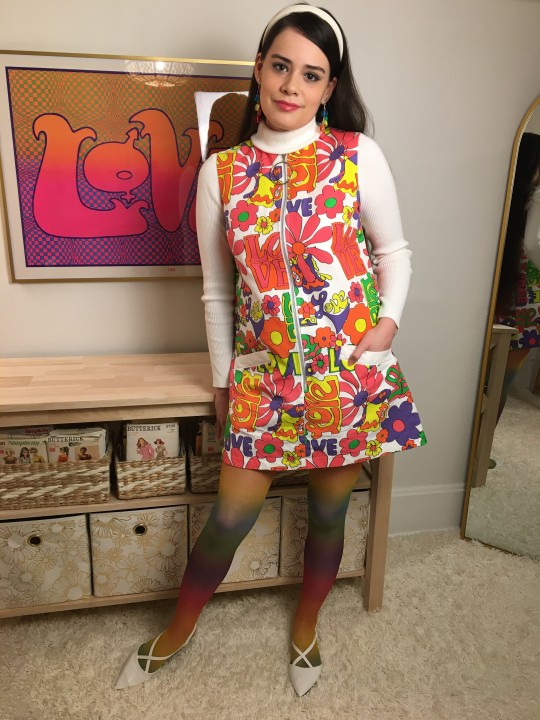
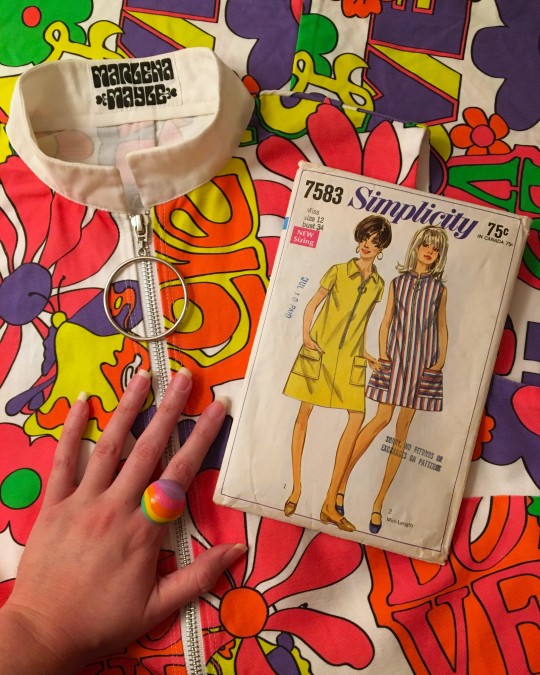
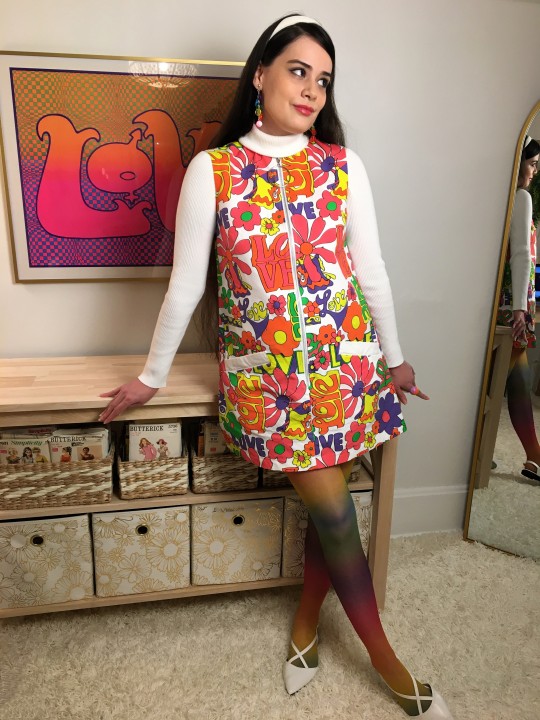
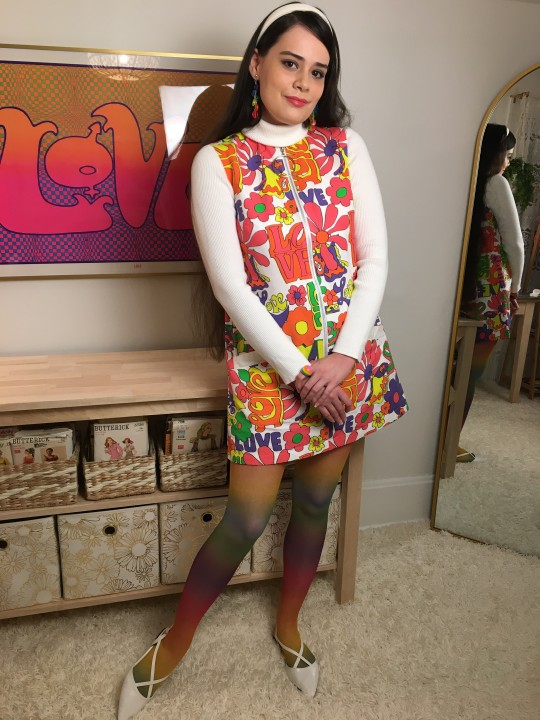
Here are a few pics I took back in February of the colorful look I wore for Valentine's. 🌈🩷 I made the dress myself using a vintage pattern and vintage-inspired print fabric from Spoonflower. 🌼
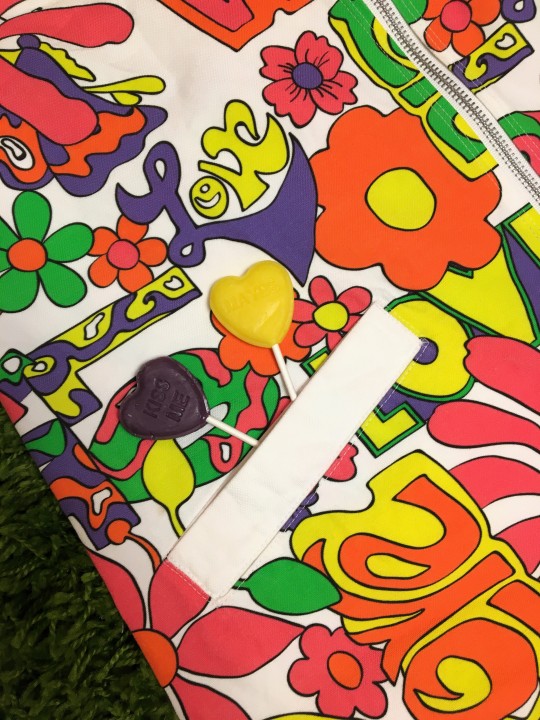
The pattern itself was a nice and straightforward sew, so if you're into casual '60s styles I definitely recommend it! It's the perfect simple a-line style for showcasing a fun graphic fabric print and with the addition of oversized pockets and a chunky metal o-ring zipper down the front you can get a pretty authentic mid-late '60s look without much effort!
My version of the dress deviates slightly from the pattern as I opted to make single welt pockets rather than large patch pockets. This design choice was mainly out of necessity as I was short on fabric yardage and didn't have enough for much else aside from the main body of the dress. Luckily I was able to utilize the generous plain white selvage edges that were provided on the fabric to create the pocket welts and contrasting stand collar.
I'm currently in the process of putting together a good old fashioned BLOG (what a throwback, right?) where I'll get more into technical detail about my sewing projects, including this one. So if that's something you're interested in watch this space for updates! I'm hoping to have it launched by the summer. 🤞😊
#completed projects#sewing#handmade wardrobe#rainbow fashion#rainbow style#vintage sewing#'60s#simplicity patterns#1968#spoonflower#60s style#my outfits#shemakesrainbows
126 notes
·
View notes
Text
Maomao's skirt
Since I have decided to torture myself and do a cosplay in just over a month, I figured I would start with the easier part - the skirt.
In my intro post, I mentioned that her skirt isn't Ming accurate being vaguely mamian-like but not really. For this I played with two main ideas, using one of my other skirt patterns that has pleats and would be mamian-like or go for the circle skirt.

The fabric I selected was around 2 1/3 yards - less than I'd like but it was the entire remaining bolt and the color was perfect - don't trust my indoor lighting here. With the limited amount of fabric I had to do a little tetris to decide what pattern pieces to use. I washed and dried the fabric before ironing it.
My first and preferred pattern was this one:
Simplicity #2710 - 1949
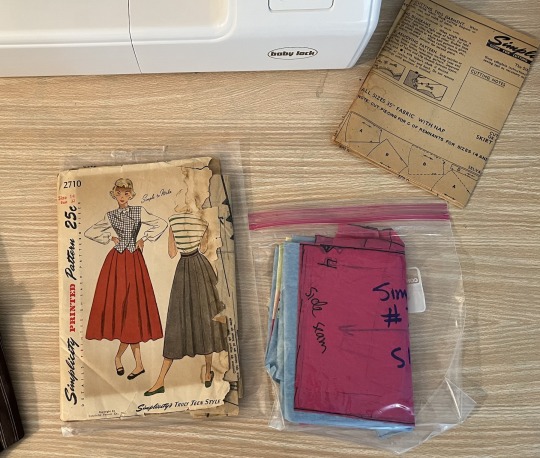
I have already made this skirt, it has thick pleats and falls nicely. I figured it might be a good selection and I'd get that extra Ming style with lazy pleating.
Circle skirt
Less complicated since all I had to do was determine my waist, put it as the circumference and make a 1/4 circle pattern with my pre-marked cutting board. The bolt was 46" from selvage to selvage meaning if I kept one strip I had more than enough for a waistband. I am currently assuming a 4" wide waistband and went with 42" for the skirt length.
Unfortunately for my original plan, the vintage Simplicity pattern was too wide with the pleating. I'd need 3 1/2 yards of fabric and my current pattern pieces were set for a length of around 36" as well to the hem.
Circle it is!
Made my pattern pieces, two so that I could see how to fit them. The fabric has a decent thickness and I didn't want to fold it over and cut, opting to instead chalk out each piece individually on the fabric.
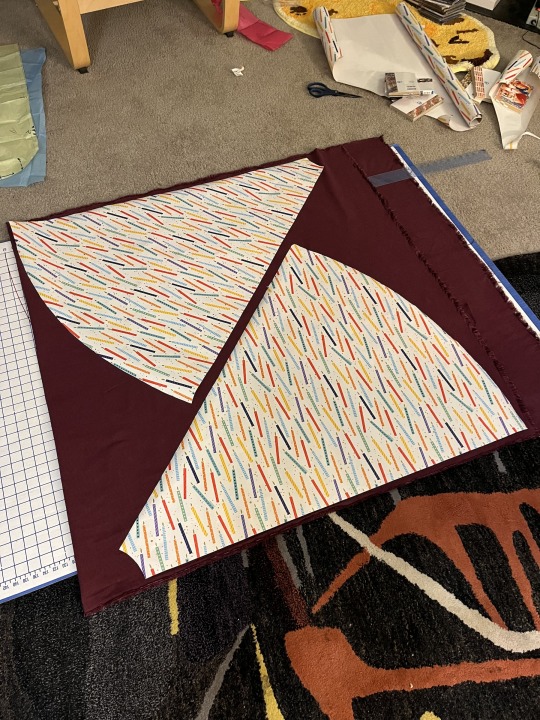
And yes, that is wrapping paper as usual with the square grids on the backside. I love this type of wrapping paper so handy! I cut out my fabric and took it to the sewing machine.

Next, I went ahead and did a zigzag stitch along all the edges except for the selvage. This fabric was showing how it would fray immediately. I washed it in the machine and this is what the edges looked like after drying.
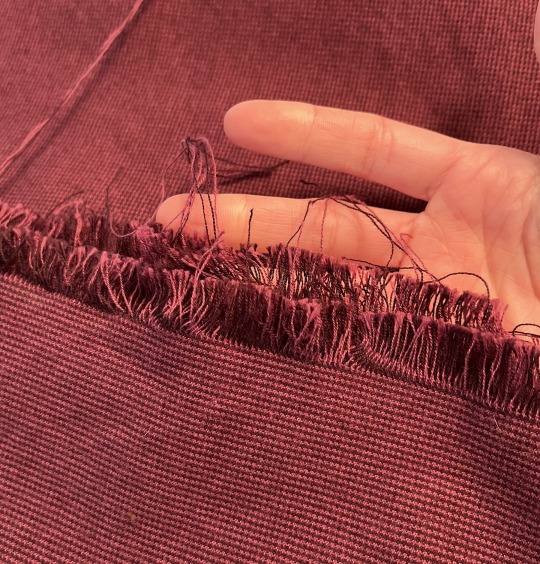
Somehow, I messed up on the waist portion of the skirt panels and I had to take them down by 2". Not sure how I messed that up since I had the radius calculated. I tested this by holding them up to my body and realizing it was off.
Recall, that I have a very limited amount of this fabric, fearing something odd, I went ahead and sewed the front pieces together selvage to selvage and then the back ones. When I held them up to my waist they were still slightly off. I put in the right side seam and made sure all my seams were pressed. Something about my top of the panel pattern is off by a smidge and I need to put in about 3" of a spacer. I decided to put it down for the day and I'll figure out how to put that piece in, since the hips are okay?
It will also allow for me to decide if I want to be lazy and put in a side zipper. I'll go back and put a pocket in the right seam for sure. The next day - I went ahead and made a triangle to wedge into the gap area before putting in the zipper. I held the skirt up to my waist and measured it with my measuring tape. I zigzag stitched it and put it in the spot.
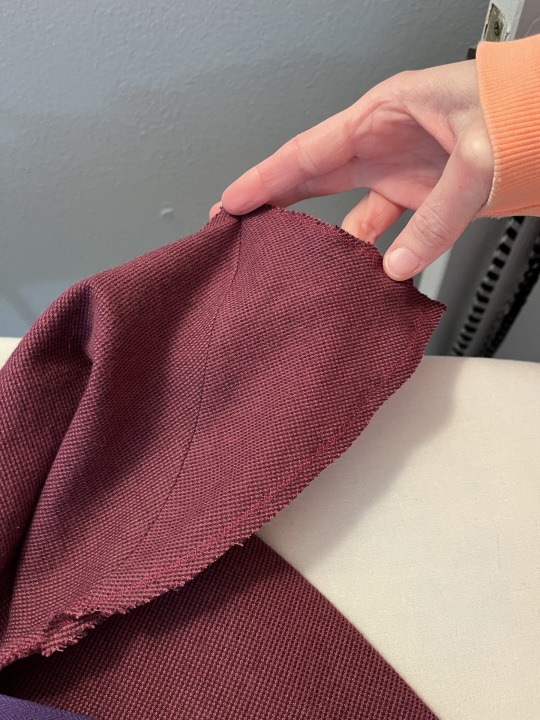
I also pressed the seam well. Then I decided to put in an invisible zipper in the spot for a side zip. I had to unpick the seam a bit to fit the zipper in further and get it up around my hips. Whoops.

Due to adding in the wedge the zipper is at a bit of an angle as shown here. I estimated the zipper coming up higher on the waistband so, I but in a hook and eye on the top to pull it together.
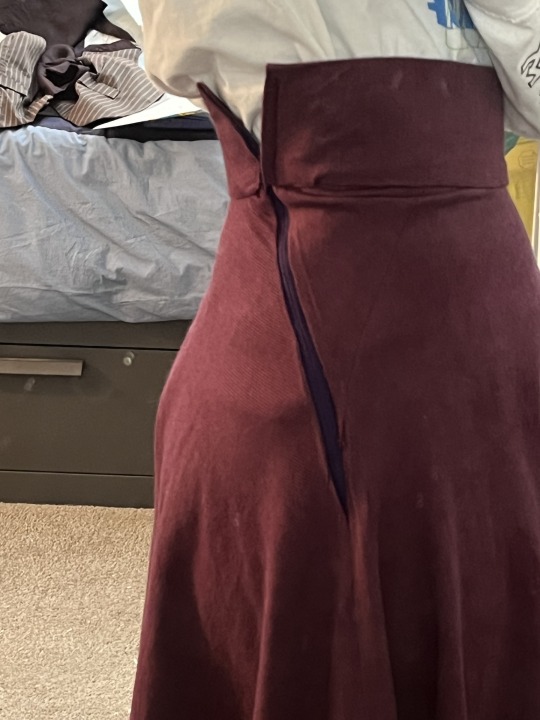
It turned out fine, I'm so limited by the fabric I have to work with. I still have enough to put in pockets on the right side. However, with the skirt cranked out in less than 24 hours, I have it now hanging to even out the hem. It hangs the right way so I'll take it.

Always remember to let your garment hang before hemming. I'm likely going to put some bias tape on the bottom, since this fabric is very prone to fray and then fold that up as opposed to a double folded hem. It is in place and will hang out in the closet for a day or two!
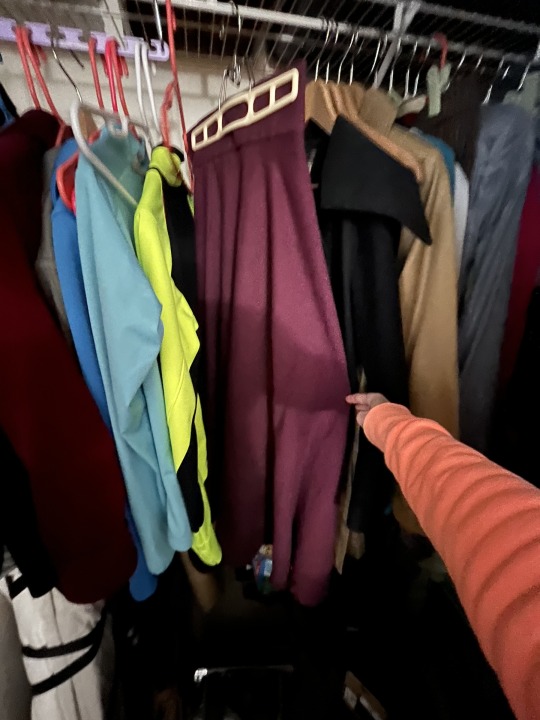
That's all for now! I'll start working on the aoqun this week as a modified pattern from my previous ones.
104 notes
·
View notes
Text
I made some zero-waste low-waste lounge pants!


Do you have almost three yards of fabric that you like, but it doesn't match anything you wear? Sounds like it's time for ✨comfy lounge pants!✨
I started by very scientifically measuring the fabric versus my leg. I only had 90" overall, so only 45" for each leg. A little short, but oh well.

In fabric terms: I laid the fabric out flat, but still folded in half hotdog-style. Then I cut it in half exactly in the middle. That gave me two pieces to be the two legs of the pants. Each pant leg has only one seam, and the selvage is the inseam. (Hopefully this makes any sort of sense.)
Then I laid out the crotch curve of some pants that I like and just hacked through all 4 layers at once.

First I put the selvages together and sewed a straight seam for the inseam of each leg. Then I staystitched the U of the crotch, then covered that with leftover red double-fold bias tape. Voila, pants shape!


Pockets were next! I used the size of my phone as my guide, then trimmed down two of the offcuts to make pockets, which I pinned to the front of the pants.


I like drawstring waistbands, but on a non-stretch fabric, you gotta be able to get them over your hips. I cut the waistband to my hip measurement (52"), then double-layered the center and fought with my machine to get two serviceable openings.

Then, using two loops of hem facing that I can pull over my feet, I pulled the ankles down into bands. I'll wash them and wear them a few times before I decide whether elastic would be sensory better or worse!

Overall, I like the concept! I wish they were longer already. Also, this is quilting cotton, so I knew from the start that they would slump rather than billowing dramatically. But hey, I finally used a very pretty piece of fabric that I've meant to use for a while! And IT HAS POCKETS!!!
#solarpunk#sewing#diy#cj sews#beginner sewing#it's not waste until you waste it#use it up wear it out make it do or do without
23 notes
·
View notes
Text
The Collector's Hat Sewing Pattern and Tutorial
Image of the pattern I made with measurements:

As a little heads up to people with big/small heads and/or more voluminous hair, this was based on measuring my own head which has a circumference of 22 inches which is dead on the average and my hair is completely straight and relatively flat. You may need to do some adjustments of these measurements because the final fit is very fitted, in that it can be easily put on and taken off but does not fall off on it's own under typical circumstances.*
This pattern is meant for knit or other stretch fabrics, I did not make a completed version with woven or stiffer fabrics, so quality may vary depending on the material you select. I recommend knits.

If you are new to sewing or this is one of your first projects you are doing without a physical pattern, I recommend following the given measurements and drawing it out on some type of paper first and then using that as reference for yourself. I am an outlier when it comes to not making patterns and drawing the shape of what I want out onto the fabric directly, and you shouldn't follow my horrible example. This hat is actually the first time I've even made a muslin prototype.
When you are going to cut out the pieces you need to make sure, like double and triple check, that if you were to lay them pattern/top side up, that they would mirror each other like in the above picture. If you don't then you'll have two lefts or two rights.
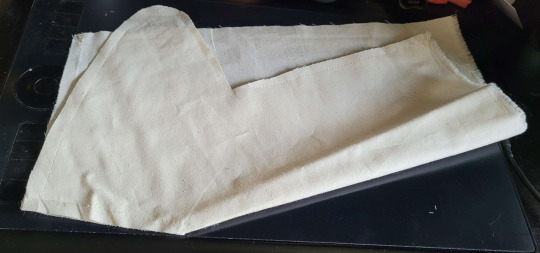
The first actual step for sewing is taking the straight lines from the V shaped notch in the top of the hat, and lining them up by folding the piece in half so the patterned/top of the fabric is on the inside of the fold, like in the picture above. You do this on one half at a time. When they are lined up sew them with a straight line stitch a 1/4 inch (1/2 cm) in from the cut, starting at the fold towards the top of the hat.
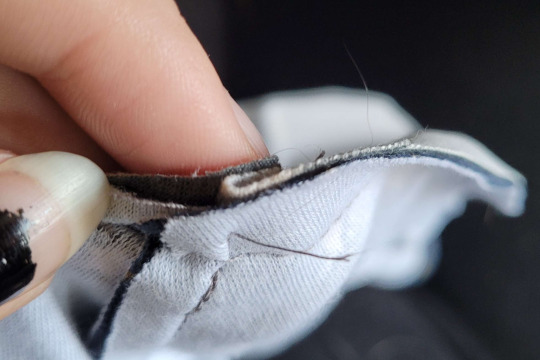
After that you want to lay them pattern to pattern, and pin them into place to make sure it's aligned properly on both sides. To reduce bulk I recommend making the excess fabric from the darts (the V cut-out) point in opposite directions, as shown in the above picture.
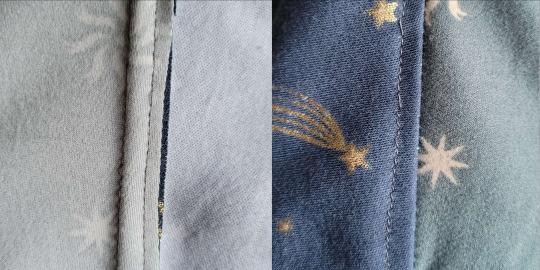
After you've sewn the sides together there is an optional step that I did to make sure the seam lies flat on the top of your head. I opted to sew both sides down onto the blue half of my hat because my machine was being picky and skipping stitches on they grey fabric if there was no blue fabric as well (I got around this on the hem by inserting thin pieces from the blue's selvage into the seam). But if your machine isn't being picky or you are hand sewing this, then you could split the excess and sew them down onto their corresponding half. Example above, as usual.
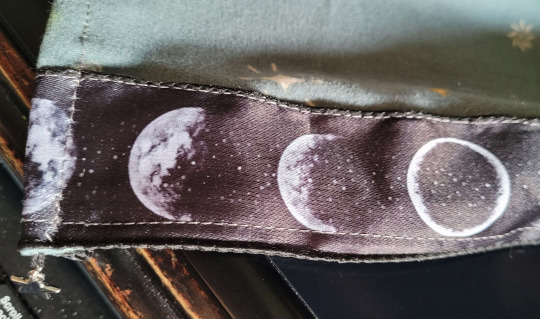
Optional step that MUST go here. If you are attaching a ribbon, or lace for a trim to edge you have to do it now. I do not recommend this step to beginners. I recommend sewing it down while rolling the edge to create the hem, and then securing the other side of the ribbon/lace further into the piece because this guarantees a better placement and straighter lines. If you are doing this step along solely the bottom or front edges then let the lace/ribbon stick out further than the edge of the fabric, so you can fold it under the hem.
The final required step is to hem it, just fold what remains of the raw edge and sew it down.

Final optional step is for adding little trinkets. I added trinkets to the front corners and the floppy bit in the back like the Archivists are depicted as having. I used embroidery thread and slid the needle to go between the seams and tied it off on the inside. If your trinkets are not detachable, like the little stars on my hat, you need to thread the needle through the ring before putting it back into the hat and tying off the thread. Thinner cord or thin ribbon could work as well.
*I actually just did some tests and I have to be tilted further back than lying flat on my back for it to fall off. I was able to bend over and look through my knees and it didn't fall off. I tested it's wind resistance against my two strongest fans and neither could knock it off my head even when I shook it. So I think it will stay in place just shy of someone pointing a leaf blower at you.
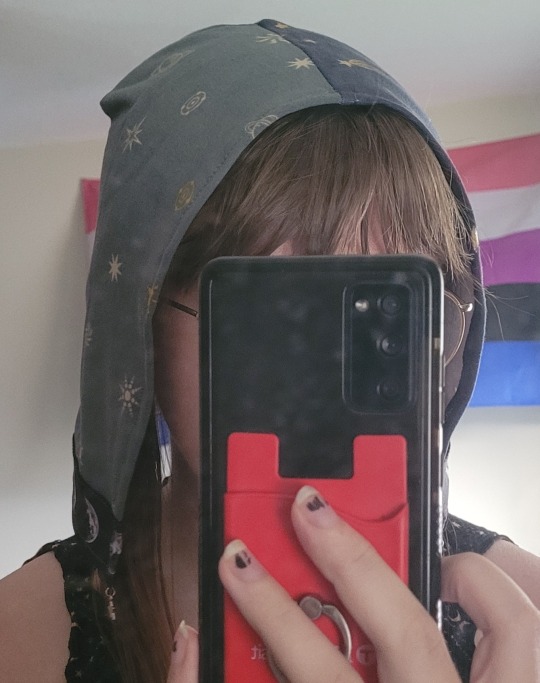
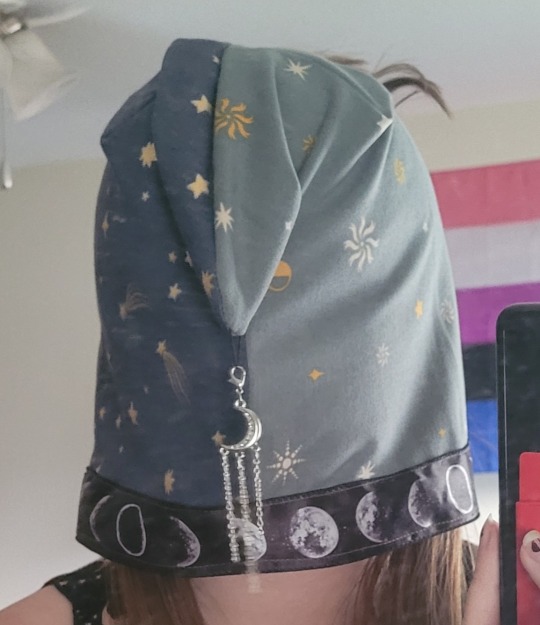
Enjoy these pictures of the finished product, including a glamor shot of me wearing it backwards while I fumble with my phone for a picture.
#the owl house#toh#owl house#the collector#the collecter toh#toh the collector#toh the archivists#the archivists#the archivists toh#cosplay#sewing#sewing tutorial
196 notes
·
View notes
Text

Earflaps still curling after washing. For my daughter's hat I'm going to go up a needle size from 8mm to 9mm, so I'm hoping the fabric will be more relaxed. And her braids will be longer, which will provide more weight. Will that be enough to defeat the curl?
The selvages are just stockinette. I used yarnovers in the first increase row to provide holes for the braids. After that I did lifted increases on the purl side because that was prettiest in my swatches.
Pattern is a heavily modified Hecla, by Brenda York. Yarn is Bernat Forever Fleece (100% polyester roving style) in Coal, Patchouli, and Rose Hip.
I am super happy with this hat! (I don't actually mind looking like Fifi Brindacier.) It's just that I don't want the earflaps on my daughter's hat to curl up, and polyester can't be blocked... can it?
#my knitting#knitting#knitblr#earflap hat#hecla#Forever Fleece#gpoy#look i remembered to smile for the camera!
9 notes
·
View notes
Text
I was actually resisting the urge to shove my fingers in and fix the edges that way on impulse because they bother me a great deal >.<
Since the fabric will lose those little gaps between threads once removed from the loom (they say hopefully), I am uncertain as to how accurate measuring the stretched fabric can be for knowing the finished length.
Otherwise, I'd treat this like a gauge in crochet and measure how much length a repeat creates and math out how many repeats I need to get to my final number.
Is this an option or does the spacing really fuddle it?
Before I start actually weaving, any last words of advice?
#learning to weave#weaving advice#measuring your fabric#selvage#weaving#loom#craftblr#kettricken#@blatantescapism
130 notes
·
View notes
Text
Cloaksforall Sewalong Step 2 - sewing down the opening seams
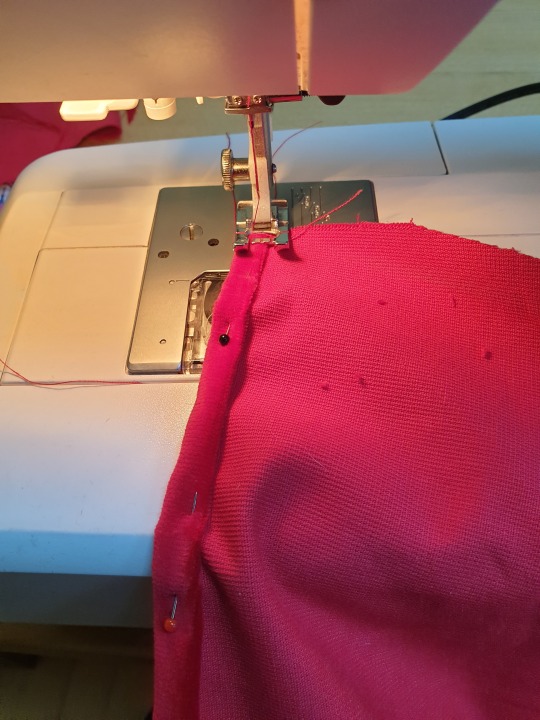

I just spent two hours making an in depth explanation on how to thread a sewing machine, so today's step is going to be quite small. The opening of our cloak is either selvage (the fuzzy ends of the fabric) or raw edge, so must be finished.
Looking at the ugly side of your fabric (this is called the wrong side) fold the straight edges (once if your selvage is neat, twice if it's not), pin down and sew.
How do I sew though?
Go here for help on how to thread your machine.
Then locate the buttons on your machine. On a modern machine (post 1960s or so) you'll have:

A dial for stitch type (on machines with more than two stitches)
A dial or lever for stitch length (how fast the feed dogs move)
A dial or lever for stitch width (how much the needle moves left to right)
A dial for tension (don't worry about it)
A button or handle for going backwards
What to do with all these levers?
Stitch type dial should be set to straight stitch (generally the first option)
Stitch lenght should be between 2 and 3
Tension is ordinarily on 3 or 4
Stitch width on 3, the neutral zone that sets your needle in the middle
You start sewing a cm or two away from the edge. Then you go backwards to catch the start of the seam as well. This prevents unravelling (and makes it harder for your machine to eat your fabric). Some machines have ruler guides you can align your seam allowance with to make sure you sew even straight lines.
At the end of the seam, go back and forth again to finish the seam.
#if you have a digital machine i'm lost as well#used one for a few lessons but i was not a fan#cloaksforall sewalong#cloaksforall step 2#i hope i'm making this clear for beginners#and not just overwhelming#cloaksforall#a talia original#image id in alt
22 notes
·
View notes