#bokeh stencil
Text
Kat's Favorite Stencils
Kat’s Favorite Stencils

View On WordPress
#bokeh stencil#cloud stencils#favorite stencils#grass edge stencil#hill stencil#kat&039;s favorite stencils#lawn fawn stencil#layered stencils#my favorite things stencils#newtons nook stencil#scene building stencils#stencils
0 notes
Photo
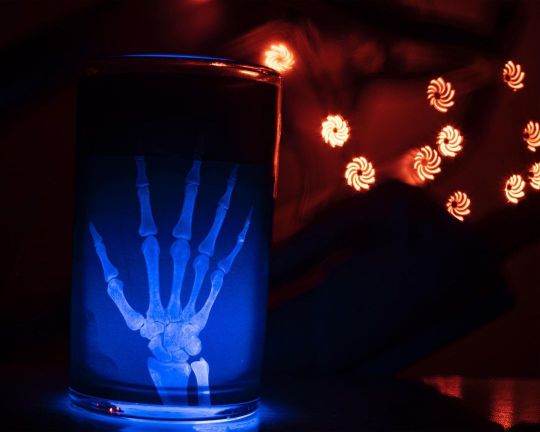
X-ray hand candle and bokeh stencil lights Candle and fairy lights from #michaelsstores Bokeh stencil kit from Amazon (Ukrainian manufacturer/seller). Lens is a Contax-Yashica f/2.0 50 mm. #halloween2021 #fairylightsphotography #bokehstencil #ledlights #lowlightphotography #sonya7iii #peakdesigntripod #spooky #creepy https://www.instagram.com/p/CVMWPJ8jfhM/?utm_medium=tumblr
#michaelsstores#halloween2021#fairylightsphotography#bokehstencil#ledlights#lowlightphotography#sonya7iii#peakdesigntripod#spooky#creepy
1 note
·
View note
Photo

TARJETA ALICIA EN EL PAÍS DE LAS MARAVILLAS Como todos los días 20 de cada mes, Instagram se llena de distintas versiones del reto #tuversionconnatiller organizado por @natiller2.0. Este mes la propuesta es hacer una tarjeta temática “Alicia en el País de las Maravillas”. Los sellos de estos personajes de la novela son de @veralanestudios y están coloreados con los rotuladores Spectrum Noir. El fondo bokeh, inspirado en @ginakdesigns, está realizado con tintas Distress, un stencil de círculos y un poco de agua. Como sentimiento, el escogido ha sido “Alicia en el País de las Maravillas”. Espero que os guste. Besitos ;-) #tarjeta #card #carte #cardmaking #tarjeteria #carterie #cardmakingfun #tarjetasbonitas #cardmakingsuperpower #cardmakers #cardmakersofinstagram #cardmakingideas #cardmakinghobby #tarjetahechaamano #handmadecard #soytarjetera #crafts #papercraft #crafting #DIYcrafts #spectrumnoir #alcoholmarkers #digis #digistamp #retosscrap #retomensual #distressink #inkblending https://www.instagram.com/rocigor78/p/CY8S5FIoy17/?utm_medium=tumblr
#tuversionconnatiller#tarjeta#card#carte#cardmaking#tarjeteria#carterie#cardmakingfun#tarjetasbonitas#cardmakingsuperpower#cardmakers#cardmakersofinstagram#cardmakingideas#cardmakinghobby#tarjetahechaamano#handmadecard#soytarjetera#crafts#papercraft#crafting#diycrafts#spectrumnoir#alcoholmarkers#digis#digistamp#retosscrap#retomensual#distressink#inkblending
0 notes
Photo


Abstract challenge 6 - lights
Our sixth abstract challenge is “lights”. We thought that’s the perfect theme for this time of the year. And gives much space for creativity and spontaneity. Amy and I will show you two different techniques today. Mine is “heart-shaped bokeh”.
What you need:
A paperboard, pencil, scissors, rubber band and lights
Preparation:
To make the stencil, put your lens on the paperboard and draw a circle around it to get the right diameter of the lens. The next step is to draw three “arms” (photo 2) outside of the circle and a heart on the inside. Then cut around your lines and your stencil is ready. You can simply apply it to your lens with the rubber band (photo 3). It doesn’t look very professional but it works great.
Shooting:
Shooting is easy here. The wider you open the aperture (smaller aperture number) the more shallow the depth of field and therefore the more apparent the bokeh. And of course, you need lights. Using lots of small light sources (like the lights on a Christmas tree), thrown out of focus will give you interesting heart shaped patterns. Don’t forget if you change your camera from vertical to horizontal orientation or otherwise to also turn the stencil.
Editing:
No special editing tips here, just have fun.
I made this stencil for a wedding shoot I had a few months ago. Of course you can give your stencil every form you want, like a star or a Christmas tree or whatever comes to your mind.
I hope this was helpful. Now it is YOUR turn to try this and having fun playing around with this technique. Don’t forget, that is only how I did it and not how it has to be done.
Please use the tag #abstract challenge in your first five tags and add @amymontico and me that we can find them.
292 notes
·
View notes
Video

flickr
Cross Bokeh por Myranda Kali
Por Flickr:
Etsy / Facebook / Twitter I made my own bokeh cover thingies with paper from an old magazine. It's destroyed now but I think in the future I'll make one out of vellum or stencil plastic to make them last!
#cross#window#house#apartment#across#bokeh#dark#shady#wall#outside#inside#Jesus#Christian#handmade#light#shape#vintage#roof
14 notes
·
View notes
Link
best tools for Photoshop
Hi guys and welcome to part 1 of this two part tutorial! You guys said you wanted some longer and more in-depth tutorials, so here I am delivering- let me know ...
youtube
Hi guys and welcome to part 1 of this two part tutorial! You guys said you wanted some longer and more in-depth tutorials, so here I am delivering- let me know what you think and if you want more! Today we'll be focusing on the background of this piece- and it's in the blurry "Bokeh" style. This tutorial is completed with Polychromos colored pencils but the basics I explain here can be applied to other mediums too. ___ Frequently Asked Questions: https://clau..___ Part 2- bird/feather tutorial: https://yout..___ Materials: *Dark Green Pastelmat UK: https://amzn..US: https://amzn.. *White and Brown Prismacolor Col-Erase UK: https://amzn..US: https://amzn.. *Polychromos coloured pencils (120) UK: https://amzn..US: https://amzn.. *Derwent Artists Black and White set UK: https://amzn..US: https://amzn.. Helix Circle Stencil -Paper Blending Stump *By purchasing through these amazon affiliate links, I earn a percentage of the sale at no extra cost to you! If you want to support my future videos, this is an excellent way to give back. Thanks for your support! ___ Reference: https://pixa..___ Music: The Engagement- Silent Partner ___ Find me on Facebook, Instagram, Twitter and RedBubble!
best tools for Photoshop
#art-time-lapse#art-timelapse#art-tutorial#claudia-sketches#claudiasketches#color-pencil#colour-pencil#drawing#realistic-backgrounds
0 notes
Text
SSS Wednesday Challenge—Happy Birthday


Paperkutzs-Jennifer Bates

For SSS Wednesday Challenge—Happy Birthday
Product List,
All paper(except white) is from my Stampin’ Up paper stash, (Stampin’ Up)
Neenah Solar White 110lb Paper, (SSS), (EH), (AMAZON)
Momento Tuxedo Black Ink Pad, (SSS), (Scrapbook.com)
SSS Bokeh Layering Stencil, (SSS)Therm o Web Glitter Gel, (SSS). (Scrapbook.com), (EH)
SSS Happy Birthday Die, (SSS)
MFT Stitched…
View On WordPress
0 notes
Text
Photoshop Tutorial for Novice Users: How to Quickly Transform a Photo into a Soft, Romantic Image
New Post has been published on https://hititem.kr/photoshop-tutorial-for-novice-users-how-to-quickly-transform-a-photo-into-a-soft-romantic-image/
Photoshop Tutorial for Novice Users: How to Quickly Transform a Photo into a Soft, Romantic Image

Hello. That is Marty from Blue Lightning tv. For these of you who are first learning Photoshop, i’m going to show you speedily and simply add a dreamy effect to your photograph, add bokeh lights and then rapidly substitute the snapshot with yet another while not having to redo the results. Open a snapshot you want to transform. I downloaded this one from Shutterstock. Step one is to crop it, so it can be framed well for your report. Open your Crop software. On account that i need my report to be square, i’m going to make the Width and the height the equal. I’ll make the resolution 150 pixels per inch, however you can make it any amount you like. Just comprehend that the the greater the quantity, the better your file size might be. Drag the perimeters of the Crop instrument’s bounding field to frame your discipline. Then, click the examine-mark at the top to take delivery of it. To suit it again onto your canvas, press Ctrl or Cmd + zero.Next, we will convert our photo into a shrewd Object, that allows you to adjust it non-destructively, as well as permit us to exchange our photograph with an additional with no need to redo the effects. To do that, click on the icon at the upper, correct of the Layers panel and click "Convert to smart Object". Make a duplicate of the layer through urgent Ctrl or Cmd + J. Click the eyeball icon next to the copy to hide the layer and click on the thumbnail of the backside layer to make that layer lively. Go to Filter, Blur and Radial Blur. Make the amount one hundred, the Blur process: "Zoom" and the excellent: "first-rate".Drag the crosshairs within the Preview window to a region that approximates the middle of your area’s face to your report. In this case, on account that my subject’s face is in the middle of the file, i will keep the crosshairs in the core of the Preview window. We will increase the blur result through pressing Ctrl or Cmd + F, which opens the final filter we used. Then, click good enough. Make the top layer obvious seen and active. Alt-click or option-click on the Layer masks icon to make a black layer masks subsequent to the active layer.Suppose of Layer masks as stencils. Black masks out or hides the layer subsequent to it, at the same time white inside the layer mask will divulge the layer subsequent to it. Open your Brush tool and Brush Picker. I will make the size seven hundred pixels, however, you can also wish to alter this amount depending to your report’s measurement and resolution. Make the Hardness: 0%. Then, press Enter or Return. Make the Opacity seventy five% and the float one hundred%. Press the F5 key at the high of your keyboard to open your Brush panel and make sure the only field checked is "Smoothing". Then, press F5 once more to close the panel. Situation your cursor in the middle of the face and left-click on. To exchange your area, double-click on on either of the wise Objects to open its source photograph. If you are engaged on variant CC or later, go to File and position Embedded. If you are utilising an earlier variation of Photoshop, i’m going to show you what to do in a minute. Locate and click on on a brand new photograph and click , "position". Drag it, so your new area’s face is headquartered over the face of your original snapshot.To magnify it, go to the turn out to be’s "Reference factor" on the middle and drag it over the middle of your new area’s face. Go to a nook and whilst you see a diagonal, double-arrow, press and hold Alt or alternative + Shift as you drag it out or in. Then, press Enter or Return. If you are working on a variation prior than CC, open your new snapshot and press "v" to open your move device. Drag the photograph onto the tab of your wise Object’s source picture. Without releasing your mouse or pen, drag it down on the source picture and release. Drag the face to the center. Open your turn into device by using urgent Ctrl or Cmd + T after which use the same steps as earlier than to size and position it. Close the tab of the supply image and while you see this message, click "sure" to avoid wasting the alterations. Routinely, the wise Object updated itself along with your new picture. Ultimately, we’ll add bokeh lights to enhance the soft, dreamy outcome.To facilitate this influence, I provided this picture so that you can down load. Its link is placed in my video’s description or venture documents. Open it in Photoshop, be certain your transfer tool is selected and drag it onto the tab of your portrait. Without releasing your mouse or pen, drag it down and liberate. Open your grow to be tool to re-size it. Then, press Enter or Return. Change its combo Mode to reveal. To reposition the bokeh lights, just drag it together with your move tool. This is Marty from Blue Lightning tv. Thanks for gazing! .
0 notes
Photo

Made with cardboard bokeh stencil.
0 notes
Photo

spooky candle holder & bokeh stencil #bokehstencil #haloween2021 #sonya7iii #contaxyashica #primelens #lowlightphotography #niksoftwarecolorefex https://www.instagram.com/p/CVt1V6BjMJ6/?utm_medium=tumblr
#bokehstencil#haloween2021#sonya7iii#contaxyashica#primelens#lowlightphotography#niksoftwarecolorefex
0 notes
Text
#74 “Glitter Dots” Happy Birthday Handmade Card


For SSS Wednesday Challenge—Happy Birthday
Product List,
All paper(except white) is from my Stampin’ Up paper stash, (Stampin’ Up)
Neenah Solar White 110lb Paper, (SSS), (EH), (AMAZON)
Momento Tuxedo Black Ink Pad, (SSS), (Scrapbook.com)
SSS Bokeh Layering Stencil, (SSS)Therm o Web Glitter Gel, (SSS). (Scrapbook.com), (EH)
SSS Happy Birthday Die, (SSS)
MFT Stitched Rectangle Stax, (SSS), (EH)
R…
View On WordPress
0 notes
Last Seen Blogs

mxmoth
unsettling yet aesthetically pleasing

the-good-stuff2
Untitled

comprimidas
Projeto Comprimidas

sushi-rollss
free space

georgescout
GeorgeScout