#anti static wristband
Text
so you're taking care of your computer's software health. NICE! but what about its physical health?
because yes, computers do need the occasional real-world checkup to make sure that they're running well. but what exactly does that entail? i see many posts about maintaining software health: limit your browser tabs, ensure your antiviruses are working properly, so on and so forth, but checking the physical components is something i sparsely see discussed here.
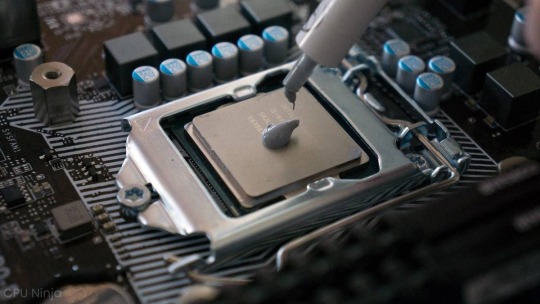
so what's the deal with physical maintenance? well, have you ever had your computer hack and wheeze trying to keep up even if your OS and all your drivers are up to date and functioning? if you've never opened up your computer before, you may be shocked to find just how FILTHY it can get in there:
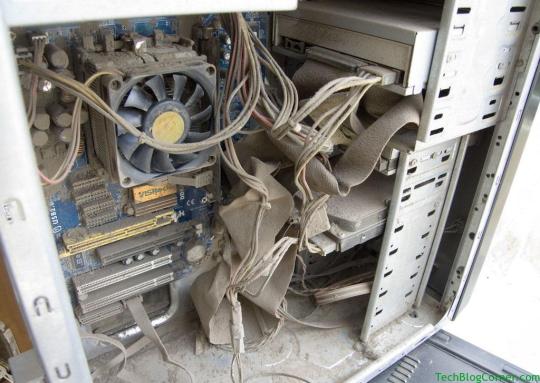
take a closer look at that snout dust! PTOOEY .. BLECKH
computers are much more likely to accumulate internal dust if they're sitting on the floor, and especially if they're near any vents and/or if you have pets.
ok, you've figured out how to open your device and now you're staring at the second coming of the dust bowl in your gaming rig. what now? let's explore some basic cleaning tips, deep cleaning pointers for your CPU/GPU, and tips to help keep maintain your computer's physical health in the future.
first of all, turn off your computer and unplug it (for my computer, i turn it off, turn off the PSU switch, unplug it, and then press the power button for about 30 seconds to drain the capacitors and minimize static risk)
generally, you're gonna want to have THESE items:
some sort of face mask (dust masks are best, but anything that'll help keep the harmful dust out of your lungs will generally work)
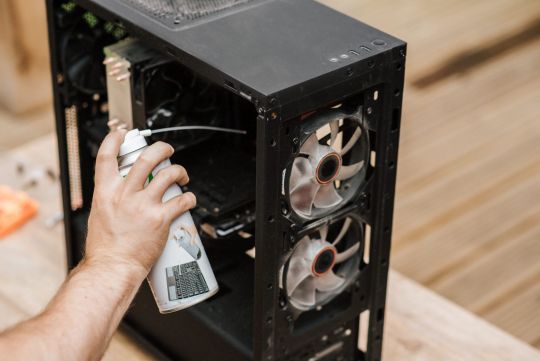
a can of compressed air (or an electric duster if you're ~fancy~. they look and function like turbo blowdryers)
a vacuum will be useful if there's a LOT of dust, best to use in combination with an anti-static cleaning kit
if you ARE gonna use a vacuum, spray every attachment you use with an anti-static spray. disturbing large amounts of dust creates a lot of static, and electronics are very sensitive to that.
it's never a bad idea to grab an grounding wristband as well, but as long as you wear loose clothes and always keep some part of your skin in contact with the case, you should be ok. (i don't know how much this applies to laptops and smaller devices, since the cases for those are typically plastic)
if there's staining (like from smoke) or there's more gunk caked on than you thought, you can gently clean electronic components with a brush/paper towel/microfiber and medical-grade isopropyl alcohol ONLY. do not use any other cleaning alcohols for this task.
before you do anything, TAKE THAT FUCKER OUTSIDE! always clean a dusty device where the wind can carry that shit away, because oh my GOD will it fuck up your lungs like crazy. (that, and compressed air cans have fluorocarbons in them, which isn't great to breathe in either)
most of the time, you'll probably be fine just using an air duster. for compressed air cans, spray the dirty surfaces in short bursts. an electric duster can be constantly blown. when dusting fans, make sure that you're holding the blades still as to not accidentally make them spin too fast (ESPECIALLY with an electric duster!), since that can damage the mechanism that makes them spin.
however, if there's a lot of dust, it may be better to give it a vacuuming first. anything from a handheld to a shop vac will work, and attachments with brushes on the end will help tons with loosening up even more dust. and of course ALWAYS make sure that you're spraying any attachments with anti-static spray, and keep a hand on the case of the computer to electrically ground yourself since the hose will be in contact with the internals.
if there's any left over, give it a blast with the duster.
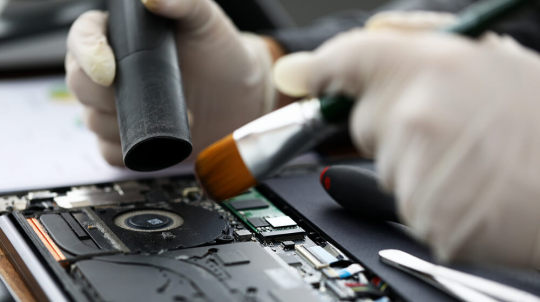
in some rare cases, there may be some extra gunk caked onto the internals, and you may have to really get your hands in there or take components out individually. if you don't have an anti static wristband (the ones with an alligator clip) do your best to ALWAYS keep your skin in contact with the case as you're finagling around in there.
it's probably a good idea to have disposable gloves on for this. grab your isopropyl and towel of choice (microfiber is ideal, but dirtier PCs may need disposable paper/shop towels), soak it a little bit, and gently scrub off the gunk n' grime as needed.
with heat sinks specifically, since they're just big blocks of metal, they're the one part of a component that can be cleaned under water. if a dusting doesn't suffice, gently scrub it with a brush under warm, soapy water, rinse thoroughly, and let it dry on a towel for a few hours before reassembling it into the electronic components.
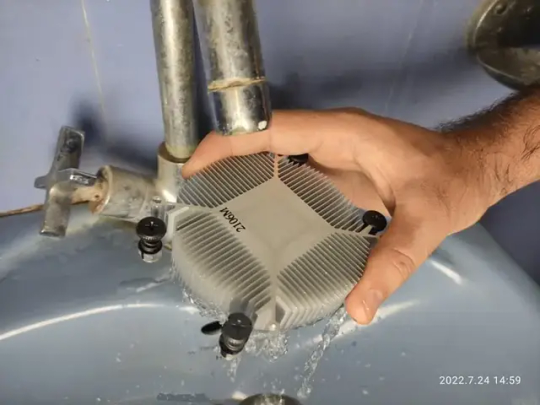
if there's still little bits stuck in the radiator fins, stick an isopropyl-soaked q-tip in there to push it out.
the dust settles, everything's put back together, and it's all clean in there again. YAY!!!!! but what if you're still experiencing temperature problems? well, it typically comes down to either the CPU or GPU:
IF ITS THE CPU: if you took off the cooler to clean it, then i hope you remembered to dab some fresh thermal paste on there. you should be replacing thermal paste few years, otherwise it dries out and loses its effectiveness.
the type you use makes a huge difference too; i like to use arctic's mx-4, it has excellent thermal conductivity while still being an electrical insulator, so spillover isn't a problem. if you go for a liquid metal compound, please do your research first, since some of them can run the risk of corroding the cooler pipes and/or the CPU's outer casing.
to replace thermal paste, make sure that the crusty old paste is sufficiently scrubbed off the contact points of both the CPU and cooler. again, use isopropyl for this. once it's all cleaned off, put about a pea-sized amount of paste on the CPU and carefully lower the cooler onto the mounting bracket before fastening it in place. (also it really doesn't matter how you put the paste on, as long as it ends up covering most of the contact area)
also if you're still using the cooler your CPU came with, you should probably get a better cooler. especially if you're doing gaming or using graphically/mathematically intensive software. sorry. the stock coolers that most CPUs come with are mid as hell. you can get a nice ARGB one for less than 20 USD i promise its worth it
IF ITS THE GPU: like CPUs, your graphics card also needs to have its thermal paste cleaned out and replaced every so often. but they also utilize a second thermal material called thermal pads. these are usually made of either silica gel or a very thick clay-like grease, and come in different thicknesses. my favoured pads are owltree's 12.8w grease pads, the assorted pack comes with enough for about 4-5 GPUs.
taking apart a GPU seems scary, and understandably so; they're incredibly expensive and hard-working pieces of technology! but i've done it twice now, and it's actually surprisingly simple (as long as you keep track of all the damn screws... im lucky there's a magnetized screw mat in the house i can use)
i recommend watching a deep clean/teardown video of the GPU model you have before digging into it yourself. generally, they separate into 4 distinct portions: the outer shell, the heatsink, the board, and the backplate.
the shell contains the fans and any possible RGB elements. it'll have 1-2 controllers plugged into the board, one for the fans and one for the lighting elements if there are any. once the case is unscrewed, unplug these connectors with a firm squeeze and tug.
these tend to be surprisingly dusty on the inside, so it's probably a good idea to blast it with a duster. again, make sure to hold the fans so they don't overspin. you can also remove the fans from the shell and clean them individually if you'd like.
the heatsink is BIG and heavy, and you can do all the same stuff here that you would with a CPU cooler heatsink. it may take a bit of effort to tug off if the thermal materials are really making it stick to the board. once it's off, scrub the old thermal paste, blast it with a duster, and wash under soapy water if needed before rinsing thoroughly and leaving it to dry for a while.
the backplate is just a flat piece of metal that protects the back side of the board. usually all this will need is a simple wipedown.
the board is where all the magic happens, and will usually have a layout that's something like this:

clean up as needed; gently scrub off old thermal paste, scrape off the old thermal pads (but take close note of how thick they are so you can replace them with the correct pads), and brush/wipe down the dust and grease on each side as needed. take care to avoid touching the PCIe connector too much (the bar of golden pins that juts out from the bottom)
thermal padding varies from card to card (i recommend checking thermal pad placements for your gpu in water cooling guides, even if you're not doing water cooling) but it's typically gonna be on THESE spots:
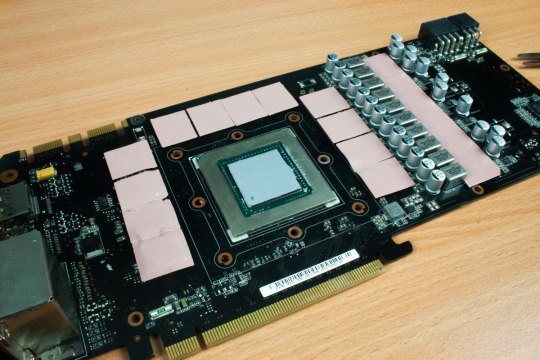
the VRAM chips surrounding the die (main chip) along with the small black chips next to the capacitors will require thermal pads the most. cut each one to size, carefully peel off the plastic films, and press each piece onto the chips.
now you can grab your thermal paste and put some on that big shiny die. now take your freshly pasted/padded board and CAREFULLY lower it back onto the heatsink. i highly suggest having a good source of lightning for this, since shifting around the pieces too much trying to get them to align properly can displace the thermal pads and mess with how the paste spreads.
screw the heatsink tight to the board, and double check to make sure that the pads and paste are snug against the heat sink. now put the backplate and shell back on and BAM YOU'RE DONE! with the paste and pads i used, i was able to bring down the temperature of my cards by a good 10-15 °C.
ok you've done all this deep cleaning shit and your computer is happy and healthy. what can you do for your computer's health in the future?
DUST AT LEAST ONCE A YEAR. haul that thang outside and spray that shit out to stop it from building up for too long.
KEEP IT OFF THE FLOOR. if you can, of course, not everyone has the desk room for it. computers accumulate dust easier when they're close to the floor. if you do need to keep it on the floor, you might have to dust it every 6-8 months rather than once a year.
AND STOP PUTTING YOUR LAPTOPS ON SOFT SURFACES I SWEAR TO GOD
GET A FAN CONTROLLER. motherboards are DOGSHIT at maintaining fan speeds!!!! there are physical fan hubs that use controller software, but if you can't afford that, fancontrol by rem0o is a stellar software-only option.
IF YOU DON'T ALREADY HAVE CASE FANS, GET THEM. the number of fans depends on the motherboard form factor your case can accommodate (ATX cases typically have 6-8), but having that air circulation is very important to maintaining ideal temperatures. arctic makes fantastic budget-friendly fans.
IF YOU HAVE AN NVMe HARD DRIVE: please put an aluminum heat sink on that thang. they get toasty :(
OK THATS IT I THINK. if anyone else has tips they wanna add, go right on ahead. ok thank you bye your computer will love you
13K notes
·
View notes
Text
Routine Maintenance
You gently laid down on the table and unbuttoned the top of your uniform. It was time for your mistress to perform your routine maintenance, your heads-up display notifying you of recognized issues. It was all part of the job, and perhaps for any other doll engineer, would be as bland and clinical as working on any other machine. Your engineer, however, your mistress, was different. She reveled in getting to play with your wires and parts more than anyone else that's ever worked on you. You squirmed on the table just thinking about what she had in store for you today.
You heard her speak from across the room, she was still getting her tools ready. "Alright Eris, any problems you're currently having? Any parts need replaced?" She spoke casually to you, using the nickname she made for you rather than your proper designation, E-415. She may have been reprimanded had any of her higher-ups witnessed her casual conversation with you, let alone what her maintenance entailed.
"Sensors have recognized a bulging capacitor in section A, number 3 specifically. No other issues of note currently."
"Mm, I'll probably have to replace the whole section. You'll also want to keep notice of any other ones too, if one has reached its end of life, the others probably aren't far off. No issues with connecting to your weapons?" She walked over to the table, holding a screwdriver and a toolbox of common replacement parts. She was already wearing her anti-static wristband. Though your external armor was plenty capable of warding off damage to any of your interior circuitry, you would still be pushed to the limit so regularly that bits and pieces needed replaced frequently, necessitating every frontline combat doll have dedicated maintenance staff.
"None, all weapons were fully operational when last connected, high altitude thrusters functioning normally. All weapons disconnected without issue."
"Good, good. Sounds like this won't take too terribly long before we can get to your favorite part." She shot you a devilish grin, you could hear the fan on your back spinning faster to disperse the heat. Not giving you a moment to calm yourself, she took the screwdriver to your abdomen, removing each of the screws holding the steel plate in place. She then pulled the plate off, and set it aside.
“E-enabling hot-swapping mode, mistress.” Though most maintenance staff would set their combat dolls into a low power mode while swapping parts, mistress always preferred to keep you largely powered, doing the minimum to allow parts to be replaced over without causing you to blue-screen.
She took a small flashlight in her hand and shined it into your now open abdomen, looking for the faulty capacitor in question. “Yeah, I see it here, shouldn’t be too hard to replace.” She placed the flashlight in her mouth, and grabbed out the necessary parts. A portable desoldering tool in one hand and the new capacitors in the other, with a soldering iron to the side to set the new ones in place. She reached in with the desolderer, and began working to remove the faulty capacitor. “You know, used to be that I’d need to pull out this whole board to remove the capacitors, but nowadays you can keep your insides inside while I work” She continued giving casual conversation as she worked, hard to understand with the flashlight in her mouth.
Before you knew it, all four had been replaced. Ordinarily, that would’ve been it, your engineer would give you a quick look over and close you back up. Mistress had other plans, of course. “Okay, I think we’re ready for a bit of stress testing.” She removed the flashlight from her mouth and set it down. “Are you ready, machine?”
Machine, there was always something about the way she called you that, so formal, yet so sensual whenever she said it. Nothing else made being a doll feel so good in your mind. You eagerly nodded your head.
She gave an amused chuckle and continued. “Very well, how about we start with…” She reached her hand into your open abdomen, and unplugged a small 3 prong connector from its socket. The fan on your back quickly slowed down and came to a stop. “It’s always important to test for these things, right?”
“A-ah, yes mistress.” You could feel yourself begin to warm up, you still had more than enough airflow to keep yourself from overheating, though to have your wires played with still excited your mind, the disconnected fan prompted a warning on your heads-up display, which you quickly dismissed.
“Hm, How about we test your radar tracking next?” Before you could respond, she disconnected the cable to your camera, leaving you unable to see. Another warning popped up, another warning dismissed. Despite this, you were still able to track what your mistress was doing, no combat doll would be limited to visible light camera for tracking targets.
You tracked your mistress as she clambered onto the table with you, and sat herself on your hips. She leaned forward slightly, and suddenly your vision came flooding back, the connection being restored. Actually seeing her now, on top of you, overwhelmed your senses.
“I’m almost done here, there’s just one last little thing I’d like to test before I’m satisfied.” The playfulness in her voice excited you, until suddenly all feelings of bliss cut off. Another warning popped up, notifying that another cable had been disconnected. You looked up to your mistress, she was holding a small 4 pin connector in one hand, the one that controls all feelings of pleasure. In her other hand was a paper clip.
She unfurled the paper clip until it was just a bent piece of metal wire, and leaned in again moving the metal wire towards the pins the connector used to be plugged in at. “So, all I have to do here is touch this to the first and fourth pins inside you, and…” A jolt of pleasure surged through your body, stronger than you could have ever imagined. By bypassing any sort of control and monitoring system, and simply shorting the two pins, she could overload your mind from sheer ecstasy leaving you, the once fearsome aerial combat doll, little more than a quivering mess on her mistress’s table.
After a couple more taps from the metal wire, you couldn’t focus on anything anymore. You hardly even noticed when your mistress got off of you and began reconnecting everything she unplugged. It was only when you heard the cooling fan on your back spin up that you finally came to your senses.
You looked over to your mistress. She was screwing your abdominal plate back into place, a content smile rested on her face. At all other times, you were E-415, an Excelsior class combat doll. But here, in these few tender moments you had, you were Eris, a machine loved by your mistress.
-----
I really hope you enjoyed this little thing I wrote, its my first time putting anything like this out on Tumblr, and I really enjoyed writing it^^
200 notes
·
View notes
Text


I think I know what this is - it's a grounding bracelet! An anti-static wristband. Stray static can instantly destroy some vital PC components if you're not careful handling them. Vash probably has a matching doohickey in his bag that lets him use it to ground any built-up charge before he starts messing with computers.


Vash is good with computers! Better than Nai, I bet.
12 notes
·
View notes
Note
Hello, a trainer from Kanto here! Do you know anything about Pokedex malfunctions? I was curious if you have some information about it, since I have a Hoenn Pokedex that have been on my shelf for years now, and I only remembered about it a few days ago. I tried to turn it on a few times, but it only turns off by itself after a minute or less. Sometimes it doesn't work at all, any suggestions what I should do?
Hey! Thanks for asking.
Pokedéx malfunctions. Those are fun. Issues like this one are usually caused by a couple of different things.
On some pokedéx models, the internal components can become improperly seated surprisingly easily. If the pokédex got dropped at all at any point, it's entirely possible that something got disconnected in there. If the internal battery or CPU isn't seated properly, the pokédex either won't power up at all, or it'll switch off very shortly after being turned on. Getting everything seated properly and reconnected will fix the problem, if this is what's going on.
It's also possible that there are loose or completely disconnected wires in there, which would also cause that issue. If you do decide to open the thing up yourself and check everything, I'd suggest getting an anti-static wristband or to ground yourself beforehand, just to make sure you don't accidentally shock it. Some things in there are pretty sensitive to electrostatic discharge.
Speaking of which, if you have electric-type pokémon and they accidentally zapped the pokédex at any point, something may have gotten fried in there due to the power surge. If that's the case, it's likely a burnt-out power supply, the motherboard's fried, or data necessary for booting up the system or normal operation got corrupted. If it's just a corrupted boot sector, your local lab or research center may be able to get you a new pokédex and just transfer your data over to the new one for free, if it's still under warranty. If something in there is fried, I'd look into replacing the parts that are messed up. You may be able to find the parts online, or have a repair shop order them for you.
It could also be a failed hard drive, but typically if that's the case, the pokédex won't boot up at all, and you'll hear a short series of beeps when attempting to start it up. Replacing it should do the trick. Your local lab / research center should be able to help you recover your data if this is the problem, too.
#rotomblr#pkmn irl#pokeblog rp#pokeblogging#rotumblr#pokeblr#pokemon irl#pokeblog#pokedex#pokedex issues#irl pokemon#pokedex repair
6 notes
·
View notes
Text
anti static wristband is such bs like ok this magic amulet is going to improve your ability to use computers somehow
7 notes
·
View notes
Photo

Preventing static in the semiconductor process
The research team led by Professor Ju-Hyuck Lee of the Department of Energy Science and Engineering at DGIST has developed a static prevention technology using a triboelectric nanogenerator. The findings of this study facilitate improved and more efficient static prevention with commercialization potential by expanding the application range of triboelectric nanogenerators.
Recent developments in semiconductors and small electronic components have increased the interest in static prevention, as static damage to small components leads to an increased defect rate. Currently, companies use a combination of various anti-static products such as wired grounding wristbands, antistatic mats, shoes, and ionizers. However, these methods result in increased equipment costs and operational inconveniences. Therefore, an efficient and simple static-prevention method is required.
The research team focused on the cause of static conditions. The human body is generally static owing to the electric potential difference between the body and an object when both come in contact.
The cause of this electric potential difference has been found in recent studies on triboelectric series between materials. Because the human skin is on the positive side of the triboelectric series, it becomes positively charged when it contacts typically used objects such as shoes and clothes, sharply increasing the body electric potential to positive, causing static. The measurement results of the research team showed that the electric potential of the body increased by more than 100 V after walking for approximately 10 s.
Read more.
22 notes
·
View notes
Text
What to do if there is a problem with LED lamp beads?
LED lamps have gradually become the mainstream choice in the lighting market with their advantages such as high efficiency, energy saving and environmental protection. However, even with such advanced technology, it is inevitable to encounter some problems. This article will explore the common problems of LED lamp beads and their solutions, and provide some tips for choosing LED lamps. Take you to understand the working principle of LED lamp beads.

Common problems and solutions of LED lamp beads
The indicator light is not on
The failure of LED lamp beads may be caused by two reasons: abnormal power supply or the positive and negative poles of the power supply are not connected properly. The solution to this problem is:
Check the power connection: Make sure that the power supply is properly connected and the power supply is normal.
Check the positive and negative poles: Confirm whether the positive and negative poles of the power supply are correctly connected and there is no reverse phase.

LED lamp beads turn yellow
The yellowing of lamp beads is usually caused by the mismatch between epoxy resin and curing agent, or the baking time of the outer sealant is too long. Solutions to this type of problem include:
Choose the right material: Buy a set of external sealant and curing agent to ensure that they match each other.
Control baking time: Avoid baking the external sealant for too short or too long.

LED lamp leakage
The leakage problem may be caused by the operator not wearing an anti-static wristband, resulting in improper electrostatic protection, or the lamp chip itself has quality problems. The solution is:
Strengthen electrostatic protection: Ensure that the operator wears an anti-static wristband and abides by anti-static operating procedures.
Check chip quality: If there is a quality problem with the chip, a qualified chip should be replaced.

Tips for choosing LED lamps
Choose from brightness and anti-static ability
The brightness and anti-static ability of LED lamps are important indicators when choosing:
Brightness: The brightness of LED lamps should meet the laser level I standard to ensure the lighting effect.
Anti-static ability: The stronger the anti-static ability, the longer the life of the LED lamp. Usually LED lamps with anti-static ability greater than 700V are a better choice. Here is the knowledge about nit brightness.

Choose from the chip and chip size
The quality and size of the chip are also key factors affecting the performance of LED lamps:
Chip source: The price of chips from different sources varies greatly. Usually, chips imported from Japan and the United States are of higher quality and relatively more expensive.
Chip size: The size of the chip is usually expressed in terms of side length. The quality of LED lamps with large chips is usually better than that of small chips. Here are 3 types of LED lamp bead specifications.

Conclusion
Although LED lamp beads are technologically advanced, they may still encounter some problems. By understanding the solutions to common problems and selection tips, users can better maintain and select LED lamps to ensure that they provide long-term and stable lighting services. With the continuous advancement of technology, it is believed that the performance and reliability of LED lamps will be further improved, bringing users a better lighting experience.
Thank you for watching. I hope we can solve your problems. Sostron is a professional LED display manufacturer. We provide all kinds of displays, display leasing and display solutions around the world. If you want to know: Advantages of monochrome LED screens for outdoor use. Please click read.
Follow me! Take you to know more about led display knowledge.
Contact us on WhatsApp:https://api.whatsapp.com/send?phone=+8613510652873&text=Hello
0 notes
Text
"Elevate Your Laptop’s Performance: How to Upgrade to an SSD"
In today’s fast-paced digital world, a slow laptop can be a major productivity killer. If you’re struggling with long boot times, sluggish performance, or unresponsive applications, Solid State Drive (SSD) upgrade for laptop could be the game-changer you need.
Why Upgrade to an SSD:
Upgrading from a traditional Hard Disk Drive (HDD) to an SSD can significantly enhance your laptop’s performance. Here’s why:
Faster Boot Times: SSDs offer rapid read and write speeds, leading to much quicker boot times compared to HDDs. You’ll notice your laptop starts up in seconds rather than minutes.
Improved Overall Performance: SSDs provide faster access to data, which speeds up file transfers and application launches. This results in a smoother and more responsive computing experience.
Enhanced Durability: Unlike HDDs, SSDs have no moving parts. This makes them more resistant to physical shock and damage, enhancing the durability of your laptop.
Quieter Operation: SSDs operate silently since they lack moving parts, unlike the noisy spinning disks of HDDs. This contributes to a quieter and more pleasant working environment.
Better Battery Life: SSDs are more energy-efficient than HDDs, which can lead to longer battery life for your laptop, making it more convenient for on-the-go use.
How to Upgrade to an SSD
Upgrading your laptop to an SSD can be a straightforward process, but it’s essential to follow the correct steps to ensure a successful installation. Here’s a step-by-step guide:
Choose the Right SSD: Before you begin, select an SSD that is compatible with your laptop. Check your laptop’s specifications for the type and size of the SSD it supports. Common sizes are 2.5-inch SATA SSDs, but some laptops may use M.2 or PCIe SSDs.
Backup Your Data: Before replacing your HDD, make sure to back up all your important data. This can be done using an external hard drive, cloud storage, or a backup software tool.
Prepare Your Laptop: Power down your laptop and unplug it from any power source. If your laptop has a removable battery, take it out. Gather the necessary tools, such as a screwdriver and an anti-static wristband.
Remove the Old HDD: Open your laptop’s back panel or access bay to locate the HDD. Carefully disconnect and remove the old HDD, taking note of how it is mounted and connected.
Install the New SSD: Place the new SSD into the slot where the HDD was located. Connect it securely and ensure it is properly mounted. If your laptop uses a mounting bracket for the HDD, you may need to transfer it to the SSD.
Reassemble and Boot Up: Close the back panel or access bay and reinsert the battery. Power on your laptop and enter the BIOS/UEFI settings to ensure the SSD is recognized. You may need to adjust the boot order to prioritize the new SSD.
Install the Operating System: If the SSD is blank, you’ll need to install your operating system. You can use a bootable USB drive or recovery media to install a fresh copy of the OS. Follow the on-screen instructions to complete the installation.
Restore Your Data: After installing the operating system, restore your data from the backup you created earlier. Reinstall any applications and configure your settings as needed.
Benefits of Professional SSD Installation
While upgrading an SSD yourself can be a rewarding DIY project, there are benefits to seeking professional help:
Expert Installation: Professionals have the expertise to ensure the SSD is installed correctly and configured properly, reducing the risk of issues.
Data Migration Services: Technicians can transfer your data from the old HDD to the new SSD, ensuring that all your files and settings are preserved.
Troubleshooting and Support: Professionals can troubleshoot any problems that arise during the upgrade process and provide ongoing support if needed.
Conclusion
Upgrading to an SSD is one of the most effective ways to boost your laptop’s performance, providing faster boot times, improved speed, and greater reliability. Whether you choose to perform the upgrade yourself or seek professional assistance, transitioning to an SSD can revitalize your laptop and enhance your overall computing experience. Embrace the power of SSD technology and enjoy a faster, more efficient laptop that meets your demands and keeps pace with your digital life.
0 notes
Text
im sure someone else ahs thought of this before but you know those like anti-static electricity wristbands for doing electronics repair and maintenance. human wearing that for gay sexwith their robot partner
1 note
·
View note
Text
How to Fix Your Laptop Screen: A Step-by-Step Guide

Table of Contents
Introduction
Common Issues with Laptop Screens
Tools and Materials Needed
Step-by-Step Guide to Laptop Screen Repair
Diagnosing the Problem
Preparing for the Repair
Removing the Damaged Screen
Installing the New Screen
Testing the New Screen
When to Seek Professional Help
FAQs
Conclusion
Introduction
Dealing with a cracked or malfunctioning laptop screen can disrupt your work and daily routine. This guide will walk you through the process of fixing your laptop screen step-by-step, helping you get back to using your device smoothly. If you’re in Mumbai and need assistance, JK Technology offers reliable solutions for laptop screen repair.
Common Issues with Laptop Screens
Understanding the common issues that affect laptop screens can help you diagnose and resolve the problem effectively:
Cracked Screen: Often due to physical impact.
Dead Pixels: Visible black or white spots on the screen.
Backlight Issues: Dim or flickering screen caused by backlight failure.
Screen Flickering: Could be due to loose connections or hardware issues.
Discoloration: Typically caused by faulty cables or screen damage.
Tools and Materials Needed
Before starting, gather the necessary tools and materials for the repair:
Replacement screen compatible with your laptop model
Small Phillips head screwdriver
Plastic prying tool or spudger
Adhesive or tape (if needed)
Anti-static wristband (optional)
Clean, flat workspace
Step-by-Step Guide to Laptop Screen Repair
Diagnosing the Problem
1. Identify the Issue:
Check for visible cracks or damage on the screen surface.
Connect your laptop to an external monitor to determine if the issue persists. If the external monitor displays properly, the problem likely lies with your laptop screen.
2. Software Check:
Ensure that the issue isn’t related to software by restarting your laptop and updating display drivers.
Preparing for the Repair
1. Safety Precautions:
Turn off your laptop and disconnect it from any power source.
If possible, remove the laptop battery to prevent electrical mishaps.
2. Set Up Your Workspace:
Choose a clean, well-lit area with ample space to work on your laptop.
Keep all screws and small parts organized to avoid misplacement.
Removing the Damaged Screen
1. Remove the Bezel:
Gently pry off the plastic bezel surrounding the screen using a plastic prying tool.
Start at one corner and carefully work your way around to avoid damaging the bezel clips.
2. Unscrew the LCD Panel:
Locate and unscrew the screws securing the LCD panel to the laptop frame.
Keep the screws in a safe place for reassembly later.
3. Disconnect the Video Cable:
Lift the damaged screen carefully away from the laptop casing.
Disconnect the video cable attached to the back of the screen. Handle the cable delicately to avoid damage.
Installing the New Screen
1. Attach the Replacement Screen:
Connect the video cable to the new screen, ensuring a secure connection.
Position the replacement screen within the laptop casing.
2. Secure the LCD Panel:
Use the previously removed screws to secure the new LCD panel in place.
Tighten the screws adequately, but avoid over-tightening to prevent damage.
3. Reattach the Bezel:
Snap the plastic bezel back onto the laptop screen assembly, ensuring all clips are firmly in place.
Testing the New Screen
1. Reassemble and Test:
Reinsert the laptop battery and reconnect the power source.
Power on your laptop to verify that the new screen functions correctly without any issues.
2. Final Checks:
If the screen displays properly and functions as expected, you’ve successfully repaired your laptop screen.
Double-check all connections and ensure that the screen alignment is correct.
When to Seek Professional Help
While repairing your laptop screen can be manageable with this guide, there are instances where professional assistance may be necessary:
Persistent issues even after replacing the screen.
Uncertainty in handling delicate electronics or complex repairs.
Additional hardware problems affecting overall laptop performance.
If you’re in Mumbai and require expert support, JK Technology provides reliable services for laptop screen repair.
FAQs
Q1: What are the signs that indicate a laptop screen needs replacement?
A: Signs include visible cracks, persistent flickering, dead pixels, or a completely blank screen.
Q2: How long does it take to replace a laptop screen?
A: Typically, replacing a laptop screen can take about 30 to 60 minutes, depending on your familiarity with the process and the complexity of the laptop model.
Q3: Can I use any replacement screen for my laptop?
A: It’s crucial to use a replacement screen compatible with your laptop model to ensure proper functionality and fit.
Q4: What should I do if my new screen doesn’t work after installation?
A: Check all connections again, ensuring they are secure. If issues persist, consult a professional technician for further diagnosis and repair.
Q5: Is it safe to repair a laptop screen myself?
A: Yes, as long as you follow safety precautions and handle components delicately. Disconnecting the laptop from power and using an anti-static wristband can help prevent damage.
Conclusion
Repairing your laptop screen with this step-by-step guide can restore functionality and save on replacement costs. By understanding the process and following safety measures, you can successfully fix your laptop screen at home. Remember, for those in Mumbai seeking reliable “laptop screen repair” services, JK Technology offers expertise and assistance to ensure your laptop is back in optimal condition.
0 notes
Text
HomeMacbook Repair center near meHow to Repair Your Apple Laptop at Home, A Step-by-Step Guide.
How to Repair Your Apple Laptop at Home, A Step-by-Step Guide.

Learn how to perform basic repairs on your Apple laptop at home with this comprehensive DIY guide. For more complex issues, visit applelaptopservice.center for expert assistance.
Apple laptops, known for their robust performance and sleek design, sometimes require repairs. Whether it's a battery issue or a screen problem, knowing how to perform basic repairs at home can save you time and money. However, for more complex issues, professional help like that provided by applelaptopservice.center is invaluable.
Understanding Your Apple Laptop
Familiarize yourself with the basic components of your Apple laptop. Knowing what each part does can help you diagnose issues more accurately. Be aware of signs indicating your laptop needs repairs, such as unusual noises, slow performance, or screen glitches.
Apple laptop Repair service center neaar me
Common Apple Laptop Issues and DIY Solutions
Many common issues, such as battery drainage or screen flickering, can be resolved at home. This section will guide you through simple fixes that you can perform without extensive technical knowledge. AMC Service Near me
Tools and Materials Needed for Home Repairs
Before you start any repair, ensure you have the right tools. This includes screwdrivers, spudgers, and anti-static wristbands. Remember, safety first! Always power down and unplug your laptop before attempting any repairs.

Step-by-Step Guide to Basic Repairs
Follow these detailed instructions to replace your laptop's battery and fix common screen problems. These step-by-step guides are designed for beginners, making home repairs less daunting. Laptop repair center near me
Troubleshooting Software Issues
Software issues like operating system errors or application crashes can often be resolved with a few simple steps. Learn how to troubleshoot these problems, from restarting your laptop to reinstalling the OS.
When to Seek Professional Help
Some issues, like complex hardware failures, are best left to professionals. If you're facing such problems, visiting a service like applelaptopservice.center can ensure your laptop is handled with expert care.
Maintaining Your Apple Laptop for Longevity
Regular maintenance can extend the life of your laptop. This section covers essential tips for physical and software maintenance, ensuring your Apple laptop remains in top condition.

Upgrading Your Apple Laptop at Home
Upgrading your laptop's RAM or storage can significantly boost its performance. Learn about compatibility and the steps involved in upgrading these components yourself.
iMac repair center near me
Mackbook repair center near me
iWatch Repair center near me
iPhone Repair center near me
Apple Laptop Repair: FAQs
How can I tell if my Apple laptop's battery needs replacement?
What should I do if my laptop's screen starts flickering?
Is it safe to upgrade my laptop's RAM at home?
0 notes
Text
Bummed out rn
My laptop started having issues recently. One of the fans stopped working and had to be replaced. After doing so (wearing an anti static wristband), I put it back together and left it to charge since I took the battery out.
Wouldn’t turn on and thought that the battery was bad. Replaced it and it still won’t turn on. My step dad offered to take it to a tech person at their college to look at it. I personally think it’s completely shot and I’m sad because of the memories I had with it.
:((
0 notes
Text
Top Factors to Keep in Mind for Effective Samsung phone repair

Samsung phones are renowned for their advanced features and cutting-edge technology. However, like any electronic device, they can encounter issues and require repair from time to time. Whether it is a cracked screen, battery problems, or software glitches, understanding the key factors for effective Samsung phone repair can save you time, money, and frustration. In this blog post, we will explore the top factors you should keep in mind to ensure successful Samsung phone repair.
Identify the Issue:
Before attempting any repair, it is crucial to accurately identify the problem with your Samsung phone. Carefully observe the symptoms, such as a non-responsive screen, frequent crashes, or poor battery life. Additionally, gather information about the specific model of your phone and research common issues associated with it. This initial assessment will help you determine the appropriate repair steps or seek professional assistance.
Warranty and Professional Repair:
If your Samsung phone is still under warranty, it’s advisable to first explore warranty options. Samsung typically provides a limited warranty that covers manufacturing defects and certain hardware issues. Contact Samsung or visit their authorized service centers to inquire about the warranty coverage and repair services they offer. Professional repair by authorized technicians ensures the use of genuine parts and expertise in handling Samsung devices.
Do-It-Yourself (DIY) Repairs:
For minor issues or if you have technical skills, DIY repairs can be a cost-effective option. However, it’s important to approach DIY repairs with caution. Research extensively, watch instructional videos, and refer to reliable online guides specific to your phone model. Be aware that attempting complex repairs without proper knowledge and tools can cause further damage. Additionally, DIY repairs may void the warranty, so consider the potential consequences before proceeding.
Genuine Parts and Quality:
When repairing your Samsung phone, always opt for genuine replacement parts. Genuine parts ensure compatibility, durability, and optimal performance. Using counterfeit or low-quality parts can result in poor functionality and may lead to further issues down the line. Genuine parts may be available through authorized service centers, reputable online retailers, or certified third-party repair shops.
Backup Your Data:
Before initiating any repair or modification, back up your important data. This includes contacts, photos, videos, and other valuable information stored on your Samsung phone. Repair processes can involve resetting the device or replacing components, which may result in data loss. Regularly backing up your data ensures that you don’t lose any critical information during the repair process.
Safety Precautions:
Repairing electronic devices, including Samsung phones, requires caution and adherence to safety precautions. Ensure you have the necessary tools, such as precision screwdrivers and anti-static wristbands, to protect both yourself and the device. Power off the phone and disconnect it from any power source before starting any repair work. If you’re unsure about any aspect of the repair process, seek professional assistance to avoid accidents or further damage.
Conclusion:
When it comes to Samsung phone repair, keeping these top factors in mind can significantly improve the effectiveness of your repair efforts. Accurately identifying the issue, considering warranty options, and making informed decisions about professional repair or DIY approaches are essential steps. Remember to prioritize the use of genuine parts, back up your data, and observe safety precautions during the repair process. By taking these factors into account, you can confidently navigate Samsung phone repair, resolving issues efficiently and ensuring the optimal performance of your device.
0 notes
Text
LED display storage and maintenance precautions
LED display screens have been widely used in advertising, information display and other fields due to their high brightness, low power consumption and long life. However, to ensure the long-term stable operation and extend the service life of LED display screens, proper storage and maintenance are essential. Here are some key storage and maintenance precautions to help users better manage their LED display screens.

Storage precautions
Clean storage environment: Make sure the storage location is clean and use pearl cotton to lay it to protect the box from damage.
Reasonable stacking: Avoid messy stacking of modules or stacking more than 10 sheets, and use pearl cotton to isolate to prevent damage. Take you to understand the LED display soft module in 5 minutes.
Correct placement: It is recommended to lay the box flat with the lamp facing up. If you need to stand it upright, pay special attention to protection and avoid standing it upright in places with strong vibration.
Handle with care: Handle with care during transportation to avoid bumps.
Anti-static measures: Workers must wear cordless anti-static wristbands during installation or maintenance.

Precautions during transportation: When carrying the box, it should be lifted up to avoid pushing or dragging on the ground to avoid damage.
Avoid hard object impact: When adjusting the box, use a soft rubber hammer to hit the metal part. It is strictly forbidden to use hard objects to hit the module.
Avoid extrusion and collision: During storage and transportation, extrusion or collision between modules is strictly prohibited.
Maintenance precautions
Switch screen operation
Correct switch sequence: Turn on the control computer first, then turn on the LED display; when shutting down, turn off the display power and control software first, then turn off the computer.
Avoid long-term full white display: The power is the highest in the full white screen state, and long-term display should be avoided to reduce the impact on the power distribution system.

Switch screen time interval: There should be at least 5 minutes between switch screen operations.
Power supply requirements
DC power supply: LED modules require DC +5V power supply, and AC power supply is strictly prohibited. Be careful not to connect the positive and negative poles in reverse.
Stable power supply voltage: Ensure that the power supply voltage is stable to avoid short circuit or tripping.
Grounding protection: Ensure safe and reliable ground contact to avoid lightning strikes.

Avoid long-term high-brightness display: Long-term playback of high-brightness all-white images may cause the power cord to heat up and the LED lamp beads to be damaged. Introduce the working principle of LED lamp beads to you.
Protection of internal circuits: Non-professionals are prohibited from touching the internal circuits to avoid damage.
Cleaning and moisture-proof
Regular cleaning: Clean the display screen regularly to remove dust and stains, and wipe it with a soft brush and alcohol.
Moisture-proof measures: The storage environment should be kept dry to avoid damage to the display screen in a humid environment.

Preheating: For displays that have not been used for a long time in a high humidity environment, the preheating method should be used to remove moisture.
Regular inspection and professional maintenance
Regular inspection: Check the working status of the display screen regularly to find and solve problems in time.
Professional maintenance: For line damage or other technical problems, professionals should be asked to inspect and repair.
By following the above storage and maintenance precautions, you can ensure the long-term stable operation of the LED display, extend its service life, and provide high-quality display effects.

Thank you for watching. I hope we can solve your problems. Sostron is a professional LED display manufacturer. We provide all kinds of displays, display leasing and display solutions around the world. If you want to know: Six major areas where the LED display industry can break through. Please click read.
Follow me! Take you to know more about led display knowledge.
Contact us on WhatsApp:https://api.whatsapp.com/send?phone=+8613510652873&text=Hello
1 note
·
View note
Text
Laptop Battery Replacement: How to Extend Your Device's Lifespan"
Laptop battery replacement is a common maintenance task that becomes necessary when your laptop’s battery no longer holds a charge or performs as efficiently as it once did. Over time, all rechargeable batteries degrade, leading to shorter battery life, frequent recharging, or even the inability to power on the laptop without being plugged in.
Here's a detailed explanation of the process and why it's important:
Why Laptop Batteries Degrade
Charge Cycles: Every battery has a limited number of charge cycles, typically between 300 to 500. A charge cycle is completed when you use up 100% of the battery's capacity, whether that’s from one full charge or multiple partial charges.
Aging: As batteries age, their chemical composition changes, leading to reduced capacity and efficiency. This is a natural process that affects all rechargeable batteries.
Overheating: Excessive heat can accelerate battery degradation. If your laptop frequently runs hot or is exposed to high temperatures, the battery’s lifespan may be shortened.
Usage Patterns: How you use and charge your laptop also affects battery health. Keeping the laptop plugged in all the time, allowing it to discharge completely too often, or charging it in short bursts can all contribute to faster battery wear.
Signs Your Laptop Battery Needs Replacement
Shortened Battery Life: If your laptop battery no longer lasts as long as it used to, requiring frequent recharges, it’s a clear sign that it’s losing capacity.
Inability to Hold a Charge: If your laptop dies soon after being unplugged, or if it only works when connected to a power source, the battery may be failing.
Overheating: A failing battery might cause the laptop to overheat more frequently, which can affect overall performance and battery safety.
Battery Warning Messages: Most modern laptops will alert you when the battery health is poor or when it’s time to consider a replacement.
Bulging or Leaking Battery: Physical signs of battery damage, such as bulging or leakage, are serious indicators that the battery needs immediate replacement to avoid potential hazards.
Steps to Replace a Laptop Battery
Determine Compatibility:
Check the Battery Model: Identify the exact model and specifications of your current battery. This information can usually be found on the battery itself or in your laptop’s documentation.
Buy a Replacement: Purchase a compatible battery from a reputable source. Ensure that it matches the voltage, capacity, and connector type of your original battery.
Prepare Your Laptop:
Turn Off and Unplug: Before starting, shut down your laptop completely and unplug it from any power sources.
Discharge Static: To avoid damaging sensitive components, discharge any static electricity by touching a grounded metal object or wearing an anti-static wristband.
Remove the Old Battery:
External Batteries: If your laptop has an external battery, removing it is usually straightforward. Slide the battery release latch and gently lift the battery out.
Internal Batteries: For laptops with internal batteries, you’ll need to open the laptop’s case. This may involve removing screws and carefully prying open the back cover. Once open, disconnect the battery from the motherboard and remove it.
Install the New Battery:
Align and Connect: Place the new battery in the same position as the old one. For internal batteries, connect it to the motherboard as the original battery was connected.
Secure the Battery: Ensure that the battery is securely in place, and if you’ve opened the case, reassemble your laptop by replacing any screws and covers.
Test the New Battery:
Power On: Turn on your laptop and check if it powers up correctly without being plugged in.
Charge and Calibrate: Fully charge the new battery and then allow it to discharge completely to calibrate it. This helps ensure accurate battery level reporting.
Why Battery Replacement is Important
Restores Mobility: A new battery allows you to use your laptop on the go without being tethered to a power outlet, restoring its portability.
Improves Performance: Failing batteries can sometimes affect overall laptop performance. A fresh battery ensures your laptop operates at its best.
Safety: Old or damaged batteries can overheat or leak, posing safety risks. Replacing a failing battery reduces these risks.
Extends Laptop Lifespan: By replacing the battery, you can extend the overall lifespan of your laptop, delaying the need for a costly replacement.
Conclusion
Laptop battery replacement is a straightforward process that can significantly enhance your laptop's usability and safety. Whether your current battery is failing or you simply want to extend the life of your device, replacing the battery is an effective solution. If you’re unsure about doing it yourself, consider seeking professional help to ensure the replacement is done correctly and safely.
0 notes
Last Seen Blogs

fullmark95
Untitled

kirmizi-mavi
kırmızı-mavi

tinlizzyart
Lizzy Chapman

ajsafshjafsmaru
Brown Eyes.

tpunktjonas
???