#THIS GUY. has been a long time coming.
Text
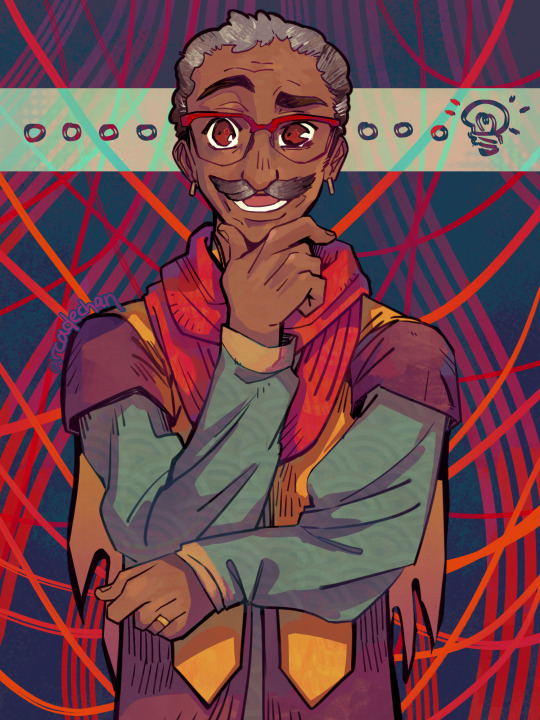
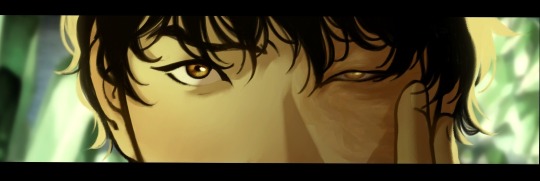
Editor of the Balefire Newsroom, the Devil's Council; Red Thread Daylin Highwater.
#art#drawing#digital art#illustration#character design#character art#oc#oc art#oc: Daylin Highwater#h&h#hell&highwater#THIS GUY. has been a long time coming.#this is Hayes's biological grandfather and CRUX of the story#he's the one that ties hayes and b together...almost literally#he's got seven ex-wives!!!!
96 notes
·
View notes
Text
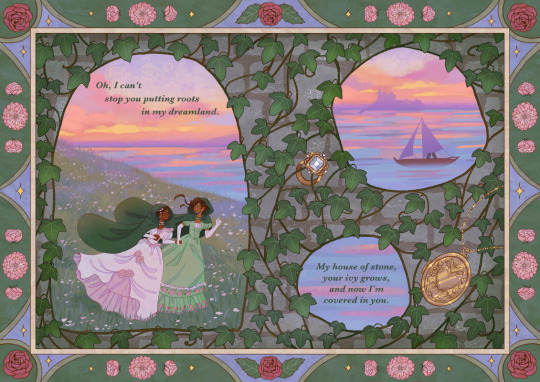
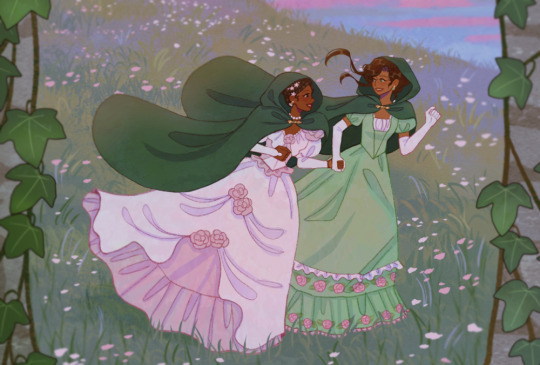
page 7 of my ivy comic ✿
<previous page completed full comic>
first page
(prints)
#finally page 7! sorry for the long wait for this update#the flower meanings for this one are#rose: love / flowering almond: hope / ivy: marriage#i promised you guys it would be a happy ending this time!#i'll be posting the full completed comic (and the digital zine with extras) soon but i wanted to give this page its own post too!#this has been such a long project but i'm proud of the way it's coming together :')#ivy comic#ivy comic mimimar#taylor swift#taylor swift ivy#wlw comic#wlw art#wlw#sapphic comic#sapphic art#sapphic#lesbian comic#lesbian art#lesbian#oc#willow#ivy#green#illustration#illo#artists on tumblr#queer comic
905 notes
·
View notes
Text


The Quest Continues...
(part 1- part 2)
#Fourfold Soul#<- That's the title of the project I've been working on!#I am very excited to finally show off the cowboy (gender redacted) I've been cooking in a slow boil!!! Yeehaw!#Yes this is the game project. YES I am commited to the bit of having the main character go through a long running pronoun-quest.#This character does not have a name so I cannot formally tag them...#(Okay. Technically they have an internal name for coding/scripting reasons...and I have a nickname for them.#But the important part of making a video game character you get to eventually name is that the name must come from *you*!)#The girl here is a npc so she has a temporary name. So I also cannot tag her. Hmm...#I have several FFS comics thumbnailed out. This one got made first because it's the funniest without context. Lore wise it's weak.#I would love to post the sexy clown but you have to wait just a few more comics.#Fun artist woes moment to share: This is the first time I've had to colour these characters traditionally. *That* was NOT fun.#Going from a specific digital colour palette to being at the whims of my limited colour choices in markers? Hell! On! Earth!#I might also be extra frustrated because this sure is 3x the length of what I usually do for comics! I spent a Whole Day on this.#Past me thought it was soooo funny and needed all the extra panels for pacing. I hate past me. That guy needs to be exploded.
497 notes
·
View notes
Text
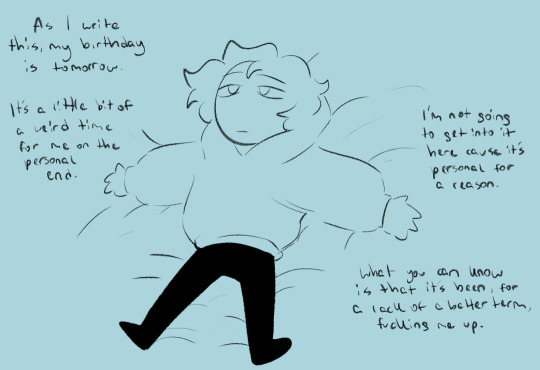
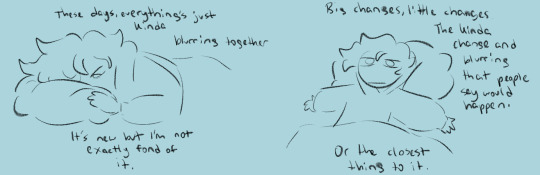
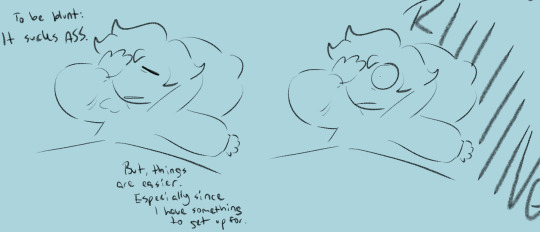


A little different than last year's, but here we are again. To say that this past year hasn't been absolutely wild would be a lie, cause HOLY SHIT MAN
This year's birthday is. A little different for me, but you already have the silly comic to show that so I won't make like a broken record oops
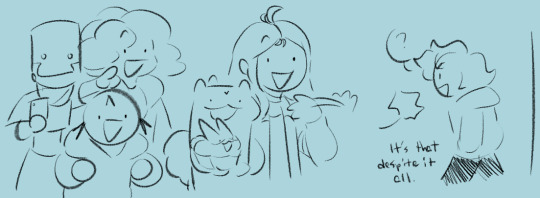
But, despite the changes and hills that life's decided I should climb or throw at, it hasn't changed the fact that I'm so genuinely fucking thankful to the people that I've known since joining this fandom. I'm not even kidding when I say that being here has actually changed my life for the better. I know I said something similar last year, but this time, hoo boy it sure turned up the AMP and test how far I could go.
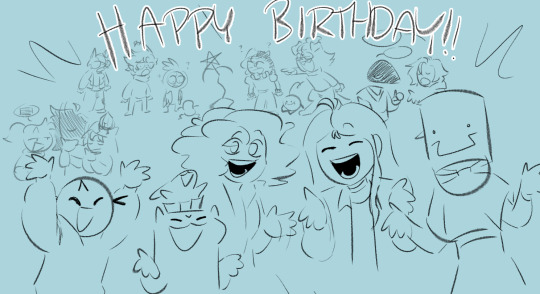
So, to everyone, both new and old; thank you for being here :D
@garbagechocolate @darkxsoulzyx @smoljeanius @bunmuffin @skizabaa
@tuzesdays @sleepykas @fernzwing @kandidandi @starsketchez
@just-a-drawing-bean @notdysfunk @ilsole @amberluvsbugs @cloudyvoid
@nomsthecat @alfinefalf @nosleepygay @theblog-with-thestuff
@cacaocheri
(Edit: ty kibbits for informing me of the. Fuck ass tagging system)
AND TAGGING OTHERS BECAUSE. POINTS. BONKS WITH HEAD. GETTING TO EITHER INTERACT OR TALK OR WHATEVER IS ALWAYS A DELIGHT
@ohno-the-sun @kibbits @ink-yy @saltyfryz @kaprisvn
@hierba-picante @sunny-sophies-garden @cookiiemancer @sneeblbop @justaduckarts
@pepethehumanz @crystalmagpie447 @woolysstuff @mocha-illustrates @duhsty1
@sanchensky @pillowspace @victarin @witherfide
[I DEFINITELY GOT SONAS WRONG AND THESE AREN'T ALL THE SILLY PEOPLE I KNOW BUT IM SITTING HERE AT 2:30 IN THE MORNING JUST KNOW YOU'RE THERE IN SPIRIT HANDING YOU ALL POPTARTS WAUGH]
#nebula art and doodles#should. i even count it as that-#nebula birthday time#fuck it birthday tag go brrr#also if i. didnt tag you it is 100% because i'm. a fucking coward <33 and am not sure if you'd like to be tagged in a silly thing like this#(or i don't. know you. that also but shaky thumbs up)#god. this year has been. insane dawg#my goofy ass going through canon events like it's a buffet /silly#jokes aside#the fact that im still like. here. right here#posting or reblogging goofy shit#still in the process of making my fic (i prommy im working on it)#and just. managing to make friends with people despite shit happening#it's so wild to me#i know for some people i've tagged we either haven't talked that much or haven't talked in awhile#and to that i say#fuck it we ball /j#but seriously it's. honestly bc getting to interact with you guys at all makes or has made my day that much brighter#even if it's been awhile like i mentioned or for whatever reason#this is. getting long as hell and i need to go to bed oops#anywhooooo#gotta go fast or some shit#OH- and thank you all so much for. almost 3k. holy shit#where the fuck did you all COME FROM HOW DID WE GET HERE#big heart emojis and sending love to you all#thank you so much
418 notes
·
View notes
Text
Almost
#zutara#atla#zuko#avatar the last airbender#katara#zutara fanart#Wip#First page of three is done!!!#Won't be sharing until I have the whole thing but I'm. So. Close!!!!!!!#It's been ages since I started this project omg#But it's worth it#Hopefully I'll get the chance to finish it tomorrow... Won't be making any promises tho#I've missed you guys and I can't wait to share this with you#Anyways I know it's ZK month (and all the content has been WONDERFUL so far) but I won't be participating. Sorry about that.#Working with prompts is such an amazing creative exercise but I know myself good enough to be certain that I'll never get past the first...#... prompt without coming up with seven different AUs and I can't deal with more of those right now lol#Like I've got this Blue Spirit! Katara and Painted Lady! Zuko AU on the works since last week or so. And more lore for the og BS/PL spirits#And also this S3 canon divergence AU... And another one... And another one...#And I need to work on them at my own rhythm otherwise I'll go nuts#So uh#Yeah#Love u all and I hope I'll get to share this one soon (if only to start on yet another comic. I've got ideas for two of them. Yay)#Dema out#(Sorry for the rambling I'm just anxious)#(Don't know why but I stopped caring a long time ago)
754 notes
·
View notes
Text
hilarious that with each new day that passes a new bit of dirt from JD Vance's past gets discovered and plastered over the internet...it's almost as if this is why presidential campaigns have always announced their running mates well before the convention...so that if glaring issues with a candidate came to light quickly there would be time to replace them on the ticket before they were officially locked in...it's almost as if certain things in political campaigns were done for a reason, donald...because the very same critical failures had happened before...but no i'm sure you and your guys attempt to recreate a fantasy version of history while ignoring all the reasons that history was a disaster will work this time...because you are built different and the 10000th time trying fascism will work like a charm...
#us politics#politics tw#i view the MAGA movement like this:#the conservatives have been desperately trying to jam a square peg into a round hole for a very long time#and they keep trying because one of these times its GOT to work! a very long time ago they heard the hole was more squarelike#so if they just TRY hard enough it will work!#failing to understand that the hole has become weathered and changed over time and the solution they are trying#will never work (if it ever did)#and then donald trump comes along and looks at the square peg#lobs one of the corners off and proclaims 'this is a triangle! THIS will work! I am so smart!'#and everyone around him is like 'whoa! this guy gets it! he's a genius and understands the problem! he's our savior!'#ignoring the fact that the peg is not a fucking triangle. it's just a deformed square now#so its still not going to work. and even if it WAS a triangle it still wouldn't work because THE HOLE IS ROUND.#it's the same damn peg but it looks a little different so everyone thinks its a genius solution that is DEFINITELY going to work#so they're all excited! they're FINALLY going to prove those idiots trying different types of oval pegs wrong!#they were right all along and it just took donald trump to see it! thank goodness he came along!#but that's just it-- he WAS just COMING ALONG. he was just walking by and saw an opportunity. he never spent time trying to make pegs#all he did was saw a crowd and took a chance to break an already failing peg even further#but because the people were desperate and it was different enough it seemed revolutionary#and now some of the conservatives--who can still see that the 'triangle' peg isnt a triangle are starting to look around#and see that elsewhere there have been some who have forced a triangle into the center of the round hole#and these people think well what if we ACTUALLY tried a real triangle?#and it does not matter to them in the slightest that it will never be the true solution to filling the hole#they just want credit for solving the problem#and so they are going to back donald trump and when the time is right put a real triangle in his hand#while the people trying ovals are busy arguing over the right type of oval#and once the triangle has been jammed into that hole...well...#it is going to be really really hard to force out#anyway thats a long and complicated metaphor and i probably should have just put it in its own post aaaaaahgh#long story short dont be a fascist triangle alright
164 notes
·
View notes
Text

does anyone remember when I drew some fanart of mcd Ein a million years ago
here's a character ref for that design lmao
#i've been chipping away at this since that og fanart so this has been#a very long time coming lol my b#anyways I imagine him to be a silly lil sorcerer guy probably under fenrir? or whatevery faction blaze was apart of#idk i didn't watch season 3 lol#aphmau#snek sketches#minecraft diaries#mystreet#aphmau fanart#aphmau mystreet#aphmau minecraft diaries#aphmau ein
157 notes
·
View notes
Text
My GIF Making process: Screen capturing using MPV player, Organizing files, 3 Sharpening settings, Basic Coloring PSD + Actions set

This is a very long post so heads up.
I’ll try to be as thorough and true as much as possible to the way I make my gifs (I already use Photoshop Actions which I’ve long since set up but now for this tutorial I’m reviewing them to show you the exact steps I’ve learned to create my gifs 😃) and present them to you in a semi-coherent way. Also, please bear with me since English is my second language.
First things first. Below are the things and tools we need to do this:
Downloaded 4K or 1080p quality videos (let’s all assume we know where to get these—especially for high definition movies and tv series—so this post doesn’t get removed, okay? 😛)
Adobe Photoshop CC or the CS versions can work as well, but full disclosure I haven’t created gifs using the CS versions since 2020. I’m currently using Adobe Photoshop 2024.
mpv player. Use mpv player to get those frames/screenshots or any other video player that has a screen grabber feature. I’ve used adapter for the longest time but I’ve switched to mpv because the press to screenshot feature while the video is playing has been a game changer not to mention ultimate time saver for me. For adapter you need to play it in another video player (like VLC player), to get the start and end timestamps of the scene you want to gif which takes me ages before I can even open Photoshop.
Anyway! Please stop reading this post for a moment and head over to this amazing tutorial by kylos. She perfectly tells you how to install and use mpv player, both for Mac and Windows users.
One thing I have to share though, I had a tough time when I updated my MacOS to Sonoma since MPV is suddenly either duplicating frames or when I delete the duplicates the player seems to be skipping frames :/ I searched and found a solution here, though it didn’t work for me lol. My workaround for this in the meantime is decreasing the speed down to 0.70 then start screenshotting—it’s not the same pre Sonoma update but it works so I’ll have to accept it rather than have jumpy looking gifs.
Now, after this part of kylos’ tutorial:

you can continue reading the following sections of my gif tutorial below.
I want to share this little tip (sorry, this will only cater to Mac users) that I hope will be helpful for organizing the screenshots that MPV saved to the folder you have selected. Because believe me you don’t want to go through 1k+ of screenshots to select just 42-50 frames for your gif.
The Control + Command + N shortcut
This shortcut allows you to create a new folder from files you have pre-selected. As you can see below I have already created a couple of folders, and inside each folder I have selected screenshots that I want to include in one single gif. It's up to you how you want to divide yours, assuming you intend to create and post a Tumblr gifset rather than just one gif.

Another tip is making use of tags. Most of, if not all the time, I make supercorp gifs so I tag blue for Kara and red (or green) for Lena—just being ridiculously on brand and all that.
Before we finally open Photoshop, there's one more thing I want to say—I know, please bear with me for the third? fourth? time 😅
It's helpful to organize everything into their respective folders so you know the total number of items/frames you have. This way, you can add or delete excess or unnecessary shots before uploading them in Photoshop.
For example below there are 80 screenshots of Kara inside this folder and for a 1:1 (540 x 540 px) Tumblr gif, Photoshop can just work around with 42-50 max number of frames with color adjustments applied before it exceeds the 10 MB file size limit of Tumblr.

Sometimes I skip this step because it can be exhausting (haha) and include everything so I can decide visually which frames to keep later on. You'll understand what I mean later on. But it's important to keep the Tumblr 10 MB file size limit in mind. Fewer frames, or just the right amount of frames, is better.
So, with the screenshot organization out of the way, let's finally head over to Photoshop.
Giffing in Photoshop, yay!
Let’s begin by navigating to File > Scripts > Load Files into Stack…

The Load Layers window will appear. Click the Browse button next.
Find your chosen screenshots folder, press Command + A to select all files from that folder then click Open. Then click OK.
After importing and stacking your files, Photoshop should display the following view:

By the way, I'll be providing the clip I've used in this tutorial so if want to use them to follow along be my guest :)
If you haven't already opened your Timeline panel, navigate to Windows > Timeline.
Now, let's focus on the Timeline panel for the next couple of steps.
Click Create Video Timeline, then you’ll have this:

Now click the menu icon on the top right corner then go to Convert Frames > Make Frames from Clips

Still working on the Timeline panel, click the bottom left icon this time—the icon with the three tiny boxes—to Convert to Frame Animation
Select Make Frames From Layers from the top right corner menu button.
So now you have this:

Go and click the top right menu icon again to Select All Frames
Then click the small dropdown icon to set another value for Frame Delay. Select Other…

The best for me and for most is 0.05 but you can always play around and see what you think works for you.
Click the top right menu icon again to Reverse Frames.
I think Photoshop has long since fixed this issue but usually the first animation frame is empty so I just delete it but now going through all these steps there seems to be none of that but anyways, the delete icon is the last one among the line of feature buttons at the bottom part of the Timeline panel.
Yay, now we can have our first proper GIF preview of a thirsty Lena 😜

Press spacebar to watch your gif play for the very first time! After an hour and half of selecting and cutting off screenshots! 😛 Play it some more. No really, I’m serious. I do this so even as early (lol) as this part in the gif making process, I can see which frames I can/should delete to be within the 10 MB file size limit. You can also do it at the end of course 🙂
Now, let’s go to the next important steps of this tutorial post which I’ve numbered below.
Crop and resize to meet Tumblr's required dimensions. The width value should be either 540px, 268px, or 177px.
Convert the gif to a Smart Object for sharpening.
Apply lighting and basic color adjustments before the heavy coloring. I will be sharing the base adjustments layers I use for my gifs 😃.
1. Crop and Resize
Click on the Crop tool (shortcut: the C key)

I like my GIFs big so I always set this to 1:1 ratio if the scene allows it. Press the Enter key after selecting the area of the frame that you want to keep.
Side note: If you find that after cropping, you want to adjust the image to the left or another direction, simply unselect the Delete Cropped Pixels option. This way, you will still have the whole frame area available to crop again as needed and as you prefer.
Now we need to resize our gif and the shortcut for that is Command + Opt + I. Type in 540 as the width measurement, then the height will automatically change to follow the ratio you’ve set while cropping.
540 x 540 px for 1:1
540 x 405 px for 4:3
540 x 304 px for 16:9
For the Resample value I prefer Bilinear—but you can always select the other options to see what you like best.
Click OK. Then Command + 0 and Command + - to properly view the those 540 pixels.

Now we get to the exciting part :) the sharpen settings!
2. Sharpen
First we need to have all these layers “compressed” intro a single smart object from which we can apply filters to.
Select this little button on the the bottom left corner of the Timeline panel.


Select > All Layers
Then go to Filter > Convert for Smart Filters
Just click OK when a pop-up shows up.
Now you should have this view on the Layers panel:

Now I have 3 sharpen settings to share but I’ll have download links to the Action packs at the end of this long ass tutorial so if you want to skip ahead, feel free to do so.
Sharpen v1
Go to Filter > Sharpen > Smart Sharpen…
Below are my settings. I don’t adjust anything under Shadows/Highlights.
Amount: 500
Radius: 0.4
Click OK then do another Smart Sharpen but this time with the below adjustments.
Amount: 12
Radius: 10.0

As you can see Lena’s beautiful eyes are “popping out” now with these filters applied. Click OK.
Now we need to Convert to Frame Animation. Follow the steps below.
Click on the menu icon at the top right corner of the Timeline panel, then click Convert Frames > Flatten Frames into Clips
Then Convert Frames > Convert to Frame Animation
One more click to Make Frames From Layers
Delete the first frame then Select All then Set Frame Delay to 0.05

and there you have it! Play your GIF and make sure it’s just around 42-50 frames. This is the time to select and delete.
To preview and save your GIF go to File > Export > Save for Web (Legacy)…
Below are my Export settings. Make sure to have the file size around 9.2 MB to 9.4 MB max and not exactly 10 MB.

This time I got away with 55 frames but this is because I haven’t applied lighting and color adjustments yet and not to mention the smart sharpen settings aren't to heavy so let’s take that into consideration.
Sharpen v1 preview:

Sharpen v2
Go back to this part of the tutorial and apply the v2 settings.
Smart Sharpen 1:
Amount: 500
Radius: 0.3
Smart Sharpen 2:
Amount: 20
Radius: 0.5
We’re adding a new type of Filter which is Reduce Noise (Filter > Noise > Reduce Noise...) with the below settings.

Then one last Smart Sharpen:
Amount: 500
Radius: 0.3
Your Layers panel should look like this:

Then do the Convert to Frames Animation section again and see below preview.
Sharpen v2 preview:

Sharpen v3:
Smart Sharpen 1:
Amount: 500
Radius: 0.4
Smart Sharpen 2:
Amount: 12
Radius: 10.0
Reduce Noise:
Strength: 5
Preserve Details: 50%
Reduce Color Noise: 0%
Sharpen Details: 50%
Sharpen v3 preview:

And here they are next to each other with coloring applied:
v1

v2

v3

Congratulations, you've made it to the end of the post 😂
As promised, here is the download link to all the files I used in this tutorial which include:
supercorp 2.05 Crossfire clip
3 PSD files with sharpen settings and basic coloring PSD
Actions set
As always, if you're feeling generous here's my Ko-fi link :) Thank you guys and I hope this tutorial will help you and make you love gif making.
P.S. In the next post I'll be sharing more references I found helpful especially with coloring. I just have to search and gather them all.
-Jill
#tutorial#gif tutorial#photoshop tutorial#gif making#sharpening#sharpening tutorial#photoshop#photoshop resources#psd#psd coloring#gif coloring#supercorp#supercorpedit#lena luthor#supergirl#my tutorial#this has been a long time coming#guys. i'm BEGGING you. use the actions set - it was a pain doing all this manually again ngl LMAO#i've been so used to just playing the actions#so this has been a wild refresher course for me too 😆
128 notes
·
View notes
Text
DP x DC
not me thinking about imaginary scenarios of ten year old Tim Drake in the ghost zone (pariah’s castle)
where Tim thinks it’s strangely soothing that despite being the only one whose steps connect to the ground, there’s not that eerie silence that befell drake manor
strange blob creatures chitter softly and nip at his hair and swooshes and wisps of wind betray the presence of an invisible ghost
which after following he realizes it’s almost like he’s trailing after the black dark shadow that is batman again
which gives him the idea that, maybe, just this one time, he can play the part of robin
that in mind Tim makes out a game of sneaking to the side of ghosts that look like they’re brooding and if they can spot him he loses
most just grunt in response (very in character) while others fuss over him and ask questions which Tim uses to infodump
he also politely asks the ghost that always asks him how he’s doing to instead say the word “report”
(the ghost looks at him weirdly but humors him and besides the answer would be the same anyways)
Tim also(!!)
gets on the case of why the walls lack tangibility when he is the one leaning on them (he doesn’t live down the time he wanted to look cool only to fall through the wall)
hyperfixates on how gravity works in the ghost zone because he couldn’t do a skateboard trick he has pulled off many many times and he’s salty about it
tries to figure out where they are getting human food from (cause it’s hot enough to be homemade but also there’s no kitchen —so how could it be) (also he wants coffee)
finds out the dude that often gives him a side eye when he finds that Tim knows how to do something (math homework), is next in line for the throne and yet doesn’t have a single “mingle and talk people up” bone in his body. (despite it his networking is a solid 7/10)
gets a ghost horse to adopt him what
discovers pretty quickly that there are rooms to which he can’t phase through (a.k.a. he’s not allowed entry) to which he begrudgingly backs off even though that stands in his way of doing a very thorough layout™ of the place (robin would)
sulks over the lack of extreme sports in the place
(Danny takes him to the Far Frozen where they go tire sliding in the snow and where tim learns how to use a skateboard skate and also that ghost ice cream is just as good as normal ice cream)
sulks again cuz he caught a common cold
also because there’s no sun or moon poor Timmy’s already screwed sleep schedule gets more messed up to the point no one knows when or where he will fall asleep
(ghosts find him in the most unhinged of places with a signature purple cloak draped over him every. single. time.)
overall, be a menace
see-> the time he threatened to build ghost weapons he’d somehow memorized the blueprints of cause Danny wouldn’t let him visit the radium girls factory but yes the renaissance period
see-> that time he went through the whole ghost energy and how to work with it book section in the library and half an hour later had a prototype of a star wars laser beam made
(note: bribing only works for hot chocolate, not for letting him keep cool-looking guns)
just tim having the time of his life
clockwork being no help at all (the ghost loves being a cryptid)
and danny trying not to get attached while he progressively gets more concerned over this chaos child he emotionally adopted as his little brother
(to fit canon cause i want it to this would just be until Danny finds the dimension little Timmy is from, then they can safely yeet the child back to the moment he first went missing)
anyways before anyone knows it’s been three months
#tim drake#danny phantom#dp x dc au#batman#dc#dp x dc#danny fenton#like this little guy practiced with ghosts#which don’t breathe#tim comes back to gotham and can sneak up to batman better than an assassin#don’t make sound on the floor if they don’t want#and have heightened senses#you are gonna tell me that in all the bats career they never saw the little tiny child that followed them around with a camara??#whelp now you got an explanation as to why#also upon realizing Danny didn’t know anything about how to mingle Tim who has been going to galas for years self appoints himself#to teach him don’t frett#little headcannons in my own au#this in my head is fic#it’s more extensive but it was getting long#i was going through some mental hoops to find the correlation between his hobby and tim this time deciding to be robin#instead of the shadow chasing AFTER Batman#but basically it’s because this time tim had someone to make of Batman#he’s not alone#and he’s a kid#he wants to play#and now that he can play With someone of course Timmy is gonna chose his hero
212 notes
·
View notes
Text


kinnporsche the series as faceless gifsets: ep 12 / 14
“I was just following my papa’s order.”
#u guys would scream if u knew how long this set has been rotting in my drafts#it had 10 gifs and i couldn't decide which one to boot but i FINALLY got it so have this#i remade it bc last time it wasn't 4k and i was also determined to do better than last time#and can u believe tumblr's audacity bc now that i was finally ready to post it didnt show up on the dash#bc tumblr was pissy abt the colouring choices i made in one gif. come on now#vegaspete#kinnporsche#kinnporsche the series#bl shows#my gifs#usertph#userboots#taggingmarion#saturntracks#faceless kp series
228 notes
·
View notes
Text
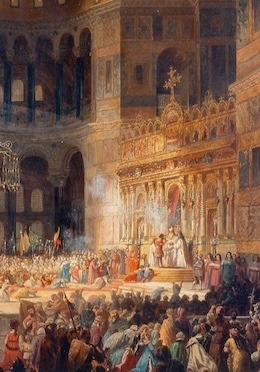


And I saw another beast come up out of the earth...and he spake as a dragon. (Revelation 13:11)
.
The Coronation of His Majesty King Bastian I - The Hour of Wolves
When he was born he was a small thing. A screaming infant, a second son, destined perhaps for military greatness, but never dukedom. Never inheritance. Never conquest.
But at the inception of the light, the birth of the world, the moment between silence and splendor when The Glory breathed across the scope of creation: he was no small thing then.
Even then, he was coming.
His rise runs with blood: knives in the back, poison, betrayal, kidnapping and vengeance.
His rise burns with greatness: glory, family, rescue, love and ferocity.
The secret world recognized him before he knew himself. A fairy witch marked his passing and offered her slender wrist for his talons. A dead sun opens its mouth for him, a vanished Christ is his counterpart, a death knight worships before him, a raven-haired little girl holds the hand of her doting and beloved father.
The world we know calls him king of France, the monarch of a seized throne, a general who has promised the great lords England on its knees.
The Devil, in his own tongue, may call him son. The Glory has said nothing.
Would you know him if you saw him? Would you recognize what he is?
Bow, while you consider, and kiss his ring. There is a crown of flame upon his brow.
#MY SHITTY LITTLE GUY IS KING OF FRANCE BABY#local worst man you have ever met receives ancient crown of charlemagne in a coup with the help of his previously-despised elder brother#god help every last person who stands in his way#he made sure the warring princes locked in civil war were Dealt With (one dead one ~conveniently misplaced~) and stood in paris#before every lord in france with the burgundian army behind him and basically dared them to tell him no#he's a big money no whammies guy so he's promised them england's total surrender within fifteen years#or he'll abdicate#he's here for a legendary time AND a long time#if he can pull this off#(lisbet has received a boon and vision from the sunflower king and invented cannon several decades early so)#(london may be in the hands of the french sooner than we think)#(but then as many would-be conquerors find - you then have the horrors of northern england to deal with)#godspeed you lunatic#I have literally never been more pleased and proud of a fictional creation of mine in my life#he's come so far and also aria and I have made something really incredible#stay tuned friends#he's only going to get worse#heretic
68 notes
·
View notes
Text
anyone interested in talking about the iconic 2000's middle-grade-bordering-on-ya book series gallagher girls??
#okay incoming rant about this series#i read the first book when i was 10 or 11 and i was absolutely obssessed with it. i read it so many times i had the entire story memorized#the issue was that i could not find the rest of the series anywhere. it was either sold out or out of stock#and then i found out that only the first 3 books had been translated into my first language so at that point i kinda gave up on them#anyway#flashforward to a couple of weeks ago#i was re organizing my bookshelf and on the back i found LYKY (is this how y'all are abreviating it??)#and remembred how much i loved it#and since i'm now fluent in english and was stuck at home recovering from a surgery i decided to download the entire series and read it#to find out what the fuck happened afterwards#long story short i read all six books in 4 or 5 days#and i haven't stopped thinking about them since#it's actually so funny how little information we have in the first book#i went all of these years thinking it was mostly a silly series about a boarding school for spies when actually SO MUCH happens afterwards#i can't believe i went all of these years unaware of zach goode's existence#truly character of all time#but also i can't stop thinking about how interesting it would have been if zach had come to hate the circle and his mom during the series#rather than before#make it a true enemies to lovers#and have us witness that portion of his character developement in real time instead of being told about it#like him slowly realizing through cammie and his time at gallagher that maybe what they were doing is wrong#i think it would have been very interesting to read#although let's be real it took me until halfway through book four to trust him and he was fully one of the good guys so..#but yeah i have a lot more to say but these tags are long enough#gallagher girls#okay i just want to add another funny anecdote about my experience with this series#my copy of LYKY has an age warning in the back recomending that readers should be above 13 yo to read it#and i distinctly remember finishing it and thinking the warning was kind of dumb bcs besides a few mentions of death and other heavier topi#nothing really happened#and now i realize it was a warning for the rest of the series not just the first book because jesus fucking chirst everything after
64 notes
·
View notes
Text
!!! FLASHING LIGHTS WARNING!!! [IM NOT FUCKIN AROUND!!]
REACHED THE CUSP OF 'THIS MAY NEVER BE ABSOLUTELY FINISHED N IF I DONT SHOW IT NOW, IT WILL NEVER SEE THE LIGHT OF DAY.' SO HERE, A PROJECT IVE BEEN ORBITING AROUND UHH SINCE 2021 OR SO.
#jrwi fanart#jrwi show#jrwi riptide#gillion tidestrider#cw flashing lights#LOOORRD OF LIGHTNING SAAAAVE ME!!!!#RAAAHHHH I LOVETHIS SONG SO FUCKIN MUCH AND I LOVE GILLION SO FUCKIN MUCH RAAHHHH!! RAAHHHH!!!#BUT YES YES I HAD LIKE A WHOLE OTHER HALF TO THIS SKETCHED OUT BUT IT WONT FINISH COOKIN FOR A MILLION YEAARS!!!!#MAYBE SOMEDAY.....#ANYWAY. this is my first time actually syncing audio to my animations. normally i domnt know howww.#i animated it all in fire alpaca AND THEN i mixed everything in a pirated movie maker. it kinda uh. sucks. but its WHAT I GOT BAYBE!!#i relaly like how i animate swishy hair... i was inspird by eris from sinbad. i can only HOPE i got on that level w the watery flowyness#LIUGHTNING IS HARD TO ANIMATE TOO. I WATCHED ALOTTA VIDEOS ABSORBED MINIMAL TUTORIALS AND UHH I THINK I DID OKAY!!#better than bad!!! but i can still do better. eventually. ugh. FLASHING LIGHTS TOO HUH? U LIKE ANIMATINGB FLASHING LIGHT?#U LIKE MAKING THE BLACK N WHITE FLICKER RLY FAST UNTIL UR EYES BLEED OUT UR SKULL?? YEAAAHH YOU DO!!!#im also vry proud o the title cards i made at the beginning teheheheh. dependign on where riptide goes i MIGHT change it#BUT HEY THEORY TIME? I HOPE ONE OF THE GODDESSES COMES DOWN TO PILOT GILLIONS BODY SO THEY CAN BEAT THE FUCK OUT O THE OTHER GODDESS#WHO IS ALSO IN SOMEONE ELSES MORTAL BODY. GODS COMING DOWN TO WREAK HAVOC OVER PETTY DISAGREEMENTS OOOGH HOW FUN!!#GOOD ON YOU CHAMPION!! YOUR VESSEL HAS BEEN TRAINED TO BE STRONG AND HARDY. PERFECT FOR CHANNELING DIVINE ENERGY.#OHHHH WHAT A PERFECT WEAPON YOU ARE. NOW GO AND IMMANENTIZE A WATERY ESCHATON#PARAGON OF OCEANS WRATH I WANT TO SEE YOU DROWN THE LAND. DESTROY!!! EAT!!! BURN!!! RAAAGHH I NEED GILLION TO GET MORE POWER!!!!#ALSO in other news i uh. actually posted this onto twitter forever ago but forgot to post it here bc i can only post it from pc and BABY!!#IM NOT ON THE COMPUTER OFTEN! NOT ANYMORE!! NOT ANYMOREE!!! IM FREE BAYBE!! i used to be so miserable. sometimes i think abt that.#ANYWAY. pls enjoy. just this much took so long. i love makin the lil guys move.... ouh.... hava good day if u get the chance to.
126 notes
·
View notes
Text

the coolest kids in forgotten valley!!☆
(…it seems there may have been a stretch of time where rock and lumina were the only kids in forgotten valley…🥲)
poseref
#in the remake hugh and the player’s kid are the same number of years apart#so i can see them having very similar conversations n friendship#surely these two kids will grow up well adjusted and they will have no lasting effects from this kind of isolation. they will be fine#i have been thinking a lot about what their childhoods were like. i want to protect both of them#everyone who has anything to say about them as kids says that both of them were not well behaved children at all#tei says rock was rambunctious and energetic and hard to handle. sebastian says lumina was less than amenable#rock says he was bored to death when he first came here and lumina asks you not to tell romana that she’s lonely#lumina also hated wearing dresses so. she is very mad and ready to bite people maybe#sos awl#bokumono#my art#rock tumbling (sos)#harvest moon#story of seasons#story of seasons a wonderful life#bokujou monogatari#i like to imagine a au where pony and cecilia come to visit their family’s respective farms#so these two can have more friends ;w;#i am always thinking about how they were both severed from their families and taken in by someone else at a young age to live in nowhere#and they are both not exactly enthused about following the path laid out for them#headcanon ⚠️ i wonder if rock’s moving out on his own happened when he was a teenager. he was extremely confident everything would work out#anyway he got fired from every job ever and after many years came crawling back. and he came crawling back blond#at the time of chapter 1 lumina is baffled by the state of the guy she grew up with. why is he using dated slang and wearing disco costume#she is also kind of mad at him for having been gone for so long#hc rock probably had more freedom as a kid than lumina did which probably annoyed her#once again takakura retrieves a small rock from the goddess pond and he’s covered in poison ivy bee stings etc. no remorse#lumina from her window on the hill feels somehow jealous of these misadventures#lumina mentions in her heart event that she doesn’t often visit the beach because her skin burns easily#meanwhile rock was probably playing outside always. if his kid is any indication#idk i like thinking about the history of this extremely small village
59 notes
·
View notes
Text

you used to be such a baby.
#marking this for . Violence.#Uh. Ask to tag.#Been hesitant to post this and i might delete it if i get embarrassed . Whatever.#If it isn't obvious. Gordon's not really there .#I will do more rambling. Past the tags#Blood#cw blood#tw blood#violence#gore#that man has been. Brutalized. Eeeyikes !#Barney Calhoun#half life#gordon freeman#Barney's supposed 2 be a little younger here . Maybe in his 30s#something something seeing the specter of your long gone companion from a time you can never go back to judging your every move#because youre doing this because of him. Youre doing this for him.#Youre doing this for everyone. and he looks exactly the same as you get older#and your clothes become drenched with blood rhat isnt your own and why have you survived this long when others havent.#(You know why)#and then he does come back. for real. Not a ghost#not a figment of your imagination.#And he looks exactly the same#Or something. Lol#LISTEN . sometimes you get caught by a CP and they're gonna blow your cover and get everyone you love killed.#What're you gonna do.#I don't think Barney is a violent man. Far from it . I just think bad things happened. And I think he had to do bad things#WAVES MY HANDS. I ALSO JUST KIND OF WANTED TO DRAW BLOOD . and Barney is my Guy of the moment .#I think about him alot . I should talk about it more. Whaterver
46 notes
·
View notes
Text
Thinking about how the Tower & the Adversary routes are connected through the Fury, and how you kind of get there by turning one into the other, and how horrified they are by what they become.
Tower is about subjugation - she outright says she does not believe the two of you are on equal footing. You get the Fury from her when you assert your independence and fight back, forcing her to take you seriously as a threat and defend herself.
Adversary is all about an equal fight - she prides herself on her strength, but also admires yours. You access the Fury through her by refusing to fight, watching her beat you to a pulp and become disgusted by what she does to you.
IDK it is interesting how the Tower & Adversary parallel one another, and how you end up with the Fury in each route by doing what their sister route would have wanted you to do.
#i have no idea if the last sentence makes sense here lol#slay the princess#stp#the adversary#the tower#the fury#ive just been thinking about these guys a lot#in part just bc fury is a fascinating route to me (im very glad she's getting expanded upon)#& while tower's probably my least favorite route i still think about her a lot. i have a lot of thoughts about tower#but also 'sacrifice the yourself' has me thinking about how the princesses might feel about each other#& while i kinda concluded tower would dismiss all of the other vessels as 'insults' to her existence#i kind of started thinking about how much adversary (who loves an equal fight) would HATE playing the tower route lmao#idk it's a shame these guys get less attention compared to the 'nicer' princesses bc the ways they connect are really interesting#honestly im also curious about apotheosis bc id like to see her turn around how some ppl feel about tower#actually final addition to these long tags -#i think part of the tower hate comes from how frustrating it can be to play#(my first time through i was struggling to figure out what to do bc of the options being taken away)#and partially bc broken is a lot of ppl's least favorite voice#but *I* didn't mind broken. he got a few laughs out of me#my least favorite voice is cold
43 notes
·
View notes
Last Seen Blogs

onioff
gross

robot-starfish-blog
Perhaps 'Fuck Off' Might Be Too Kind.

strawberry-princess
Strawberry Princess's Tumblr

welbonworkhealthandwellness-blog
Untitled

gremzon
Down in the forest, we'll sing a chorus