
paulandrewdunker
PAUL ANDREW DUNKER
Firm supporter of the oxford comma.
20 posts
Don't wanna be here? Send us removal request.
Last Seen Blogs

psy1117
경남.30후반.일탈

shelmarts
The art blog for weirdotwins
psy1117
경남.30후반.일탈

tresbelles0
Très Belles

thetelekineticfrog
*Warning* may contain sarcasm
Photo

My wife and I went to Dismaland yesterday, but it was closed due to high winds. Thankfully, the tide was out at the Bristol Channel, and I had my camera with me. This channel experiences the second widest tidal range in the world, at a whopping 13 meters (43 feet)! With the tide out, there are beautiful patterns of water, seaweed, sand, and reflections of light as one looks toward the horizon.
This shot was captured at f11, ISO100, and 1/100th of a second on a Nikon D800e, and the Sigma ART series 50mm f1.4, and was edited for black and white in Adobe Lightroom.
#dismaland#weston super mare#bristol channel#bristol#england#united kingdom#beach#black and white#nikon#d800e#d800#sigma art 50mm#sigma art 50mm f1.4#rothko#landscape photography
3 notes
·
View notes
Photo


DELTA BLUES
The Delta National Wildlife Refuge is located at the very tip of highway 23, about 80 miles outside of New Orleans, Louisiana. I arrived at the edge of the refuge midday, just as a blanket of fog was rolling in from the Gulf of Mexico.
I quickly set up for a long exposure shot, setting the line of cypress trees just above the lower third of the frame. I experimented with various filter and exposure combinations, but my absolute favorite has to be the eight minute exposure. I used my Nikon D610 at ISO100, with a Bower 35mm f1.4 set at f8. I also decided to double up on filters, using both a Lee Filters Big Stopper and B+W 3.0 10-stop neutral density filter. The color cast of the Lee Filters Big Stopper normally drives me mad, but in this instance, it lent a nice shade to the otherwise brown water.
It is extremely difficult to shoot with this much reduction of light. Using two 10-stop filters reduces the incoming light by 1,000,000 times, which means the exposure time must be exceedingly long in order to have a properly exposed image. For instance, a properly exposed image with the camera set at f8, ISO100, and a shutter speed of 1/500th of a second would require a 2 second exposure with a single 10-stop filter, and adding a second 10-stop filter would require a 30 minute exposure!
In order to pull off such a long exposure, there are many considerations to make. The camera must be secured on a very sturdy tripod. I have switched to carbon fiber tripods because aluminum tripods have too much flex, and will move in the wind, ruining the shot. The ISO must be kept as low as possible, in order to reduce the amount of noise present in the final image. Before mounting the filter on the lens, the image must be composed and focused, as you can’t see through the viewfinder with even a 10-stop filter mounted. Once everything is set and composed, I take a test shot to confirm my correct exposure with no filter, and to closely inspect the image to confirm focus.
Once I have everything set as I want it, I mount the filters, make certain features like autofocus and vibration reduction are turned off, and set the camera to the BULB setting. I use a Polaroid wired remote for long exposures, simply for the display which shows the duration of the exposure. To calculate the correct exposure time, I use either an app called LongTime or a paper chart I keep in my camera bag. I don’t use Nikon’s built-in Long Exposure Noise Reduction feature, as it requires a second exposure of the same settings, which is a bit onerous with an exposure time of 8 minutes or more.
I am very excited to continue pushing the limits of long exposure photography. The way water turns completely smooth, and clouds turn into dramatic streaks, give an image so much impact and emotion.
#Nikon#nikon photography#Nikon Equipment#nikkor#Bower 35mm#long exposure#Long exposure photography#abstract#minimal#minimalist#andreas gursky#Michael Kenna#kenna#hiroshi sugimoto#sugimoto#mississippi river#mississippi river delta#delta wildlife national refuge#cypress swamp#fog#clouds#Rokinon#Samyang#D610#Nikon D610#Nikon D600#D600#Bower 35mm f1.4#35mm f1.4#Lee Filters
5 notes
·
View notes
Photo


The hardest part of living in New Orleans is deciding where to go spend the day shooting. Usually I jump on Google Maps, and search on satellite view for an interesting looking location. On Sunday night, I came across the Bayou Sauvage Nation Wildlife Refuge, and on the far east side, on the banks of the bayou, a location called Fort Macomb. Google showed two pictures of a run down fort, built right into the swamp, surrounded by hurricane damaged concrete and the remains of a disused jetty.
Perfect.
The weather was equal parts clouds and rain, which are my favorite conditions in which to shoot. My sister is visiting, and thankfully, she likes to explore and shoot as well We headed out around noon, and made it to the fort just as the clouds were starting to build. By the time I had my gear and filters set up, the rain was starting to fall. I snagged a few shots, but the water kept building up on the front of my filters, causing unwanted spots to appear in the shot.
Thankfully, it’s the south, which means the rain lasts for about 10 minutes at a stretch. After a quick break, the rain had slowed to an occasional spattering of drops, infrequent enough that I could shoot in between and keep my filters clear.
In the end, my favorite shot was a 10 second exposure that I converted to black and white in Lightroom. I captured the shot on my Nikon D610 and the Nikon 16-35mm f4 at ISO100 and f8, and a Lee Filters 10-stop Big Stopper neutral density filter and a Lee Filters hard-edge 3-stop graduated neutral density filter to control the exposure on the sky. I really wanted to capture a panoramic shot of the fort using my Bower 35mm f1.4 lens and my B+W circular ND filters, but there were too many gnats (called “noseeums” in the south!), and the LOVE me!
The weather and light weren’t perfect for what I was hoping to get, but it was a great test shoot at a location I will visit a few more times!
#Nikon#D610#16-35mm f4#nikon 16-35mm f/4 g ed vr#long exposure#Long exposure photography#Michael Kenna#Fort Macomb#Carcosa#True Detective#Black and White#Water#Movement#Mamiya#Lee filters#Big Stopper#graduated neutral density#Graduated ND#10-stop#10-stop nd filter
2 notes
·
View notes
Photo

THE LAND OF ENCHANTMENT // Life in New Mexico
In the beginning of June, Emma and I moved from a soggy seaside island on the coast of South Carolina to the dry, rocky high desert of Albuquerque, New Mexico. The scenery is different, to say the least!
I have been working on a new series, but I am still finding time to hike and explore the foothills of the Sandia Mountains, which rise up to the east behind our apartment.
The Sandia mountains reach a height of 10,678' (3254.65 meters). We live in the Northeast Heights, in the High Desert community, which is around 6500'. With the mountains directly in front of our apartment, we get to witness so truly spectacular weather.
As winds push against the east side of the mountains, the warm air from the flat desert gets pushed up against the cool air at the top of the mountains. This creates some spectacular clouds that roll like chopping waves along the upper edge of the mountains.
I am really excited to see what winter brings-the sparse desert landscape against the red and gray rock, dusted in fresh white snow, with all of the drama of a stormy mountaintop as a backdrop should provide some amazing photographic opportunities!
Shot on a Nikon D610, with a Tamron 70-200mm F2.8 lens at ISO100, F11, and 1/500th shutter speed.
#Nikon#D610#D600#Tamron#Tamron 70-200mm#F11#tamron 70-200mm f2.8#new mexico#albuquerque#Duke City#High Desert#Sandia Mountains#Foothills#Northeast Heights#Clouds#Mountains#Storm#Black and White#Photography
1 note
·
View note
Photo


STRAND // BRITTANY, FR
The coast of Brittany, France is absolutely incredible. On the western coast of the country, the cold Atlantic ocean meets tall, rocky cliffs that give way to fields of wildflowers and dense forests.
The rocks along the coast are particularly beautiful. Made up of layer after layer of granite left behind by periods of intense volcanic activity, the diagonal sheets of granite have been worn by thousands of years of waves, wind and sand. Beautiful gold, green, and white splashes of moss provide a pop of color against the gray and black granite.
I love shooting this series around the world. Each beach is completely different, providing a new challenge, a new inspiration. Brittany has been by far the most challenging, and most rewarding, yet.
#France#Bretagne#brittany france#Coast#Shore#strand#Sea#Long exposure photography#long exposure#photography#fine art photography#neutral density#nd filters#B+W Filter#b+w filters#10 stop#16 stops#35mm#Fuji#Fujifilm#fuji x100s#fujifilm x100s#X100s
3 notes
·
View notes
Photo


PANORAMIC STITCHING
When packing for a two-week trip to Europe, I decided to leave my Nikon D600 and lenses at home, and instead take my Fuji x100s and a small set of filters. This compact camera has a great 16MP CMOS sensor and an incredibly well-matched 35mm-equivalent f2.0 lens.
The only downside for me is that I print very large, and a 16MP image will print about 13x19 at native resolution. To make up for this, I often shoot a panorama and stitch multiple images together.
For this image captured on the coast of Brittany, France, I stitched six images together with the camera in portrait orientation. I overlap each image by about 60%, to make sure that I have plenty of pixels to work with where they overlap. These are all 30-second exposures at f8.0.
I used a B+W 10-stop ND filter and a Lee Filters 3-stop hard edge graduated ND to bring the exposure down in the sky. After several months of experimenting with Lee filters, however, I've grown increasingly dissatisfied with the coloration of these particular filters. The ND filters all have a very intense blue coloration to them that I find extremely difficult to correct for. My Tiffen 3-stop ND has a slight warm/reddish cast, but it's very easy to correct. My B+W 10-stop is actually completely color-neutral, so I am at the point where I plan on selling my Lee filter set and purchasing a second B+W 10-stop.
I will definitely miss the convenience of the filter holder and the quick release system, but color accuracy is much more important to me.
#Fuji#Fujifilm#fuji x100s#fujifilm x100s#35mm#neutral density#nd filters#big stopper#lee big stopper#lee filters#tiffen#B+W Filter#b+w filters#10-stop#10 stop#Long exposure photography#long exposure#water#strand#coast#brittany#france#bretagne#finistere sud
2 notes
·
View notes
Photo


I have been wanting to do some abstract shots at this little patch of forest for quite some time. This is actually a stand of pine trees planted in even rows, at the center of a freeway exit!
For this shot, I wanted the viewer to feel like they were out for a walk and came upon this mysterious scene. I made several very calculated decisions in my equipment in order to achieve the desired result.
I shot this with a 50mm lens, set at f8 to maximize depth of field but to minimize loss of sharpness from diffraction. I didn't want to use a wider lens, because I wanted the angle of view to be similar to what the human eye sees-this helps the image feel 'real,' although there is obviously something strange at play.
My original plan was to set the antlers on the ground between the trees and move them around, and then composite the images together so it looked like dozens of pairs of antlers on the forest floor. I quickly realized that the antlers were way too similar in color to the pine straw, and were not visible in the way I wanted. Fortunately, a storm had just cleared, so all of the trees were black from being soaked in water.
I took the three sets of antlers that I had with me and set to work. I spent well over an our running back and forth, moving the antlers from tree to tree and snapping shots. In the end, I had almost 50 shots to work with. I pulled them into Photoshop in groups of 10, lassoed around the antlers, and cut away the rest until I had one image with all of the antlers.
This shot took me about 6 hours total to pull off, but I am extremely happy with the result!
1 note
·
View note
Photo


I have revisited the Morris Island lighthouse several times trying to get a shot that I liked, but until last weekend I kept coming away empty handed.
The weird storm we had Saturday night left some clouds behind that made some cool light on Sunday morning.
For landscape shots with water, i almost always use neutral density filters to slow the shutter speed and smooth out the motion in the water. A neutral density filter is a specialized type of very dark glass that blocks all wave lengths of light equally, reducing how much light hits the sensor/film without affecting the color of the scene. Every ‘stop’ of an ND filter reduces the amount of light in half. That means that a 10-stop filter will reduce the light getting to the sensor/film by 1000 times.
For this image, I was experimenting with a technique called filter stacking. I had a B+W 77mm 10-stop neutral density filter directly on the lens, and then the Lee Filters holder in front of that. In the Lee holder I had the Big Stopper 10-stop neutral density filer, and in front of that the Lee 3-stop hard edge graduated neutral density filter. A graduated filter like the one you see in the picture helps darken the sky so it matches the foreground in terms of brightness. You can put the line of the filter on the horizon and darken the clouds, increase contrast, and make sure the sun isn’t overexposed. Stacking the filters like these means over a million times reduction in the amount of light passing through the lens, and 3 million times reduction of the sky!
I had my ISO set to 200. I usually shoot at ISO50, but with so much filtering, that would have meant a 20 minute exposure time! In order to calculate my shutter speed, I have a few tricks up my sleeve. There is a great app called Long Time that will calculate for up to 20-stops of reduction. I also keep a chart of shutter speeds and exposure times in my bag. If I don’t have either with me, I simply set my camera so it is properly exposed and then cut the shutter speed in half 10 times for one filter or 20 times for two filters.
In the end, I am really, really happy with this shot. The sun lit the clouds in a very cool way, the oyster beds make a great visual anchor to the front of the image.
#lee filters#bog stopper#lee big stopper#bw filters#B&W filters#nikon#d600#nikon d600#nikon photography#morris island lighthouse#charleston#folly beach#water#waves#long exposure#long exposure photography#filter stacking#10-stop#20-stop#landscape photography
2 notes
·
View notes
Photo


My Nikon is in the shop, so I took a chance to play with my Fuji X100s compact today. It has a lot more noise, and focusing was incredibly difficult, but I still got a couple of cool shots.
For this image, I walked the length of the beach twice looking for a spot where the water reached the shore in a perfectly straight line. I was also on the hunt for a spot with a decent amount of shells. Many photographers that do abstract landscapes with water don't incorporate any fixed visual element, it's all water and sky. This is unsettling to view, as your eye is on the hunt for a subject, but cannot find one. There is also no sense of scale-you could be looking at an inch or a mile.
These shells provide a great anchor for the image-they tell the viewer how much space they are looking at, where it is, and add some texture to otherwise smooth colorfields.
I also experimented with multiple neutral density (ND) filters for this image. A powerful ND filter-like the Lee Filters Big Stopper used here-looks like black glass, and cuts the light that hits the sensor by 1000 times. This means that a an image that would need a shutter speed of 1/250 of a second would take 8 seconds to expose with this filter in front.
Here I am combining the Lee Big Stopper 10-stop ND filter, with a Lee 3-stop graded ND filter across the top half of the frame. This brings the exposure in clouds down and gives them the dark, moody feeling that they have.
I also used the Fuji X100s' built-in 3-stop ND filter to give an even longer exposure time. Here I am shooting at the base ISO of 200, f11 (to minimize diffraction and make the image as sharp as possible), and a shutter speed of 30".
I love the way the straight lines come together here, along with the contrast from the white rushing water and the shells on the sand.
#fuji#fujifilm#X100s#fuji x100s#lee filters#leefilters#big stopper#neutral density#photography#landscape photography#abstractrealism#abstractionist#Colorfield#waves#beach#SouthCarolina#south carolina#charleston#Edisto Island#botany bay plantation
3 notes
·
View notes
Photo


I was cleaning all of my gear the other night and thought it might be informative to share what I carry with me when I go shoot. I use an InCase DSLR Pro backpack.
This is a basic kit the I take for landscape work, I would carry different gear for portraits or wildlife.
Nikon D600
Nikon 16-35mm f4 AF-S G ED
Nikon 50mm f1.4 AF-S G
Nikon 105mm f2.8 AF-D Micro-Nikkor
Nikon SB-800 Speedlight
(3x) Nikon EN EL-15 Batteries
Nikon ML-3 Remote
Nikon WU-1b Wireless transmitter
(2x) extra Nikon rear lens caps and body caps
Fuji X100s
(3x) Fuji Batteries
Lee Filters Foundation kit with the 77mm WA adapter ring
Lee Filters 3-stop hard edge ND filter
Lee Filters 81A Warming filter
Lee Filters Big Stopper
B+W Filters 77mm 10-Stop ND Filter
Hoya Filters 77mm 3-stops (0.9) ND Filter
(8x) AA batteries
(2x) OP|TECH Rainsleeves
(2x) static-free cleaning cloths
Nikon lens cleaning spray
(10x) disposable one-time use lens wipes
Toilet paper
Tissue
Hand sanitizer
Pocket knife
10-LED Portable hand lamp
Portable flashlight
Mamiya Carbon Fiber tripod w/Manfrotto 496RC2 ball head
Knee-high waterproof boots
Watersocks (shoes meant to go in the water)
Towel
A lof crap, right? I have never needed the toilet paper or the pocket knife, however I would rather have and not need than need and not have!
When I shoot, I am usually using the D600 with the 16-35mm f4 lens, either one or both of the B+W and Hoya filters, the ML3 remote, the Mamiya tripod, and I always have a cleaning cloth on me. I get a fair amount of ocean spray on the lens!
I clean everything when I am done shooting, and store my cameras without the battery in them. I pack and double check everything the night before I shoot, and have everything waiting by the door in the morning. I usually leave around 5am, so the last thing I want to do is rely on my sleepy brain to remember to bring the eyepiece cover or the tripod quick release plate. I have forgotten both before, and it can ruin an otherwise well planned shoot!
What's in your bag? Different gear? Different filters? Film? What kind of bag do you use?
#nikon#nikon d600#Nikon 16-35#nikon equipment#camera gear#gear acquisition syndrome#incase backpack#mamiya#long exposer photography#landscape photography#fuji#fuji x100s#b+w filter#hoya#lee filters#big stopper#50mm#105mm
6 notes
·
View notes
Photo


BOTANY BAY | EDISTO ISLAND, SOUTH CAROLINA
I have had this image in my head for a while-a perfectly exposed tree, with a completely white sky, and smooth, soft water in front of it. I knew the place to get this shot was Botany Bay plantation beach, I even knew exactly the tree I wanted to shoot. I just needed the right weather, and the right tide. The stars (or clouds?) lined up, and I had my window on Sunday morning. I got up at 4am, and made the 90 minute drive from Daniel Island to my favorite beach in the world.
There are a great number of technical challenges to overcome when shooting long exposure photography in the day time, and around water. First, the water. It’s fatal to electronics, and as you can see in the shot above, my camera is about two feet above the rushing waves. I’ve had waves crash into me, ocean spray covering my camera and lens, water filling up my boots and soaking my jeans. You get the idea.
Potential for catastrophic equipment damage aside, the water and waves also pull the tripod every time they move in and out, and the slightest movement will ruin a long exposure. To fight this, the center section of my tripod is sunk about 3 inches into the sand, as are all three legs of the tripod.
Another thing you are battling is the light itself. I can really only get the shots I want when it is foggy or cloudy, and the sun is diffused. If there is direct light, contrast becomes a problem-the brightest brights and darkest dark parts of an image are too far apart for the camera to pick up detail in both. This means either the whites get blown out, or the shadows become black with no detail whatsoever. This problem was the one that was truly a challenge for a shot of a tree isolated on a white sky.
I knew I needed even cloud cover, a low angle of the sun (not too far overhead or the clouds would look like a gradient of dark gray in the corners of the background and wouldn’t disappear the way I wanted them to), it had to be sunrise so the sun was behind the tree and not in front of it, and it had to be around high tide.
All of the right conditions happened on Sunday morning, and I got the shot I wanted. It ended up being a 25-second exposure at 10:15 am, with the camera and lens ISO 50 and f10. I was pretty far out into the surf, with the lens at 35mm to frame out the other trees that are on either side of this one. I took a couple longer and a couple shorter exposures, but this one had the right balance of backgrounds that were slightly overexposed, the tree lit just right, and the movement of the waves the way I wanted.
You can see in the screenshots of Lightroom that I barely had to touch up the image. I actually pulled down the highlights a touch to even out the brightest parts of the background, and then pushed the exposure slightly. The boost in vibrance brings out the colors of tree. A little contrast made the tree pop, and I did something I rarely do-I really pushed the sharpness. This gave there tree great definition against the BG, and since there was no sky to speak of, I wasn’t risking getting a halo around my dark subject on a light background, which tends to happen when an image is over-sharpened.
I’m really happy with this shot, and I can’t wait to print it out. It almost looks black and white, until you notice the tree has lots of nuanced color and detail.I think it’ll look fantastic on a pure white mat in a simple white frame.
#nikon#D600#nikon d600#Nikon 16-35#16-35mm#long exposer photography#long exposure#south carolina#edisto island#edisto#botany bay#charleston#dead tree#water#waves#sunrise#beaches#beach#nature#neutral density#10 stop#b and w filters#b&w filter
1 note
·
View note
Video
Please check out this beautiful video describing what our Instagallery is all about, and see some footage of the gorgeous Real Estate Studio on King St. in historic downtown Charleston!
0 notes
Text
#Hashtag
So I have had the amazing opportunity to co-host and participate in a gallery show here in Charleston!
When Mark asked me if I would be involved, our first thought was a show centered around the community that Instagram has built in Charleston. We were connected to so many people-and in a deeper way, connected to the beauty and history that is Charleston-through the images we saw scrolling through our feeds every day.
Wouldn't it be amazing to see those images come to life? To see them on a wall, in frames, on paper and canvas? To bring together in one room all of the people who created these pictures that inspire me to shoot; to wake up at 5am, drive an hour, and get soaked in the rain to get a picture of a cool spot that I only learned about because of #Charleston?
Well, on Wednesday we are bringing that vision to life! I am so honored to be part of this, and so incredibly humbled by the response of the community.
Please join us Saturday, March 22nd from 5-8pm for the gallery opening party. If my monologue didn't get you interested...#freebeer.

1 note
·
View note
Photo

The first rule of landscape photography...get up early.
#phil dunphy#dad jokes#phils osophy#phil's osophy#landscaper photography#nikon#nikon photographers#sunrise
14 notes
·
View notes
Photo


FOLLY BEACH SUNRISE | South Carolina
Sometimes I wonder if I am an idiot. Other days, I have strong empirical evidence that I definitely am.
Case in point: Waking up at 4:30, driving nearly an hour, setting up $4000 worth of camera gear IN the ocean, and realizing that I forgot to check the tide charts.
Mind you, I realized I forgot to check the tide charts when I walked a quarter of a mile from my car in the dark to this foundation of a house that washed away during Hurricane Hugo, and couldn’t go any further. I was trying to walk the coast all the way down the dune restoration area at the north east end of Folly Beach, in order to capture the rising sun directly behind the Morris Island lighthouse.
Best laid plans and all that. The tide and some crazy waves made this IMPOSSIBLE. I still got a couple of decent shots, including the former beach house, which I never could have gotten if the tide was out-last time I was here, the waves lost their energy about 15’ short of this structure.
After giving up on getting any decent shots of the lighthouse, I made my way down the beach and set my camera up with the wall between the surf and I. The ground shook as the waves slammed against the wall, the low rumble of the water sucking and smashing against the distressed wood sounded like cannon fire in the distance. This may have been enough to warn any normal person that they were POSSIBLY in the wrong place with their extremely expensive camera. But not me! Not the idiot!
ENTER WAVE
A huge roller smashed into the breaker wall and covered my camera and I in cold, salty water. Undaunted, I wiped my off camera (always bring a cleaning cloth and lens pen!) and made my way further down the point. I found a huge piece of driftwood that had broken free of the wall, and set up to take a shot. I had just opened the shutter when a long wave came rolling in, dragging my tripod several inches and soaking me midway up my calves.
CUE RAIN
As it started to rain on me, I decided I’d had enough. I wiped down my gear, packed up very carefully, and decided to spend the rest of the morning scouting future shoots. I made my way to the other side of The island, and ended up at the Folly Beach Country Park. I actually got a few winners here, including these trees in the tidal pool, and the long concrete barrier that just reaches out into the sea.
As you can see, I still wasn’t above risking my gear to get an interesting shot. And it’s most narrow configuration, my tripod JUST rested all three legs on the wall-and the waves were running steadily across every 15 seconds or so. I even snapped a quick self portrait before my second battery died-both were barely charged when I started, it appears my Nikon charger no longer blinks when charging so batteries always look like they are fully charged.
Anyhow, just thought I’d share some of the stupid stuff I do to get pictures! If you’ll excuse me, I need to go wash my jeans and shop for some new boots.
#nikon#d600#1635f4#nikkor#lee filters#long exposure#long exposer photography#beach#beaches#waves#water#south carolina#charleston#folly beach#folly beach country park#black and white#35mm#landscape
2 notes
·
View notes
Photo


THE RAVENEL BRIDGE
There she sits, draped seductively across the Cooper River, with her poured concrete towers and bright white cables. A decade of dirt and gasoline and weather have stained the concrete, lending to her beauty and character. When the cables and towers light up at night, she dominates the horizon, a manifestation of beauty and stark precision.
The top of her towers reach 575 feet into the air, the 8 lane highway is suspended some 186 feet hove the river. In a coastal city as flat as Charleston, this means the Ravenel Bridge is visible from nearly any point on the ground, drawing photographers to her like a Siren’s sweet song. A twelve foot wide pedestrian walkway flanks her southern facing side, providing an almost three-mile walkway that draws thousands of people a day. With panoramic views of Mount Pleasant and the U.S.S. Yorktown Navel Destroyer to downtown Charleston and the Atlantic Ocean beyond, naturally this is one of the can’t-miss tourist attractions in the state. On the north side, a park and a long pier reach out into the Cooper River, offering otherwise inaccessible views of the belly of the bridge.
As a photographer, I am always on the hunt for the perfect way to shoot iconic landmarks. I will visit a subject again and again, trying different angles, equipment, and techniques to find a unique and exciting way to photograph. As a resident of Charleston for the last 8 months, naturally the Ravenel Bridge is one of my go-to spots when the weather turns and the sky gets dramatic. And yet every time I shoot the bridge, I walk away disappointed.
There are a number of challenges to getting a perfectly composed show of the bridge. First, the land where the bridge connects is marshy and difficult to access. From the northwest, there is a gated road behind a recycling center that one can walk down for about a mile to get to a spot with a decent view of the bridge. There is a large island that part of the bridge rests on that obscures the shots from this perspective, however. Womp womp.
From the southwest side, there are views of the bridge from downtown, and the South Carolina aquarium. This view, however, puts you nearly side-on with the bridge. You lose the power of the diamond-shaped concrete spires, they just look like pillars. #Weak!
From the north east, there is a decent view of the bridge from the Remleys Point public boat landing…as long as you don’t mind dozens of docks between you and the bridge, and a skyline of shipping cranes and container ships behind the bridge. No thanks, Captain Phillips!
The images in this photo set were all shot from the southeastern side of the bridge, facing northwest. I am actually standing ankle deep in mud and water, halfway out into a tidal marsh behind an office complex. I can only imagine what the folks inside were thinking, watching me from their warm office windows. Sometimes I think I might be an idiot, other times, I have cold, hard proof.
These are among the best shots of the Ravenel I have gotten to date, but I am still not happy with them. For starters, there is a barge that is stuck in the mud that I had to carefully frame out of the lower horizon line. Also, there is a second barge, closer to the bridge, that is running a pump and dredging mud out of the canal, that also needs to be framed out. Then there are the concrete supports for the bridge, visible in the colorful shot of the storm clearing at sunset. These tall concrete ribs are distracting visually-I was trying to get the entire right side of the cables in the frame, and didn’t notice that they were there until I reviewed my images. In the other shots, I wisely framed them out by moving my position much farther east. And nevermind trying to shoot the bridge at sunrise-it's only lit up at night, which means you lose one of the golden hours each day!
I still haven’t gotten the perfect shot of the Ravenel Bridge that I can visualize in my mind, but I am patient. I am getting closer each time. All of the hours I have put in exploring the land around the bridge will pay off. She has made me promises, promises I intend to make her keep.
#nikon#d600#105mm#nikkor#charleston#ravenelbridge#ravenel#southcarolina#south carolina#ravenel bridge#photography#landscape#bridge#bridges#sunset#storm#fog#chasingfog#lee filters
2 notes
·
View notes
Photo


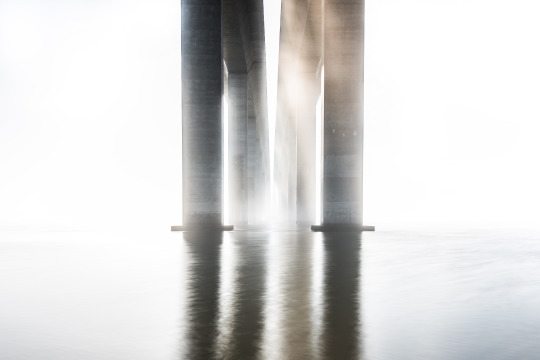

Here on Daniel Island, we are connected to Mount Pleasant and North Charleston by the Mark Clark Expressway, more commonly referred to as the 526. These images are from underneath the belly of the expressway as it crosses the Wando River on the north eastern side of Daniel Island.
In long-exposure photography, I am always on the hunt for still objects surrounded by water. This allows for perfectly focused, sharp, and detailed subjects set within a wash of smooth, dreamy water. Fog is also extremely exciting-it removes distracting background elements and provides a beautiful, blank canvas to compose on.
Yesterday I left for my morning walk around 7:30 am. Sunrise is at 7:03 am these days, so even though there was a slight cover of fog around our apartment, I assumed I missed any dramatic light. Armed with my iPhone, I decided to walk straight up Seven Farms Drive and behind the Family Circle Tennis Center, just to see if there was anything exciting to capture.
The fog thickened up nicely as I got closer to the Wando river. I made my way under the bridge, across a tiny wooden plank, a broken wooden palette, and long, slippery tree branch that forge the path to the beach. In my excitement I wasn't careful enough, and slipped off of the branch and stepped ankle-deep in the smelly "pluff mud" that surrounds the briny banks of the river.
It was all worth it the moment I arrived at this location. I knew I needed to get my camera-and fast. When the sun is above the horizon, it burns off fog in a hurry, so I didn't have much time to work with. It was nearly 8am by now, I figured I had less than an hour of dramatic fog and light. I turned back, and immediately slipped into the marsh again, this time with my other, previously clean foot.
Undeterred, I ran all the way home-a little over two miles. Covered in mud and sweat, I rounded up my Nikon D600, Nikon 16-35mm f4 lens, an extra battery (you never know!), and made certain I had the eye-cup cover and remote for my camera. I grabbed my new Lee Filters Big Stopper, and made sure I had my trusty B+W 77mm 10-Stop ND filter as a back up. I had never used the Big Stopper before, and I didn't want to end up with no shots for some unforeseen reason!
I drove straight back, used my tripod as a walking stick so I could balance my way along the path, and set up as quickly as possible with the Big Stopper. My first shot is time-stamped 8:45 am, however after two shots I knew I needed to slow down and start over. The Big Stopper had an unacceptable blue cast, extreme vignetting, and some kind of light leak. Not wanting to lose shots to figure out how to get the best results from this new filter set, I packed up the Lee set and grabbed my B+W.
My first shot with the B+W is from 8:52 am, and the last shot with any fog in it is from 9:03 am. I had 11 minutes to make it work, and I managed to get the shots I had visualized.
The moral of this post is to always:
1. PLAN YOUR SHOOT AHEAD OF TIME
Know where the light is, where the sun rises and sets, and the time it rises and sets! I use an app called Sun Compass on my iPhone that is indispensable. There is a more expensive and full-featured app called The Photographer's Ephemeris that I plan on adopting in the near future.
2. HAVE A BACK UP PLAN
If I had left my B+W filter at home, I would have walked away covered in mud and smelling like a swamp for no reason. I also had my Fuji x100s in my camera bag, with the Lee 49mm filter ring adapter in case something happened to my Nikon. I am standing in a swamp, after all!
3. TRY BEFORE YOU RELY
I was eager to test out the Lee Filter set in the wild. I had done a dry run at home, and took a few pictures in my office, but had never used the Big Stopper. If I had, I would have known that I would need some time to correct the color cast and how to get best results. I would have skipped it on this day, and spent that first 8 minutes getting more shots!
4. PRACTICE
I have been to this spot numerous times, with my iPhone and my Fuji x100s. I know what it looks like and how to shoot it at 28mm (iPhone) and 35mm (Fuji), and what shots are achievable. I walked in knowing the compositions I wanted, so I could spend my time watching the clouds move and waiting for the sun to disappear in a way that I wanted it to, instead of trying to figure out how to compose.
Happy shooting!
#nikon#D600#Fog#chasingfog#nikond600#leefilters#lee filters#nikon d600#nikon 16-35#wide angle#photography#longexposure#long exposure#b&w photography#b&w filter#neutral density#fuji#fujifilm#x100s#fuji x100s#fujifilm x100s
3 notes
·
View notes