She/her, 21, Single, Feminine feminist, cat mom, lover of all living things, sewing, vegan cooking, just a place to put all wants, dreams and hopefully some projects.
Don't wanna be here? Send us removal request.
Text
tldr: WASH YOUR RECYCLABLES AND IF YOU DON’T KNOW IF IT CAN BE RECYCLED, DON’T PUT IT IN RECYCLING
hey guys! just gonna quick talk about something that i don’t think is discussed enough regarding recycling!
so you know when you finish a pizza and the box says “recycle me!”? well a lot of people are never told that recycling plants cannot recycle dirty cardboard. cardboard cannot be properly cleaned so when it is stained with food grease, the recycling plant will simply send it to the dump! typically, though, food stained cardboard CAN be put in ORGANICS!!!
now you may be thinking “why does it matter who sends it to the dump?”
WRONG!!! recycling plants (where i live, and in many other places) actually have a government mandated QUOTA of what percent of the things that they receive actually get recycled. for example, where i’m from the quota is around 14%. this means that if less than 14% of things sent to recycling plants actually end up being recycled, the government will CUT THEIR FUNDING.
this means that every non-recyclable that we throw in our recycling bins is bringing us further from the quota. if their funding gets cut we either:
1: wont have recycling as an option anymore (bad for the environment)
or
2: will have higher taxes to compensate for the extra money that it takes to fund recycling plants (bad for the people)
so you may be wondering, “woobiz, what *can* i put in my recycling bin?”
the answer is a lot of things! just make sure they are clean (this means rinsing them with water, not necessarily soap, just a good rinse should be enough for most things, should be visibly clean).
- metal cans and foils (foils should be cleaned and bunched into a ball)
- plastics with the numbers 1, 2, and 5 (should show with the recycling symbol)
- clean cardboard and paper
- glass (bottles, containers, etc)
now let’s talk about what CAN’T be recycled!
- anything dirty
- certain plastics (thinner plastics like bags, if you’re not sure, look it up or trash it)
- closed bags (if you have, say, an opaque trash bag full of recyclables and tied closed, the plant will most likely trash it because cutting it open can be a safety hazard if they do not know what is inside)
recyclables should be separated (don’t put plastic inside of a cardboard box or cans inside of a glass container, etc) because the scanners at the recycling plants will have a much harder time identifying the recyclable. you can put them all in the same recycling bin, just make sure they’re empty and separate for the machines.
recycling is great for the environment but it can’t help us to its full potential without education on what can and can’t be recycled. if you’ve read this through, thank you and i hope you learned something about recycling! if you have anything to add, feel free!!!
10 notes
·
View notes
Photo


Rinse an empty wine bottle, (or other glass bottle with a narrow neck) and fill with water. Standing next to your planter, quickly turn over the bottle and push the neck down into the soil near the center of the planter. Make sure the neck is at least several inches underground. The water in the bottle will seep into the soil over several days, keeping the soil evenly moist.
To make this waterer drip even slower, fill bottle ¼-1/3 of the way with fine gravel before filling with water. Place cheesecloth or cotton scraps over bottle mouth and secure with twine. Insert deeply into soil.
201 notes
·
View notes
Photo

Blueberries are one of the easiest, most productive types of fruit you can grow at home. Blueberries are acid-loving plants and grow best in soil that has a pH between 4.5 and 5.5. Iron becomes less available as the soil pH goes above 7, and since blueberries are iron loving plants, they then turn yellow, weaken, and die.
Growing blueberries in containers
Plant blueberry bushes individually in 15-gallon containers. Make sure the containers have several holes for drainage.
Fill the containers with a growing mix made up of half peat moss and half finely ground pine bark mulch. (You might find this in bags labeled “soil conditioner.”)
Adding fertilizer will provide the best nutrients for your bushes. For each 15-gallon container, blend the peat-bark mix with eight ounces of Osmocote 16-4-8 (or any similar analysis), two ounces of dolomitic lime, and one ounce of trace elements. (Micromax or other trace element fertilizers would be suitable. Just follow label directions.) Each March, fertilize your container blueberry plants with eight ounces of a slow-release fertilizer.
Blueberry plants do best in about six hours of sun with some shade in the afternoon. Place your container blueberries on the east or southeast side of a house to get this type of light. Avoid shady areas. More sun is better than more shade.
The peat-bark mix will dry out faster than regular potting soil, so check it frequently, and water as needed.
Blueberry bushes are quite hardy. There’s no need to protect the plants during the winter. You can expect to average around five to seven pints of fresh, sweet blueberries per plant each summer.
You aren’t likely to encounter many insects or diseases, and if birds are a problem, just cover the plants with netting.
In about four years, the plants will outgrow the 15-gallon containers, and the vigor and productivity of the bushes will decline. When that occurs, they should be transplanted into 25-gallon containers. This is best done between November and February.
Growing in the ground
When growing outside, when to plant will depend on which breed you select and where you live. This article will go into more depth on when you should plant. Select a well-drained location that receives part-to-full sun. Decide how large an area you want to plant, spacing the bushes about five feet apart.
Remove any unwanted vegetation and turn the soil. Remove two inches of soil in a one foot circle and lay a layer of newspaper (no colored ink) or corrugated cardboard before covering it with the soil. Then, spread a 4-inch layer of peat moss and ground sulfur (available in bags at area nurseries) at the rate of ½ cup per 10 square feet, and thoroughly mix everything in. The sulfur will make the soil more acidic. Mulching the area with several inches of pine straw will keep weeds from growing as well as making the soil more acidic.
Usually, blueberry bushes are planted in fall or early winter, or, at the beginning of the year. It takes several months for sulfur to lower the pH of the soil, so plan ahead. When it comes time to plant the bushes, the pH should be about 5.5.
Fertilize the bushes with acid-loving plant food each spring, and treat with copperas (iron sulfate) if the foliage begins to develop iron deficiency symptoms.
249 notes
·
View notes
Text
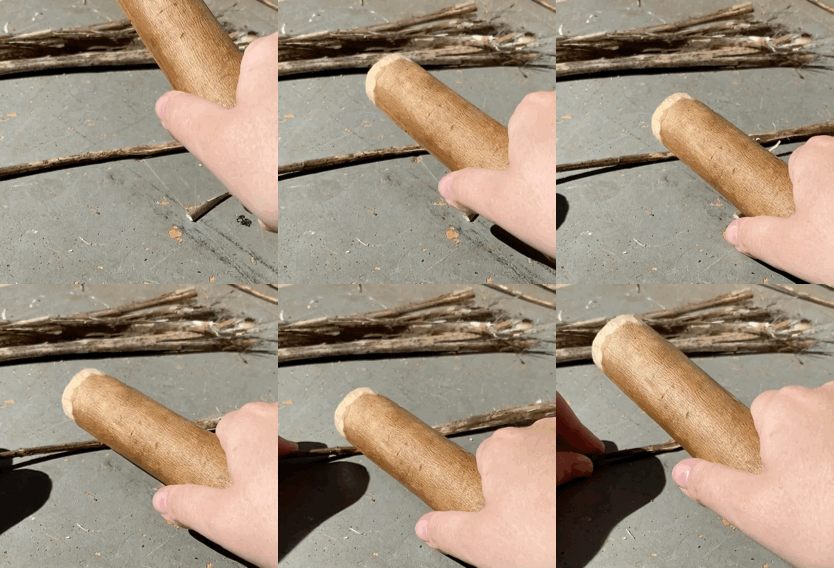
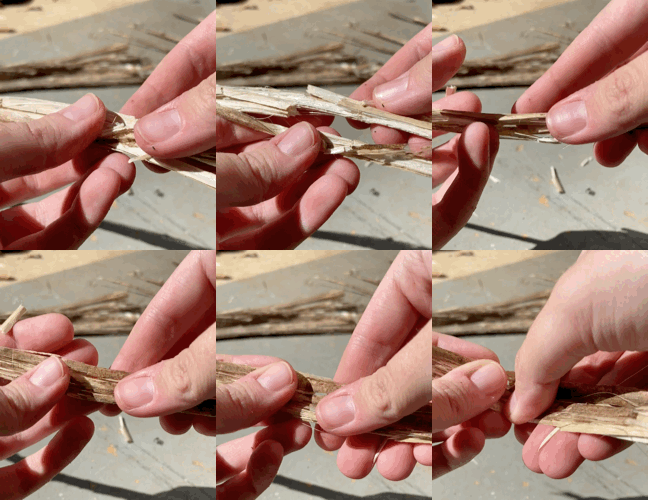
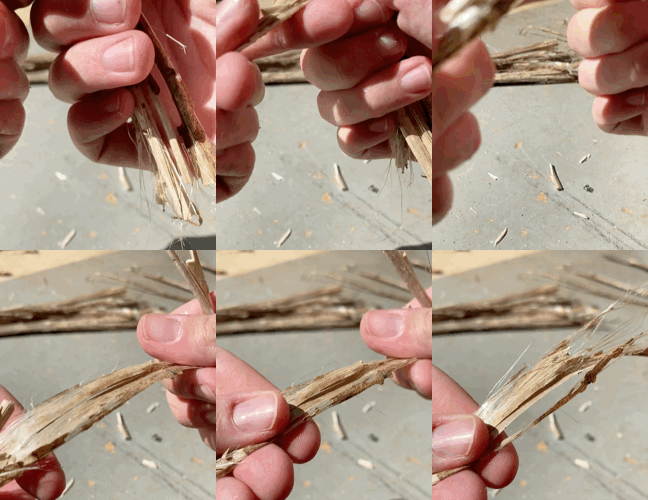
breaking open dried milkweed stalks to collect their bast fibers.
i pounded them with a makeshift billet against a smooth surface to break them similar to how ive broken brambles before, and then snapped the pith in order to get only the outer fibers.
At this point i had a bunch of the papery skins attaching all the fibers together, like the image just below. But peeling them off is both inefficient and can lead to breaking

in order to get rid of the outer layer, i rubbed/rolled them vigorously between the palms of my hands, breaking it into flakes that either fell off or can be combed/carded out. it was too difficult to film but basically the same as making a friction fire (although easier for sure).
At this point i had a handful of fibers, still long but in need of combing. I have a fine-toothed comb i use for a lot of fiber stuff, and ran that through it
I'll leave the sound on this one because it's an interesting auditory experience, some might like it some might hate it. Note, be prepared to sweep afterwards!
i used to worry about combing stuff like this too much, and i sort of still am, but its important to remember that what im removing are fibers that would otherwise be too short or fragile to include in a refined long-fiber bundle. What im going for is a line flax/fluff flax-like combo; aka i comb out the short fibers and then i have a bundle of extra long ones to work with!
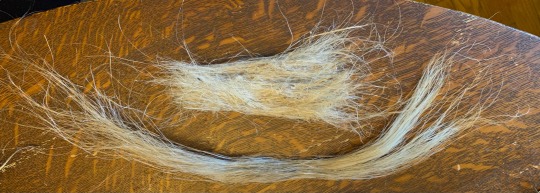
the result is two bundles of different textures and potential
i made a little test string with the "line" milkweed, but i have yet to do anything more with it
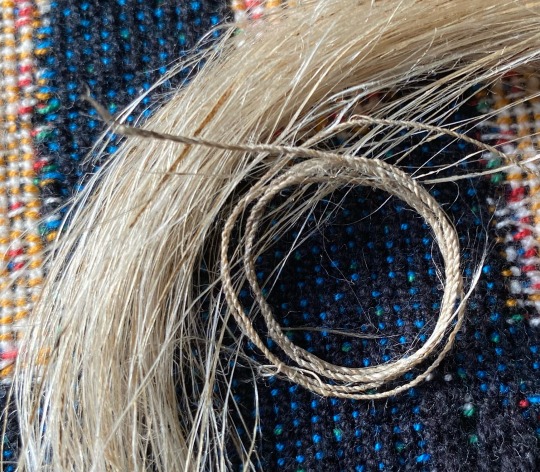
as for the fluff, i carded it out!
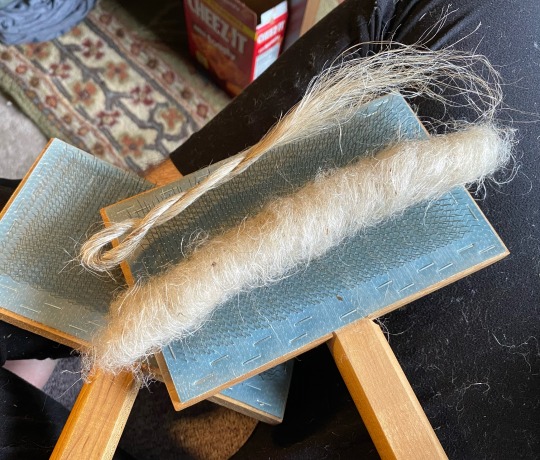
i made it into a rolag that i then spun up on my tiny spindle
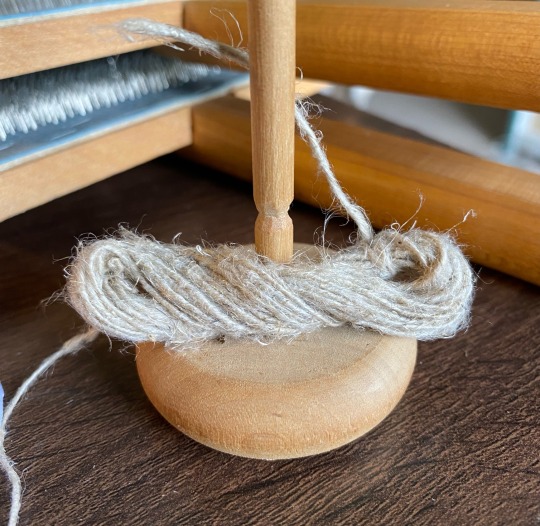
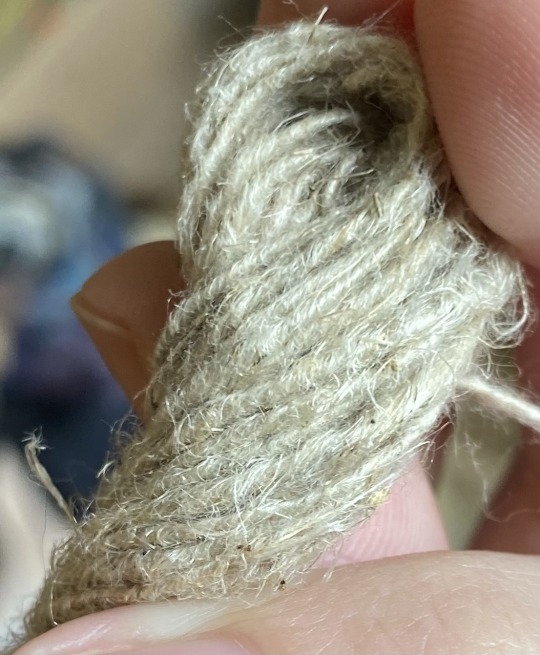
I quite like it. It definitely reminds me of flax/linen, which makes sense since it's also a bast fiber. Milkweed is often known for being extremely strong; i've heard from a fiber class instructor that you can tow a car with a finger-sized rope of it
I don't know exactly what kind of milkweed this is , but i've heard swamp milkweed is top of the class for fiber. orange butterflyweed is a bit weaker than this one (which might be swamp, might not)
(Also note, if you plant milkweeds, don't plant tropical milkweed outside of its native range! it's not as good as the native ones and can even increase disease in monarchs since it doesnt die back in warm winters)
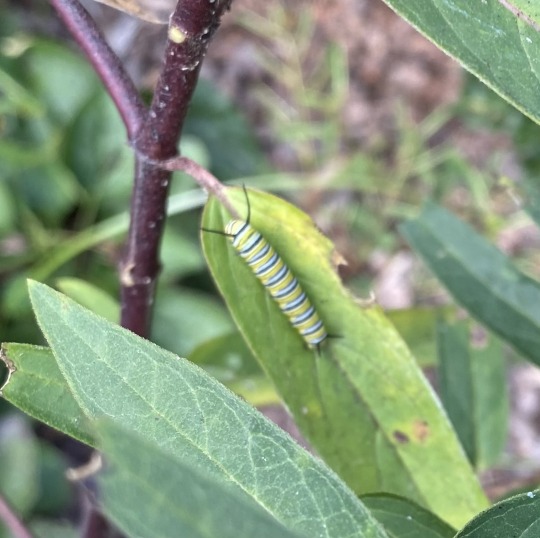
anyways, have a lil monarch caterpillar!
5K notes
·
View notes
Text
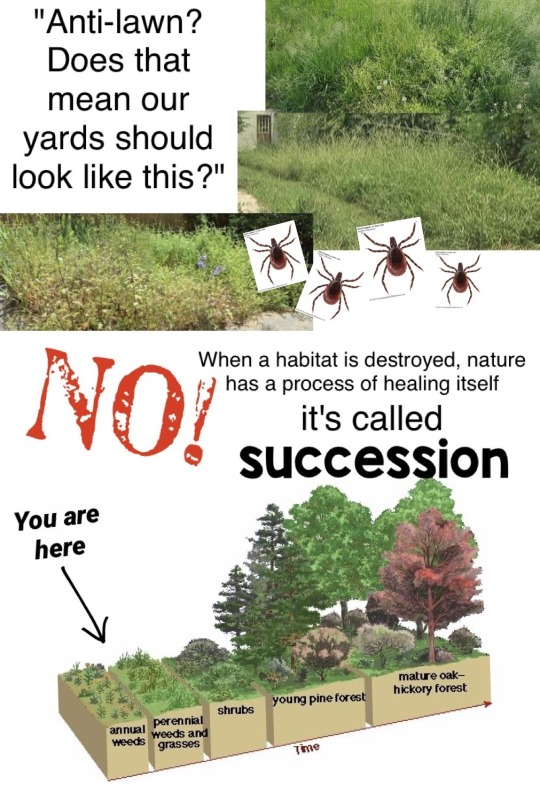
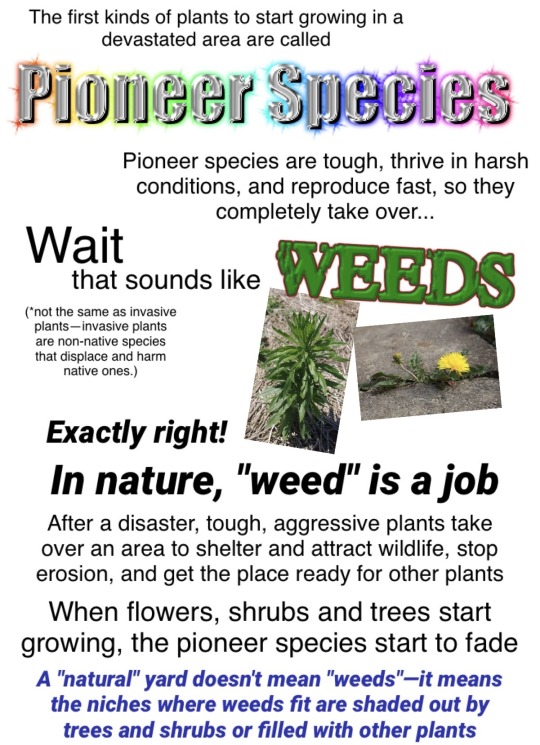
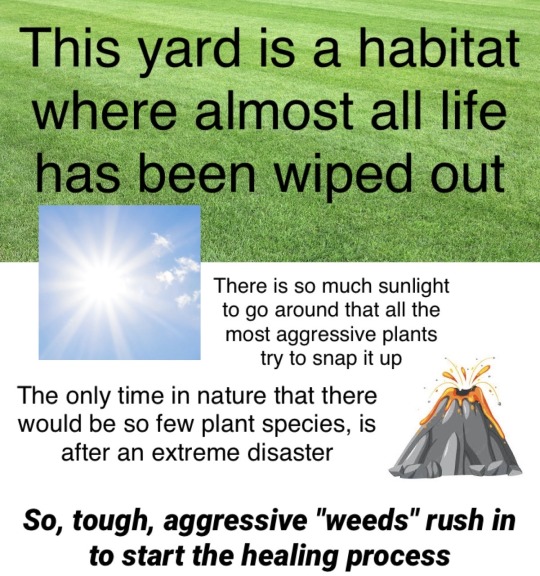
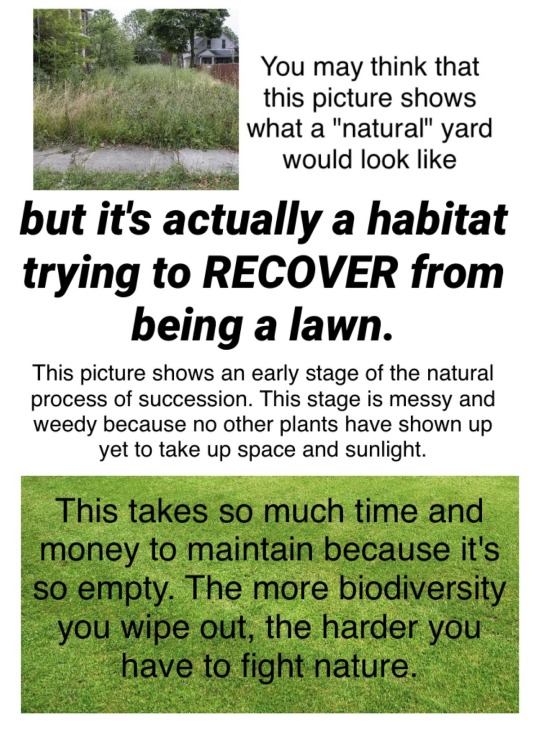
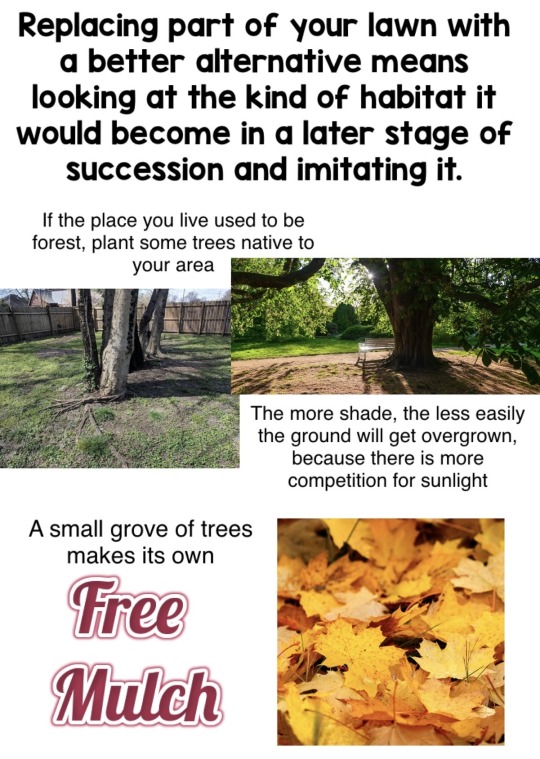
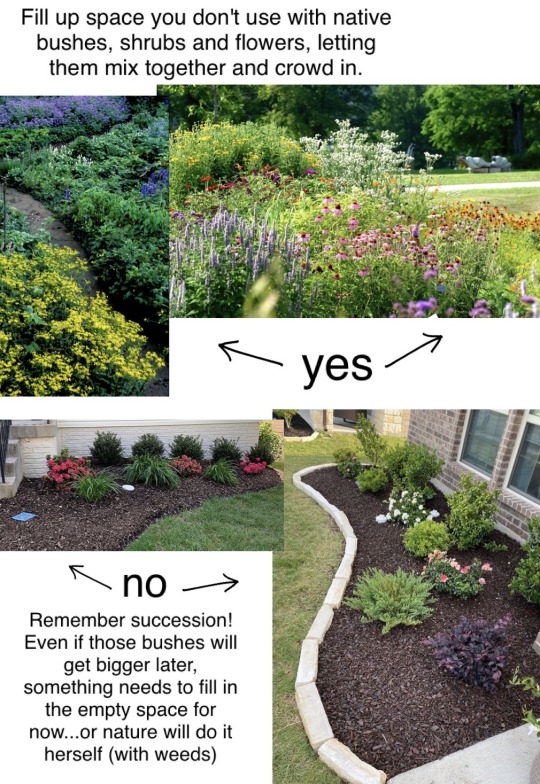
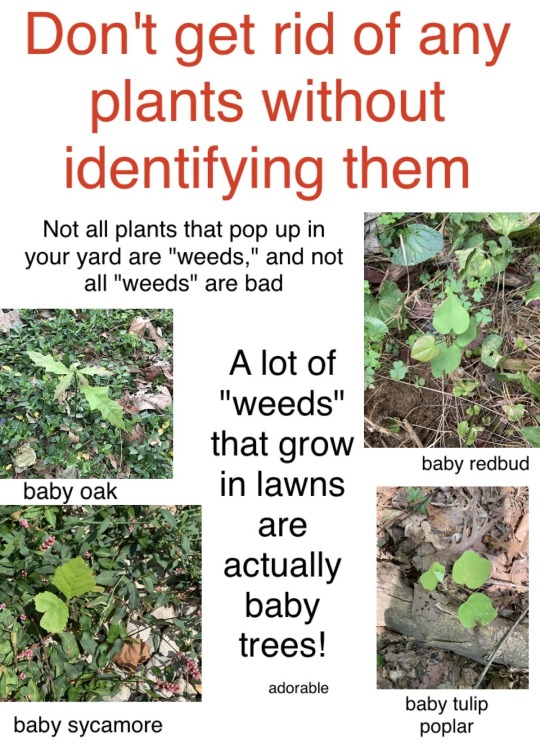
I...tried to make a meme and got carried away and made A Thing that is like partially unfinished because i spent like 3 hours on it and then got tired.
I think this is mostly scientifically accurate but truth be told, there seems to be relatively little research on succession in regards to lawns specifically (as opposed to like, pastures). I am not exaggerating how bad they are for biodiversity though—recent research has referred to them as "ecological deserts."
Feel free to repost, no need for credit
189K notes
·
View notes
Text
Hand sewing needles

Introduction:
Let's take a closer look at one of the most crucial tools of mending/sewing by hand: the sewing needle. Not every needle serves the same purpose. While everyone has different preferences, using the right needle for your project will save you a lot of frustration.
Don't know how to thread a needle? Check out this written tutorial (with video clips). Need something you can pause so you don't get distracted? Check out this YouTube tutorial.
If you need a little help threading a needle, then take a look at this written tutorial or this video tutorial on how to use a needle threader.
Please note that machine needles and hand needles are very different and should never be confused with each other. You can't use a machine needle for hand sewing, or a hand sewing needle for machine sewing.
Types of needles:
Needles consist of three parts: the point, the shaft, and the eye. Variations in these three parts define the purpose of your needle.
Hand sewing needles are labelled with numbers: the larger the number, the smaller the needle and vice versa. The number you need depends on your fabric: heavier fabrics require larger needles (smaller needle numbers), lighter fabrics require smaller needles (larger needle numbers). This is something you'll develop a feel for as you become more experienced. A packet of needles will usually contain multiple sizes.
The following list is by no means exhaustive, but it'll give you an idea of the most common hand sewing needles you'll find.

Sharps: this is the most common type of hand sewing needle. They've got a sharp point and a medium length, and are considered all-purpose needles. If you don't know what needle to use or if you're just starting out, go for sharps.
Ballpoints: ballpoint needles have a rounded tip rather than a sharp one. They don't pierce fabric but glide between its fibres, which makes them great for stretchy knits such as jersey.
Crewel: crewel needles are similar to sharps, but have larger eyes. They're commonly used for embroidery: embroidery floss consists of multiple threads, which means a large eye is needed to thread it properly. They can also be useful if you have trouble threading a sharp.
Chenille: chenille needles are also used for embroidery, but are bigger than crewel needles. Their large eye and sharp point makes them perfect for embroidery with large thread types such as ribbon or yarn.
Tapestry: tapestry needles are big needles with big eyes and a blunt point. They're usually used on open-weave fabrics, which means they're perfect for cross-stitch embroidery, tapestry work, and for sewing knitting projects together.
Darners: darners have long eyes and a semi-blunt point. Just like the name suggests, they're commonly used for darning, which is a type of mending.
Beading: beading needles are long and very thin, often with thin elongated eyes. These needles are commonly used to sew beads and sequins to fabric, and are super thin so they can pass through a variety of bead sizes.
Conclusion:
Try to use the correct needle for your project. If you don't know what needle to use, you probably need a sharp needle.
Want to know more? Check out this John James needles PDF guide. They've got pictures of these different types of needles too, which is great in case you need a visual reference.
236 notes
·
View notes
Text
Project: easy wrap pants
Introduction:
I was in need of a new pair of warm weather pants. My requirements were for them to be 1) handmade, 2) cotton or linen, and 3) preferably made from upcycled materials.
While looking for inspiration, I found the following images of a simple but ingenious wrap pants design. I love this type of sewing pattern, so I decided to try it out.

(Image source) [ID: four pictures of a person demonstrating how to put on a pair of wrap pants. First, the front of the pants is tied to the front of the person. Then, the centre of the pants is pulled up through the legs. Finally, the back of the pants is also tied around the person's waist, creating a pair of pants.]

(Image source) [ID: three images of a pair of white wrap pants with a floral print. Image one shows the pants untied and hanging on a wall. Image two shows the fabric for the pants right after cutting. Image three shows the pants while worn.]

(Image source) [ID: two images: the first one is a drawing of the front and back of a pair of wrap pants. The second one is a technical drawing showing how to construct a pair of wrap pants by cutting a U-shape out of two rectangles of fabric and then sewing the U-shaped holes together to form the crotch of the pants.]
The project:
I rarely buy new fabric. I'm at my most creative when I'm limited by what materials I have available, so I usually limit myself to things like thrifted scarves or discarded clothes. This type of pants requires a lot of fabric, so that wasn't an option this time. I still managed to reuse old fabric: a local charity was selling donated fabrics a while ago, and I was lucky enough to find a few metres of green cotton.
It's always advisable to wash your fabric before starting a new project. This went double for this specific fabric as I have no idea of its origins, plus it had a fair amount of stains.

[ID: green folded cotton fabric with pleats lying on top of white bed sheets with a floral print.]
The pattern for this project is really simple: just two rectangles with a U-shape cut out for the crotch, and straps at the sides.
I used these tutorials by Miss_Kreant, Laupre, Instructables, and Mirginie DIY to get a general idea of what measurements to use.
I wanted my pants to be high-waisted, so I ended up going with a height of 40cm for my U-shape. You can go as high or as low as you want. Heck, you could probably go even higher and turn these pants into a jumpsuit. My U was 15 cm wide.
I used my waist circumference + 15cm for the width of both panels as I wanted a large overlap between the sides of the pants when worn. You don't have to use that much if you don't want to. The measurements I've seen in tutorials varied between what I used to 3/4th of your waist. It depends on how much fabric you have on hand and how much skin you want to show.
As for the length, I measured down from my waist to my ankles. You could easily make a pair of wrap shorts by using a shorter length.
If your fabric isn't wide enough to accommodate your measurements, you can always put an extra seam at the centre of your rectangles (the side with the U-shape). It won't be noticeable as this seam will sit between your legs. You could also sew strips of fabric to the sides of your rectangles for additional width, or cut a vertical line down your rectangles and insert your extra fabric there.

[ID: green fabric lying on top of a black and white chequered floor. The fabric has been folded in two at the side. Half a U-shape has been cut at the side.]
If you cut your fabric like this, you end up with two rectangles with a U-shape cut out at the top. That U-shape is the crotch of your pants, so sew both rectangles together along the edges of the U. Leave the other sides alone for now.
I used a French seam because my fabric is prone to fraying. You can use whatever works best for yours.

[ID: two green fabric rectangles lying on top of each other on a black and white chequered floor. A U-shape has been cut out at the top.]
The main construction of the pants is done! Easy, right?
The U-shape is the only seam in these pants. All of the other raw edges are left open and need to be hemmed. I used a double fold hem for mine.

[ID: a green pair of green pants lying on top of a wooden floor. The sides of the pants have been left open and are partly hemmed.]
Once you're done hemming, you need to make straps to tie the pants around your waist with. Pick a length that feels comfortable to you. I made mine long enough to be able to tie a bow.
You could probably forgo the strap tying and use short straps with buttons or snaps instead, if you wanted to.

[ID: a green fabric strap lying on top of a worn-out black surface.]
All that was left to do was to sew the straps onto the sides of the pants. If you plan ahead, you could incorporate them into your top hem for a cleaner finish. I did not plan ahead.

[ID: a pair of green wrap pants with ties at the sides lying unfolded on a wooden floor.]

[ID: a pair of green wrap pants with ties at the sides lying on a wooden floor, folded as if worn.]
All done! They fit well, and are very airy thanks to the open sides. Perfect for summer.
I made my pants wider than necessary: this gives me some wiggle room in case I gain weight, ensuring I'll be able to wear them for a long time to come regardless of how my body changes in the future.
Conclusion:
These are the easiest pants I've ever sewn. No zippers, no buttons, not even elastic, and only one seam! It makes for a great beginner's project and is very versatile.
Play around with different lengths, widths, fabrics, trims, and closures to create different designs.
2K notes
·
View notes
Text


If you’ve been trying to go plastic free for awhile you’ve probably accumulated quite a few jars some way or another. I often buy in jars and will keep them for upcycling, but sometimes I run out of ideas on how to reuse them. These are some good ways to repurpose those jars. In addition to these some zero waste stores will take cleaned jars for people who don’t have containers but are looking for a refill. While some of these are exclusively for glass, some of these ideas work for plastic containers too! Happy upcycling!
photo credit to zerowastenerd on instagram
2K notes
·
View notes
Photo

Traditional Irish Soda Bread It bakes up into such a beautiful loaf that I can hardly believe it isn’t a yeast bread. And it’s so incredibly easy, especially if you’re impatient like me and don’t want to wait around for the dough to rise. Seriously, you can have a gorgeous loaf of homemade bread on the table in about an hour, from start to finish. Ingredients: 4 cups flour 2 teaspoon baking soda 1 teaspoon salt 1 3/4 cups buttermilk Directions: 1. Preheat oven to 425 degrees. Grease and flour a round cake pan. 2. In a large bowl, combine the flour, baking soda and salt. 3. Gradually stir in the buttermilk until the dough comes together in a slightly sticky ball. 4. Turn dough onto a floured surface and knead gently a few times. 5. Form the dough into a ball and then press into the prepared pan so that the dough resembles a large disk. The dough should reach the edges of the pan, but may spring back slightly. 6. Cut an X into the dough with a sharp knife, about ¼ of an inch deep. Cover the pan of dough with another round cake pan turned upside down. 7. Bake for 30 minutes, covered, then remove the top pan and bake uncovered for about 10 minutes more or until the crust is dark golden brown.
247 notes
·
View notes
Text
i am not joking we need to force teach cooking in schools. like. it is an essential thing for survival. do you know how easy it is to make things if you know even the bare bones shit about how cooking works. we need to teach teenagers how far you can take an onion and some other veggies it’’s sad that people grow up not knowing how to prepare literally anything. and i’m not talking about oh this home ed class taught me how to make chicken nuggets at home i’m talking about learning the balancing of sweetness and acidity and saltiness and bitterness and shit like that and techniques and oil temperatures and how meats cook. it needs to be taught because it’s literally not even that difficult and it matters so much
211K notes
·
View notes
Text
was anyone going to tell me that king arthur flour is an 100% employee-owned benefit corporation or were you just going to let me keep using their recipes without buying their flour
66K notes
·
View notes
Text
reblog if you hate the current interior design trend of painting everything white with hints of grey or black. ignore if you have no taste

130K notes
·
View notes


